Bonnie Prince Charlie’s final defeat!
At the Battle of Culloden, on 16 April 1746, the Jacobite army of Charles Edward Stuart was crushed by the Duke of Cumberland’s government forces. The defeat ended the Stuart cause and reshaped the Scottish Highlands forever.

Key facts
Google Earth map – location of the Culloden battlefield
Strategic Context: The Jacobite Rising of 1745–46
The Battle of Culloden, fought on 16 April 1746, was the final and decisive confrontation of the Jacobite Rising of 1745. The rebellion represented the last serious attempt by the Jacobites to restore the exiled Stuart dynasty to the thrones of Britain and Ireland. Its outcome determined not only the fate of Charles Edward Stuart — “Bonnie Prince Charlie” — but also the political and cultural future of the Scottish Highlands.

The Jacobite Cause Revived
Charles Edward Stuart, grandson of the deposed King James II, had landed at Glenfinnan in western Scotland in July 1745 with a handful of companions and no French support. His gamble relied on rallying the Highland clans to his cause. Against the expectations of both London and Versailles, he succeeded. Within weeks, thousands of Highlanders had joined him, and in September, his army captured Edinburgh.
At the Battle of Prestonpans (21 September 1745), a Jacobite force of about 2,500 overwhelmed Sir John Cope’s government army in a dawn Highland charge that became a template for the rest of the campaign. The victory electrified Scotland and gave Charles legitimacy as a serious contender for the throne. His army, swollen to around 5,000, then pressed south into England. By December, they had advanced as far as Derby, little more than 120 miles from London.
Retreat and pursuit
Despite the daring advance, the Jacobite council of war had lost confidence. French reinforcements had not materialised, English Jacobite risings had not materialised in strength, and government armies were massing. Against Charles’ wishes, the army retreated north in mid-December. Pursued by government forces under the Duke of Cumberland, the Jacobites fought a rearguard action at Clifton Moor and crossed back into Scotland.
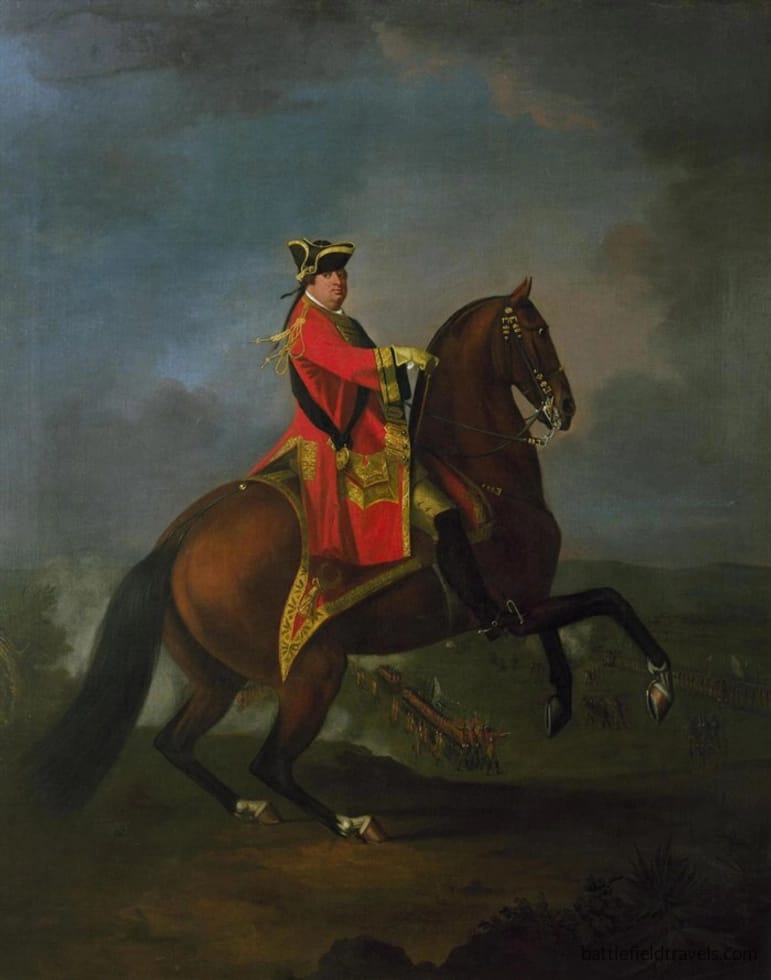
The retreat cost them credibility, and desertion became a serious problem. However, they rallied again in early 1746 with reinforcements from the Highlands and a small contingent of Irish and French regulars. They won a sharp victory over Cumberland’s vanguard at Falkirk Muir (17 January 1746), but this success did little to stabilise their strategic situation. Supplies were scarce, coordination between Highland chiefs and Charles’s advisers was poor, and Cumberland pressed north with a well-trained, well-supplied army.
The Road to Culloden
By April 1746, Charles’ army was concentrated near Inverness, short of food and ammunition. Desertions had reduced his effective strength to around 5,000–7,000 men. Cumberland’s army, numbering about 8,000 and supported by artillery and cavalry, was established in a camp near Nairn. Charles and his commanders chose to stand and fight at Culloden, a flat and open ground ill-suited to Highland tactics but convenient to cover Inverness. The choice would prove fatal.
Culloden thus became not merely another battle but the last throw of the dice for the Jacobite cause. Its result would determine whether the Stuart dynasty might still return to power, or whether the Hanoverian monarchy and its system of centralised government would remain secure.
Opposing Forces: Highland Jacobites vs the Duke of Cumberland’s Government Army
 The Jacobite Army
 The Jacobite Army
The Jacobite army at Culloden numbered between 5,000 and 7,000 men, though desertion and fatigue meant far fewer were effective on the day. It was a coalition force:
- Highland clans formed the bulk, armed with broadswords, targes (small round shields), dirks, and muskets of varying quality.
- Lowland Scots and Irish volunteers provided smaller contingents.
- French support arrived in the form of the Royal Écossais regiment (regulars in French service, raised from Scottish exiles) and some Irish Picquets detached from French service in Flanders. These troops were among the few trained regulars on the Jacobite side.
The Jacobites’ hallmark tactic was the Highland charge: a wild rush designed to close the distance quickly, fire a single volley, then break the enemy line with shock combat using sword and targe. This had succeeded spectacularly at Prestonpans and Falkirk, but depended on speed, cohesion, and terrain that masked their approach. On Culloden Moor — flat, boggy, and swept by artillery — these advantages were nulled.
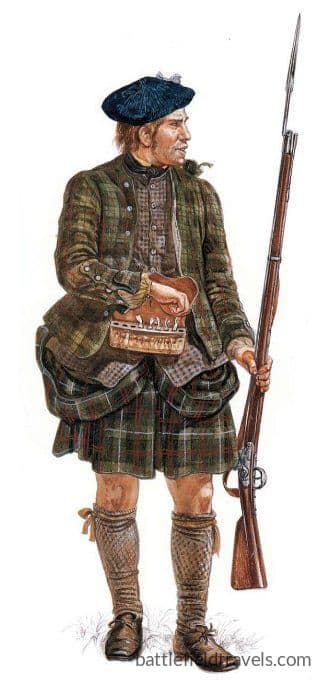
Charles Edward Stuart was charismatic but militarily inexperienced. He frequently clashed with his Scottish commanders, many of whom urged caution or the adoption of guerrilla tactics. His decision to fight on open ground at Culloden contradicted advice from Highland leaders, who favoured drawing the enemy into broken country where their style of fighting might still succeed.
Exhaustion and hunger compounded their difficulties. After the failed night march against Cumberland’s camp on 15–16 April, many Jacobites returned to the battlefield weary, unfed, and demoralised. Their artillery was light, poorly served, and outmatched. Cavalry was negligible.
 The Government Army
 The Government Army
The government force, about 8,000 strong, was commanded by William Augustus, Duke of Cumberland, the 25-year-old son of King George II. Despite his youth, Cumberland had already fought in the War of the Austrian Succession and was supported by professional officers and staff. Cumberland had led the Pragmatic Army at the Battle of Fontenoy (11 May 1745).
Cumberland’s army included:
- British infantry regiments from the line army, drilled in contemporary linear tactics.
- Scottish loyalists, opposed to the Jacobite cause.
- Cavalry, including dragoons, capable of pursuit.
- Artillery with more guns and trained gunners than the Jacobites.
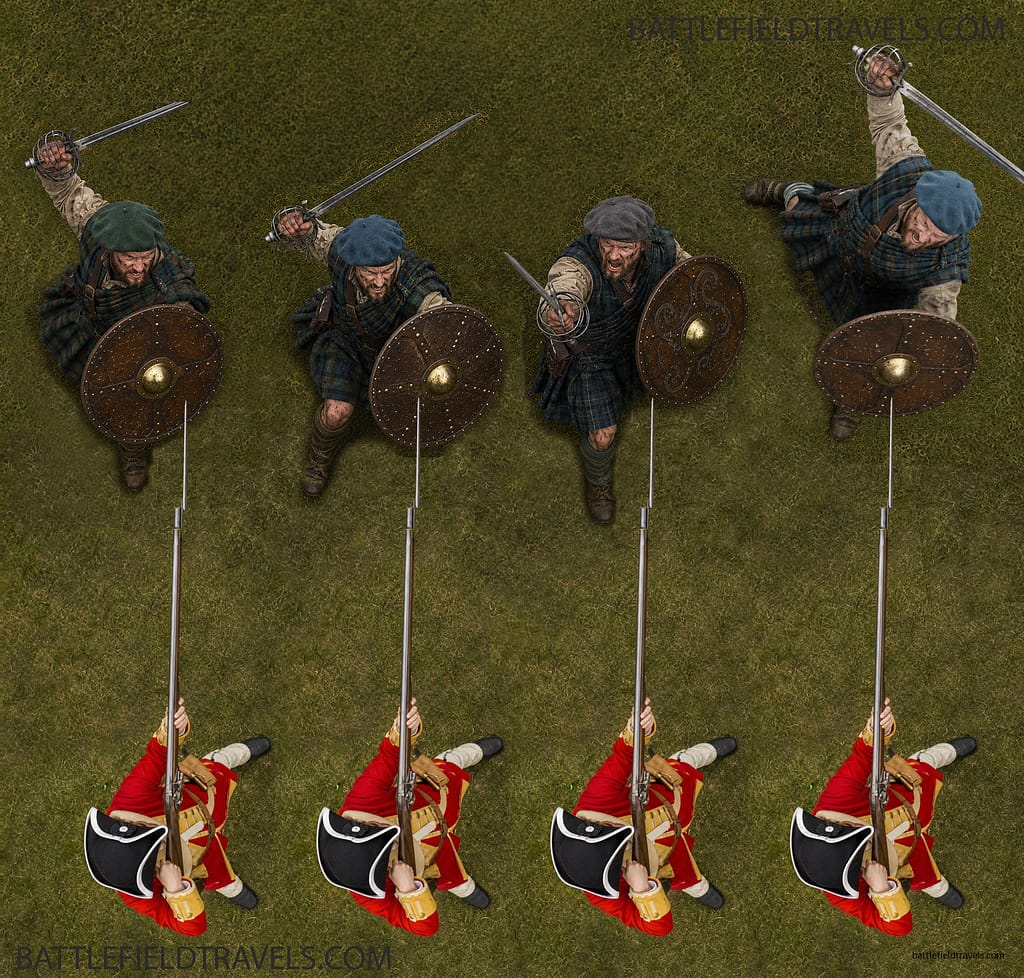
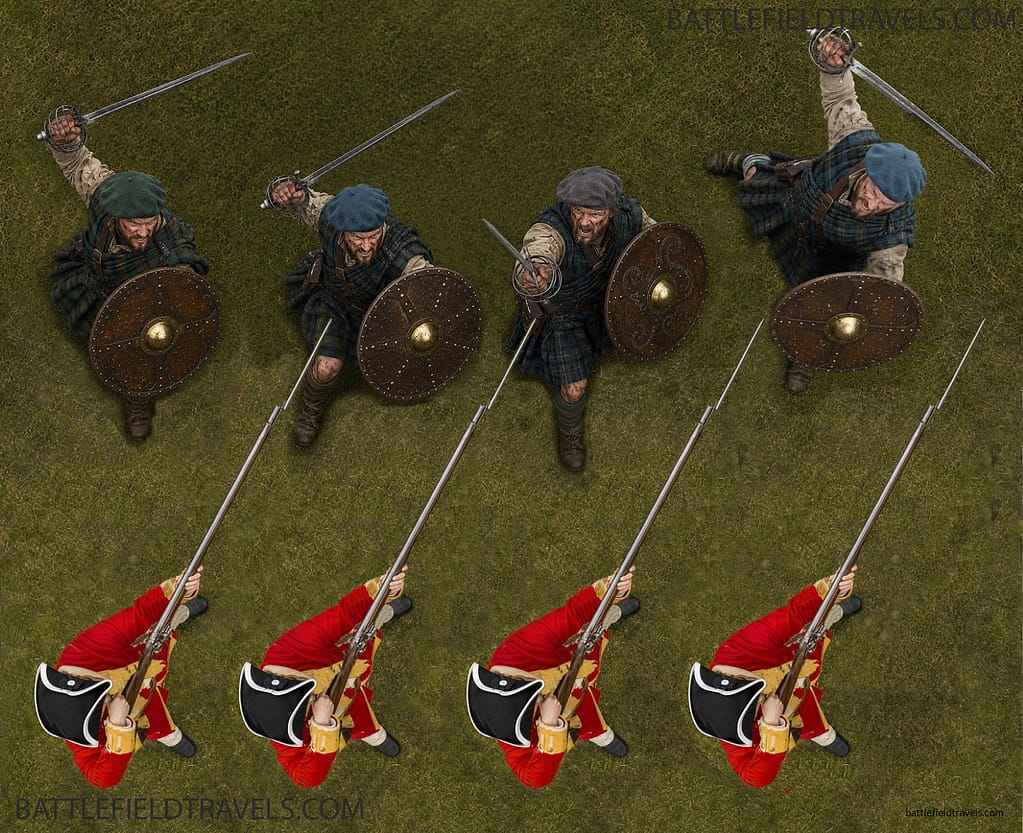
Morale was high. The men were well-fed, rested, and confident after months of pursuit. Their training had been adapted specifically to counter Highland tactics. A new bayonet drill had been introduced: rather than thrusting straight at the Highlander to their front — who might parry with his targe — each soldier was ordered to thrust at the exposed right side of his opponent, effectively striking the man attacking his comrade to the right.

The Culloden bayonet drill: fact or fiction?
This is a brief summary of the Culloden bayonet drill debate. I have published a full, primary source-based study in the Tactical Innovations hub: The ‘New Bayonet Drill’ at Culloden, 1746.
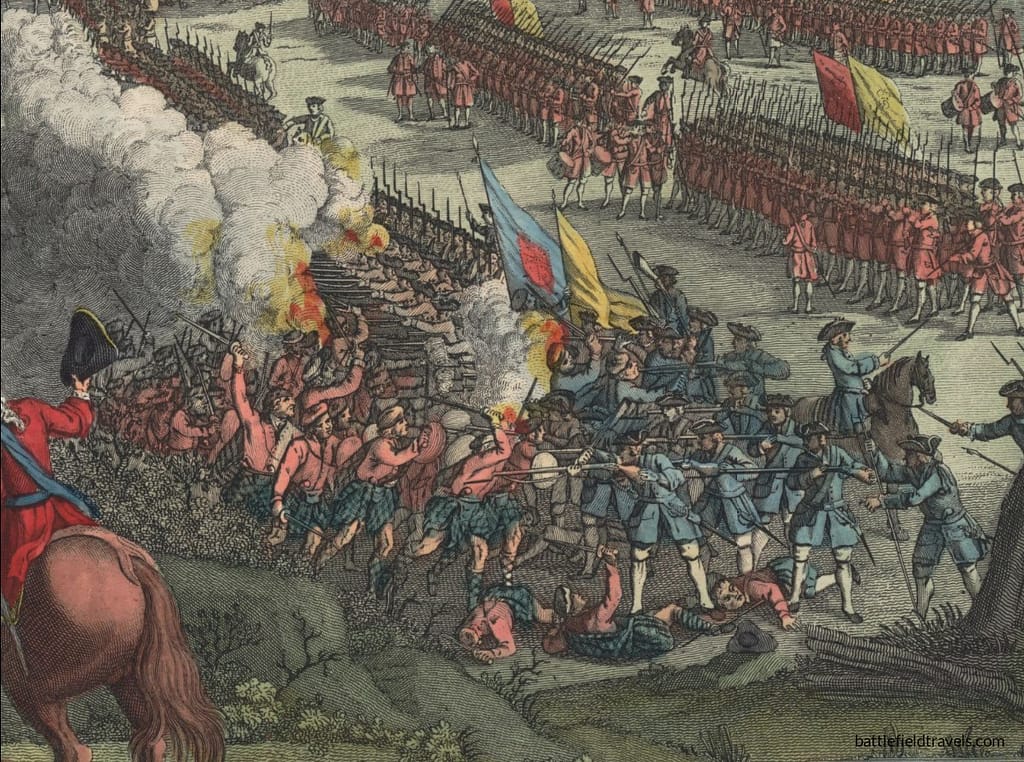
A point of contention in the history of the Battle of Culloden is whether or not the British Army had introduced a new bayonet drill to counter the Highland Charge. The April 1746 edition of ‘The Scots Magazine‘ published numerous firsthand accounts of the battle, two of which claimed that a new bayonet drill had been introduced into the British Army to counter a charge by Highlanders armed with swords (in the right hand) and a Targe shield (on the left arm). The new drill meant that instead of a soldier bayoneting the man directly to his front (as depicted in the first image below), he would instead bayonet into the unshielded right side of the man diagonally to his right (as depicted in the second image).
‘The next was, the direction given about the use of the bayonet. The alteration was mighty little, but of the last consequence. Before this, the bayonet-man attacked the sword-man right fronting him; now the left-hand bayonet attacked the sword fronting his next right-hand man. He was then covered by the enemy’s shield where open on his left, and the enemy’s right open to him. This manner made an essential difference, staggered the enemy, who were not prepared to alter their way of fighting, and destroyed them in a manner rather to be conceived than told.‘
The November 1746 retraction
In November 1746, The Scots Magazine (November 1746, p.524) retracted the earlier claim, and advised that: ‘We are likewise informed that there is no foundation for what was said on p.193. of an alteration having been made in the manner of using the bayonet.‘
The other evidence..
There are at least six other primary source documents that attest that the new bayonet drill did, indeed, exist. I cover them all in my article: The ‘New Bayonet Drill’ at Culloden, 1746. Several of the sources also attest that it was Cumberland himself who directed the introduction of the new drill, and several claim that it was one of the factors that led to the Royal Army victory that day.
The sources make it clear that the key change in the drill was that it involved an oblique thrust by each soldier against the unprotected right side of the highlander to his right front, rather than the man directly in front. The written sources otherwise do not give details on the mechanics of the new drill. However, a 1747 engraving by Augustin Heckel depicts the peak moment of the battle as Appin’s Jacobite Regiment fought a bitter hand-to-hand battle with Barrel’s and Monroe’s Regiments on the left flank of Cumberland’s army. This engraving, clearly based on detailed advice from eyewitnesses, depicts the front ranks of Barrel’s Regiment (closest regiment to the viewer in a reverse bayonet stance: right leg forward, left leg back, left hand pushing on the musket’s buttplate, and right hand supporting the forestock. This may well be the ‘mighty little’ change described by other witnesses.
Prelude: The failed night march, 15–16 April 1746
A bold plan for a surprise attack!
On the eve of the battle, Charles Edward Stuart and his council of war debated how best to confront Cumberland’s larger and better-supplied army. The Jacobites knew that facing him in open battle on the moor would put them at a disadvantage. Lord George Murray, one of Charles’s most capable commanders, proposed a bold alternative: a night march and surprise attack on the government camp at Nairn, about 19km (12 miles) away.
The plan was ambitious but not impossible. Cumberland’s men would be celebrating his 25th birthday that evening, and the Jacobites hoped to catch them off guard, drunk and unprepared. If successful, a night assault might disrupt or even destroy the government army before it could deploy.
Surprise attack is aborted
At about 20:00 hrs on 15 April, the Jacobite columns began to move east from their positions. The march immediately ran into problems. Darkness, poor roads, and marshy ground slowed progress. Units became separated, halting repeatedly to close up. Stragglers fell behind in the night, and no reliable system of signals or guides kept the columns coordinated. By midnight, the army was still far from Nairn, and men were already exhausted from hunger and the strain of the march.
As dawn approached, it became clear they could not reach the enemy camp in time for a surprise attack. Murray and other senior officers urged retreat before they were caught in the open by Cumberland’s advance guard. Reluctantly, the march was abandoned. The Jacobites straggled back to Culloden Moor, many collapsing from fatigue and hunger.
This abortive manoeuvre left the army demoralised, disorganised, and fatigued on the morning of 16 April. Instead of inflicting a preemptive blow against the government army, they had exhausted themselves and now faced the prospects of battle in their weakened state. The failed night march thus set the stage for the disaster that followed on the moor.
⚔️ Go deeper — Members get exclusive access to the Deep Research Collection, Field Notes, and monthly Research Dispatches. Try membership free for 7 days, cancel anytime. From $9/month.
16 April 1746: The last charge of the Jacobite Army
Initial dispositions at Culloden
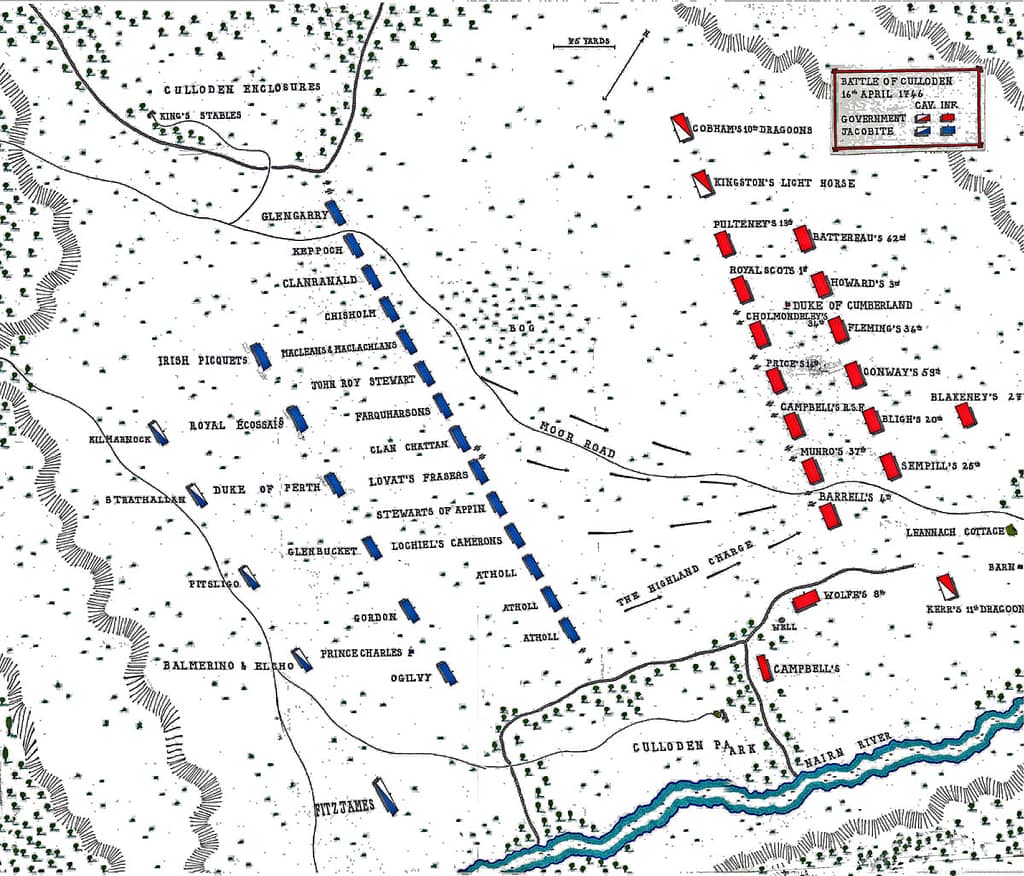
By dawn on 16 April 1746, both armies were assembling on Drumossie Moor, the flat, open ground east of Inverness. The Jacobite army, weakened by desertion and exhaustion after the failed night march on Cumberland’s camp at Nairn, mustered perhaps 5,000–6,000 men. Their line stretched across the moor, two ranks deep. The right wing was commanded by Lord George Murray, the left by the Duke of Perth, and the reserve by Charles himself with the French and Irish regulars.
The terrain was against them. Drumossie Moor was exposed, waterlogged in places, and offered no cover from artillery or musketry. The Jacobite guns — around a dozen small pieces, poorly manned by French gunners and short of ammunition — opened fire first but proved ineffective. Shots fell short or overshot, doing little to disrupt the enemy. The micro-terrain (small scale terrain features that often do not appear on maps and can only be seen when you are standing on the ground) factors at Culloden had a profound influence on the outcome of the battle.
Boggy ground would cause the highland charge to drift right and land against the Government army left. The subtle slope of the ground also rendered the Government army artillery fire less effective on the Highland right, and more effective on the Highland left, again adding to the tendency of the Highland attack to drift to the right. The concept of exploiting small scale terrain features in battle is examined further in the Micro-Terrain and Battlefield Decision-Making research hub.
Cumberland’s opening bombardment
Cumberland’s army, by contrast, was in excellent condition. He deployed 16–17 battalions of infantry in three lines, supported by two regiments of dragoons and cavalry on each flank, and 16 field guns placed at regular intervals along the front. Well-supplied and drilled, they had marched only a few miles from their camp at Nairn.
At about 11:00 hours, Cumberland ordered his gunners to commence a deliberate bombardment. Roundshot and canister tore into the Jacobite lines. Eyewitnesses described men dismembered by cannonballs and whole ranks disordered by the cannon fire. The bombardment lasted perhaps half an hour. The Highlanders, unaccustomed to standing idle under fire, grew increasingly restless and pleaded with their officers to attack. Charles hesitated, hoping his artillery would do more damage; instead, he was ceding the initiative.
360 View from centre of Highland lines – looking towards the British position. Blue flags mark the Jacobite positions
The Highland charge
Finally, the order was given for the advance. The signal was confused, and only the Jacobite right wing surged forward in strength, led by the Clan Cameron, Clan Stewart of Appin, and Clan MacIntosh. The MacDonalds, positioned on the left, felt slighted at their place of honour being given elsewhere, and their advance was slow and uneven. This weakened the Jacobite line at the very moment it needed cohesion.
360 view from the British right flank. Red flags mark the government positions
The Highlanders ran forward through boggy ground, their speed sapped by marshes and ditches. As they closed, Cumberland’s infantry delivered controlled volleys of musket fire. Whole clusters of Highlanders went down. Survivors pressed on, discharging a ragged volley of their own before charging with broadsword and targe.
Where they made contact, the fighting was brutal. Government infantry employed the new bayonet drill, trained to thrust obliquely into the exposed side of the Highlander attacking their neighbour, rather than straight ahead into a shield. One regiment in particular, Barrell’s 4th Foot, later received praise for holding against repeated assaults.
On the Jacobite left, progress was worse. Enfiladed by artillery firing canister and by musketry from the government right, many fell before reaching the government line. Confusion spread as gaps opened, and the will to press home the charge faltered.
360 view from the centre of the battlefield near the Highland monument and Clan memorial stones
Collapse of the Jacobite line
On the Jacobite right, Scottish loyalists, including the Campbells, occupied the Culwhiniac enclosure (a stone walled enclosure) from where they could fire into the Jacobite right flank. This played a critical role in the collapse on the right.
Despite terrible losses, parts of the Jacobite right succeeded in reaching the government line. Hand-to-hand fighting raged for several minutes, Highlanders hacking with broadswords while government troops thrust bayonets in disciplined ranks. A few small penetrations were achieved but quickly sealed by Cumberland’s second line.
The Royal Écossais and Irish Picquets in the Jacobite reserve attempted to intervene. Formed as disciplined regulars, they stood their ground and provided covering fire, but their numbers were too few. Charles, positioned behind the line, gave no effective orders; his lack of battlefield control became increasingly evident.
With the right checked and the left disintegrating under musketry and grapeshot, the Jacobite line buckled. After perhaps 40 minutes of fighting, the advance had stalled everywhere. Survivors began drifting back across the moor. Charles himself was urged to quit the field before the collapse became total.
360 view of Culwhiniac enclosure on the Jacobite right flank
Rout and pursuit
The retreat turned quickly into rout. Cumberland unleashed his dragoons to pursue the fleeing Jacobites. Exhausted Highlanders were cut down across the moor and into the broken ground beyond. Government infantry pressed forward in line, ensuring no rally could form.
The rout was only partially delayed by the stand of the Royal Écossais, who covered the retreat with volleys before themselves being forced back. Their discipline prevented an even swifter annihilation of the army.
Contemporary observers remarked on the ferocity of the fight where contact had been made:
“The Battle was so desperate, that the Soldiers Bayonets were stain’d and clotted with the Blood of the Rebels up to the Muzzles of their Muskets……General Barrel’s Regiment gain’d the greatest Reputation imaginable in the late Engagement, the best of the Clans having made their strongest Efforts to break them, but without Effect, for the old Tangierines bravely repulsed those Boasters, with a dreadful Slaughter, and convinced them that the Broad Sword and Target is unequal to their Musket and Bayonet, when in the Hands of Veterans, who are determined to use them. After the Battle there was not a Bayonet in the Regiment but was either bloody or bent.“
John Marchant, The History of the Present Rebellion, 1746, p. 397.
By noon, the Jacobite army had ceased to exist as a fighting force. The moor was strewn with bodies, many of whom were dispatched in the hours after the fighting by Cumberland’s patrols. Charles Edward Stuart fled the field and began his long flight through the Highlands.
Outcomes: casualties, reprisals, and the end of the Jacobite cause
Casualties on both sides
The cost of Culloden was devastating for the Jacobites. Of the 5,000–7,000 men who entered the field, perhaps 1,500–2,000 were killed outright, with many more wounded. Highland clan losses were particularly severe: whole families and lineages were shattered in a single morning. The exhausted state of the army meant that many wounded Highlanders were left behind on the moor.
Government losses were comparatively light. Out of 8,000 men, only around 300 were killed or wounded. The disparity reflected the mismatch in firepower and the effectiveness of Cumberland’s defensive preparations.

Cumberland’s reprisals
Brutal reprisals marked the immediate aftermath. Cumberland issued orders that few prisoners were to be taken and wounded Jacobites were to be killed where they lay. Over the next two days, government patrols scoured the moor, executing the injured and burning nearby crofts. The severity of these measures earned Cumberland the lasting epithet of “the Butcher.”
Villages suspected of harbouring fugitives were torched, livestock seized, and food supplies destroyed to prevent further resistance. Jacobite officers and notables captured after the battle were tried for treason; some were executed, others transported to the colonies.
Collapse of the Jacobite cause
The defeat at Culloden extinguished the Jacobite movement as a serious military force. Charles Edward Stuart fled the battlefield and began a five-month odyssey of evasion across the Highlands and islands before escaping to France in September 1746. He would never again return to Scotland with an army.
Without men, money, or foreign support, the Stuart claim collapsed. The dream of restoring the dynasty that had ruled Britain before 1688 was finished. Culloden was thus not merely a defeat, but the end of the Jacobite cause in arms.
Political and cultural consequences
The Hanoverian regime consolidated its authority following the Battle of Culloden. Parliament and the Crown implemented measures to eradicate the conditions that had enabled rebellion:
- Disarming Act (1746): outlawed the carrying of weapons in the Highlands.
- Dress Act (1746): banned the wearing of Highland dress and tartan, aiming to weaken clan identity.
- Abolition of Heritable Jurisdictions Act (1747): removed the judicial powers of clan chiefs, centralising authority under the Crown.
These policies, combined with economic pressures, accelerated the decline of the traditional Highland clan system. Cultural expressions of Jacobitism were repressed, and the Highlands entered a period of profound transformation.
Strategic legacy
For the British Army, Culloden reinforced the effectiveness of discipline, firepower, and linear tactics against irregular assaults. The bayonet drill, whether decisive in practice or not, became emblematic of the victory of modern drill over traditional methods. For Scotland, the battle marked a cultural rupture: the end of the old clan world and the beginning of integration — often forced — into the structures of the British state.
Culloden was the last pitched battle fought on British soil. Its consequences were felt for generations, reshaping the politics, culture, and society of Scotland and cementing Hanoverian rule.

The battlefield today: visiting Culloden Moor and the National Trust Centre
Preservation of the moor
Culloden Moor, just east of Inverness, remains one of the most evocative battlefields in Britain. Unlike many sites that have been lost to agriculture or urban sprawl, large portions of the ground are preserved under the care of the National Trust for Scotland. The battlefield still carries the bleak, open character that shaped the outcome in 1746: flat, windswept, with patches of heather and bog. Visitors can still trace the Jacobite and government lines across the moor, marked by paths and interpretation boards.

Part of the ground was damaged in the 20th century by road construction and housing encroachment, and preservation groups continue to campaign against further development. Despite these pressures, the core battlefield remains recognisable, with restored features like Leanach Cottage and stone markers indicating where Highland clans fell.

Monuments and memorials
A striking cairn, erected in 1881, dominates the site. Around it stand dozens of clan markers — simple stone slabs inscribed with the names of the principal clans who fought and died here: Fraser, MacGillivray, MacDonald, Cameron, Stewart, and others. These markers, set into the heather, are solemn reminders of the scale of clan losses and have become places of remembrance.
Near the government line stands a separate marker to the Cumberland regiments, recognising the role of the disciplined infantry that repelled the Highland charge.

The Visitor Centre
The Culloden Visitor Centre, opened in 2007, is one of the most advanced battlefield interpretation centres in Europe. It contains:
- A chronological walk-through of the Jacobite campaign of 1745–46.
- Original artefacts — weapons, uniforms, and personal items recovered from the battlefield.
- Audio-visual presentations, including a 360° battle immersion theatre that places the visitor at the heart of the fighting.
- Genealogical resources for those tracing clan connections.
The Centre also hosts guided battlefield walks, led by historians who explain troop positions, tactics, and terrain features.
Link to the National Trust for Scotland visitor centre website
Experience of the ground
Walking the moor gives a powerful sense of the difficulties faced by the Jacobites. The ground is uneven, soft underfoot, and offers no cover — visitors can easily appreciate how the Highland charge slowed and broke under artillery and musket fire. Standing at the Jacobite line, you can see the open expanse across which the clans advanced, and at the government line, the fields of fire are clear.
In quiet moments, the site has a sombre atmosphere. The cairn, the clan stones, and the windswept moor carry a sense of loss that has made Culloden a site of memory and pilgrimage not just for Scots, but for descendants of the diaspora worldwide.
Culloden battlefield – Field of the English marker

Culloden battlefield – Clan monuments


Found this useful? Buy me a coffee — it helps fund future battlefield research


Authored by Mick Prictor, a retired military officer with 40 years’ service, and a military historian specialising in terrain-focused analysis of tactics, doctrine, and command decision-making in land warfare. His work draws on extensive battlefield fieldwork—more than 280 sites worldwide—and one of the world’s largest private collections of historic military arms, uniforms, and equipment. About me
Sources
Primary Sources
- The History of the Present Rebellion in Scotland (John Marchant, 1746) — contemporary narrative including detailed descriptions of the fighting at Culloden.
- Culloden Papers (Duncan Forbes of Culloden, ed. 1815) — correspondence and documents from government and Jacobite perspectives.
- The Lyon in Mourning (Robert Forbes, 1746–1749) — first-hand accounts collected from Jacobite survivors.
- Memoirs of the Rebellion in Scotland, 1745 and 1746 (Chevalier de Johnstone) — personal narrative of a French officer who served in the Jacobite army.
- Government and regimental returns in the London Gazette (April–May 1746).
Secondary Sources
- Christopher Duffy, The ’45: Bonnie Prince Charlie and the Untold Story of the Jacobite Rising (2003).
- John Prebble, Culloden (1961) — classic narrative account.
- Murray Pittock, Culloden (Oxford University Press, 2016) — modern scholarly reassessment.
- Stuart Reid, Culloden Moor 1746: The Death of the Jacobite Cause (Osprey Campaign Series, 2002).
- Michael Barthorp, The Jacobite Rebellions 1689–1746 (Osprey Men-at-Arms, 1982).
- National Trust for Scotland, Culloden Battlefield Guide (official visitor materials).
📚 Further Reading – Jacobite Rising (1745-46)
This battle study nests within the broader analytical framework explored in the Research Hub, where operational methods, operating environments, armies, commanders, and weapons are examined across conflicts and eras. The links below connect related studies across the wider body of battlefield analysis on the BattlefieldTravels site.
⚔️ Explore all battle studies from the Jacobite Rising of 1745-46
🏛️Explore the museum of War of the Austrian Succession historic weapons and equipment
The book list for this conflict includes the leading campaign studies, memoirs, and operational analyses available on the Jacobite Rising of 1745-46, selected specifically to complement this battlefield study.
📚Jacobite Rising 1745-46 – Recommended Reading
🗞️ For updates on new battlefield studies and research insights, you can subscribe to the Newsletter.
Related Battle Studies, Museum Pieces & Reading Resources


🧭 Battlefield Travel Guide: Culloden (16 April 1746)
Getting There
- Nearest City: Inverness, Scotland.
- Access: Culloden Battlefield is about 5 miles (8 km) east of Inverness via the B9006; well signposted from the A9.
- Parking: Large car park at the Visitor Centre (charges apply, free for National Trust for Scotland members).
Site Orientation
- Key Landmarks: Memorial Cairn (erected 1881); Clan Grave Markers; Leanach Cottage; Government line and Jacobite line paths.
- Best Vantage Points: From the government line, looking across the open moor towards the Jacobite start positions; clan stone areas for atmosphere.
- Walking Routes: Marked trails loop around the Jacobite and government lines, with interpretation boards at each stop.
Museums & Visitor Centres
- On-site: Culloden Visitor Centre (National Trust for Scotland) — artefacts, 360° immersive theatre, genealogical resources, guided tours.
- Nearby: Inverness Museum & Art Gallery for broader Highland history; Clava Cairns prehistoric site a short drive away.
On-Site Experience
- Interpretive Signage: Panels mark the clan positions, government regiments, and phases of the battle; audio guides available.
- Atmosphere: Windswept moorland retains the bleak character of 1746; clan stones and cairn provide a sombre memorial setting.
Nearby Points of Interest
- Related Sites: Fort George (post-Culloden fortress, still standing); Kilravock Castle (Jacobite-linked site); Clava Cairns.
- Local: Inverness city heritage trail, River Ness walks, and Highland regimental museum collections.
Practical Tips
- When to Visit: Spring and autumn for mild walking weather; April 16 anniversary events include commemorations.
- Facilities: Visitor Centre café, bookshop, and restrooms; guided tours daily in peak season.
- Notes: Moorland can be wet and exposed — sturdy shoes and weatherproof clothing recommended.
Subscribe to Battlefield Travels and receive a free E-Book Battlefield Guide
Unlock expert battlefield analysis, campaign reconstructions, and historical insights drawn from firsthand exploration and primary sources.
🗺️ You’ll receive:
🎖️ Exclusive historical insights you won’t find elsewhere
📘 A free eBook: 10 Tips for Exploring Historic Battlefields
📰 New battlefield studies straight to your inbox as they are published

⚔️ Go deeper — Members get exclusive access to the Deep Research Collection, Field Notes, and monthly Research Dispatches. Try membership free for 7 days, cancel anytime. From $9/month.