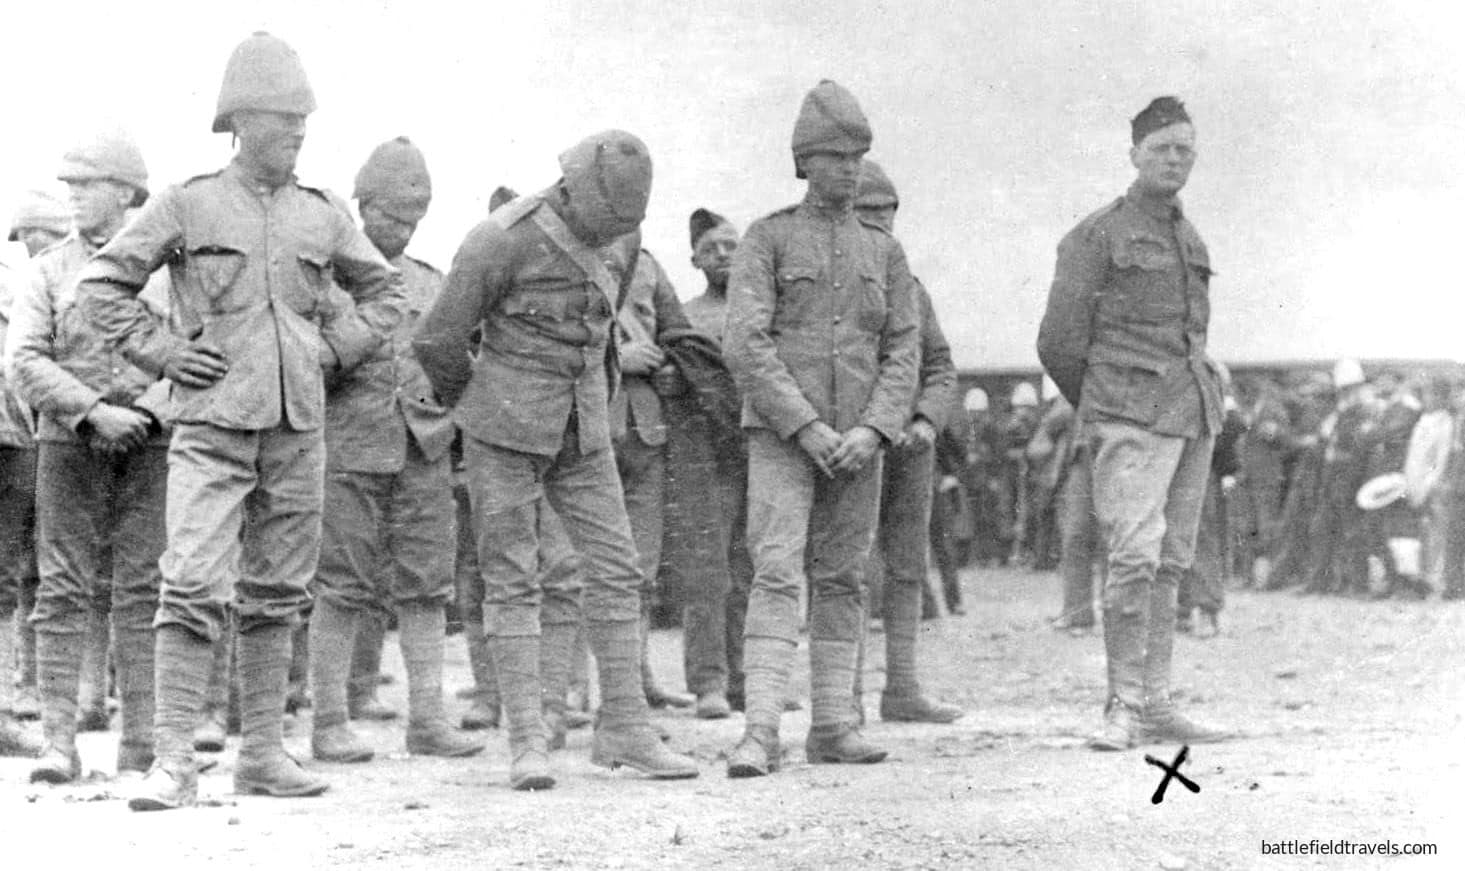
Winston Churchill’s story of ambush, capture, imprisonment, escape, evasion, freedom!
On 15 November 1899, just south of Chieveley Station in Natal, a Boer force allowed a British armoured train patrol to pass before trapping it in a well-placed ambush. On board was 24-year-old war correspondent for the Morning Post, Winston Churchill, along with about 120 British troops under Captain Aylmer Haldane. The Boers placed large boulders across the railway line, derailing part of the train before opening fire with artillery and small arms. The British force eventually managed to free the locomotive and send it back towards Chieveley, but many of the men were captured and transported to prison camps in Pretoria. Churchill subsequently escaped from captivity and evaded Boer security forces in an extraordinary journey of some 400 kilometres to Portuguese East Africa. Haldane and several other prisoners later made their own escape from Pretoria.
Key facts
Google Earth map – location of the Chieveley armoured train ambush
🧭🥾 Walking the site of the armoured train ambush
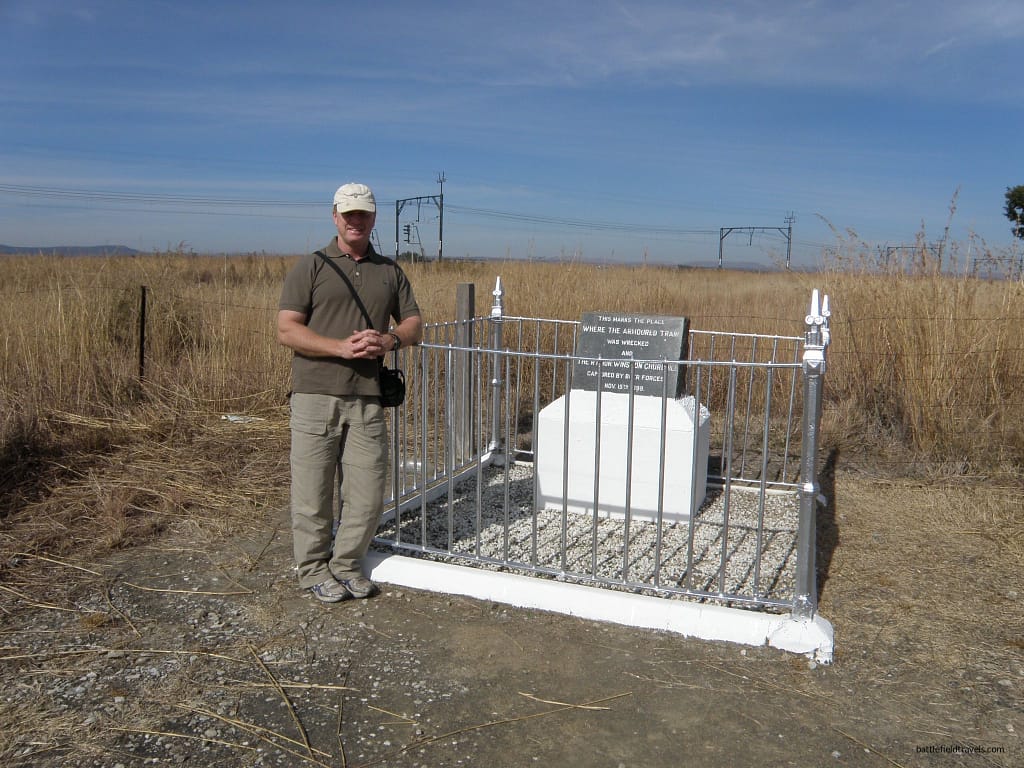
June 2011. Chieveley, KwaZulu-Natal. I am standing beside the railway line south of Colenso, looking across rolling, open country. There is little here to suggest that this quiet stretch of railway was the scene of one of the most famous episodes in the early life of Winston Churchill. There is a small monument here on what was once the site of a much larger monument, but that is the only sign of the events of November 1899.
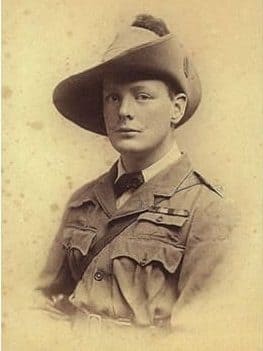
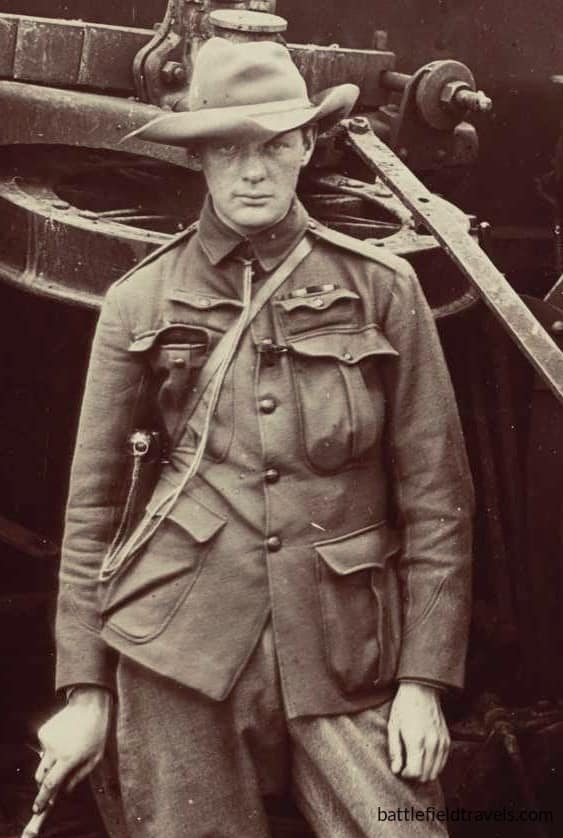
By 1899, 24-year-old Winston Churchill was already a veteran of the Cuban War of Independence, the Northwest Frontier of India, and the Mahdist War in Sudan. He had served at the Battle of Omdurman the previous year, and was now back in South Africa as a 24-year-old war correspondent for the Morning Post. On the morning of 15 November 1899, he embarked on a British armoured train to patrol towards the Boer lines around Colenso. The Boers ambushed and derailed the train just south of Chieveley Station. Churchill played a leading role in the desperate effort to extricate the train under artillery and rifle fire before finally being captured as the survivors withdrew.
His subsequent imprisonment in Pretoria, extraordinary escape and return to British lines became part of the Churchill legend. But the ground here at Chieveley is also a reminder that this was a carefully executed Boer ambush against a fundamentally vulnerable tactical method. And Churchill knew the armoured train was vulnerable long before the ambush occurred.
The following account draws principally on Winston Churchill’s own accounts, London to Ladysmith via Pretoria (1900) and My Early Life: A Roving Commission (1930), supplemented by the recollections of fellow prisoner James Aylmer Lowthorpe Haldane in How We Escaped from Pretoria (1901), plus my own fieldwork in the Colenso/Chieveley area in 2011.
Strategic Context: The Second Anglo-Boer War, 1899–1902
Natal in crisis
The Anglo-Boer War was barely a month old. On 1 November 1899, Boer forces completed their investment of Ladysmith, thereby trapping the main British force in northern Natal. On the following day, the last train escaped southwards under fire before the railway was cut north of Colenso. On 3 November, the small British force at Colenso withdrew towards Estcourt, leaving the railway northwards increasingly exposed to the Boer forces on the Tugela Heights.1Winston Spencer Churchill, London to Ladysmith via Pretoria (London: Longmans, Green and Co., 1900), 49-50.
Estcourt became an improvised forward base. When Churchill arrived there in early November, he found only about 2,000 troops: the Dublin Fusiliers and the Border Regiment, a squadron of Imperial Light Horse, Natal volunteers and cyclists, and a volunteer artillery battery. The force was too small to defend all of the surrounding high ground, while intelligence reporting suggested that Boer commandos might soon push south towards Pietermaritzburg.2Churchill, London to Ladysmith via Pretoria, 51.
Colonel Wolfe Murray commanded the small force and the British lines of communication and expected to be reinforced by the General Buller and the fresh troops then arriving in South Africa. Therefore, reconnaissance forward of Estcourt was critical to understanding Boer intentions. Each day, he pushed forward mounted patrols and an armoured train towards Colenso, probing and testing the Boer positions.

8 November 1899: Churchill’s first patrol on the armoured train
The Estcourt armoured train
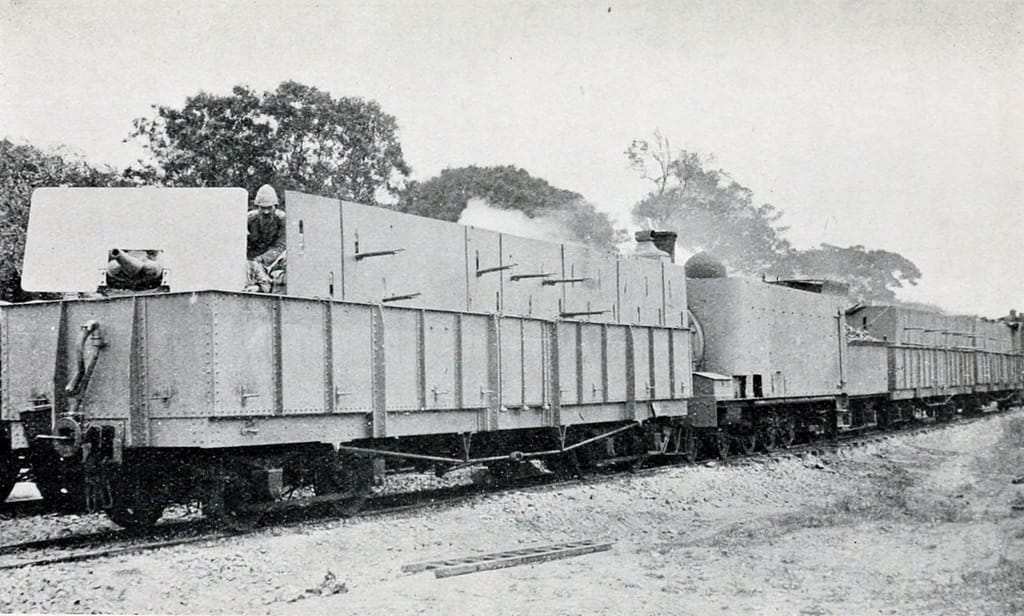
On 8 November, just a week before the ambush, Churchill accompanied one of these armoured train patrols. He was not impressed by the train. Compared with armoured trains he had seen elsewhere in South Africa, the Estcourt train was a “very puny specimen”.3Churchill, London to Ladysmith via Pretoria, 52. Its open-topped armoured trucks had loopholes but no shutters, and on this first journey it carried neither a machine gun nor artillery. A company of Dublin Fusiliers occupied armoured cars on either side of the locomotive, while three unarmoured trucks carried railway workers, spare rails and equipment to repair damage to the track.
Churchill described the country between Estcourt and Colenso as “open, undulating, and grassy.”4Churchill, London to Ladysmith via Pretoria, 53. Small railway stations every few miles were almost the only obvious landmarks amid rolling green slopes. The train could move rapidly along this corridor, but its freedom of movement was subjective. It could go only where the rails went. A damaged bridge, lifted rail or obstruction could transform a mobile reconnaissance platform into an immobile target.
Chieveley – signs of Boer presence
At Chieveley Station the train slowed. Beyond lay Boer-held territory and Colenso. Railway officials examined culverts and bridges before crossing them, while military officers repeatedly stopped to scan the surrounding hills through binoculars. They found Colenso abandoned and discovered that two lengths of railway had been lifted, sleepers still attached, and thrown from the embankment. The telegraph had been cut but the bridge across the Tugela remained intact.5Churchill, London to Ladysmith via Pretoria, 54.
There was a reason for the Boer restraint. Churchill concluded that the Boers themselves intended to use the railway during their advance through Natal. Rather than systematically destroying the rail line, they were preserving an asset they expected eventually to control.
The train returned safely to Estcourt but the dangers were obvious. A week later, looking back from captivity in Pretoria, Churchill recalled that the armoured train’s weaknesses had been so apparent that men in the British camp had already given it an ominous nickname: “Wilson’s death trap.”6Churchill, London to Ladysmith via Pretoria, 77.

15 November 1899: the armoured train to Chieveley
An intelligence gathering patrol
By 14 November, the situation had changed. British mounted patrols reported Boer parties moving south from the directions of Colenso and Weenen. There was growing concern in the British camp that part of the Boer army besieging Ladysmith was about to move southwards against Estcourt and, ultimately, Pietermaritzburg.7A. C. Martin, The Durban Light Infantry: The History of the Durban Light Infantry, Incorporating That of the Sixth South African Infantry, 1915–1918, vol. 1, 1854–1934 (Durban: Headquarter Board of the Durban Light Infantry in cooperation with the Regimental Association, 1969), 61. At daylight on 15 November, British patrols again fanned out towards the north and northwest. The armoured train was ordered to reconnoitre north towards Chieveley.
The train was composed of five wagons and the locomotive. An open truck carried a small 7-pounder muzzle-loading gun manned by four sailors from HMS Tartar. Three armoured cars carried elements of the Dublin Fusiliers, a company of Durban Light Infantry, and a civilian breakdown gang. Another open truck carried the tools and materials required to repair the railway. Altogether, Churchill counted 120 men, commanded by Captain Aylmer Haldane.8Churchill, London to Ladysmith via Pretoria, 78.

First sighting of the Boers
They departed Estcourt at 05:30 AM and reached Frere without incident. Haldane decided to continue cautiously towards Chieveley. Everything appeared peaceful. The same rolling grassland Churchill had travelled through a week earlier seemed deserted. It was not.9Churchill, London to Ladysmith via Pretoria, 79.
Hidden behind the folds of the ground, Boer commandos were already moving rapidly south. As the train entered Chieveley, Churchill spotted about a hundred mounted Boers a mile from the railway. Beyond the station, more figures appeared along a long hill. The telegraphist reported the sightings to Estcourt, and Colonel Long immediately ordered Haldane to withdraw to Frere. The train reversed and began moving south. About a mile and three-quarters short of Frere, it rounded a bend. The Boers had occupied a hill overlooking the railway only 600 yards away. The trap had closed.
The armoured train ambush and derailment
The trap is sprung
The Boers waited until the train was committed. As it approached the occupied hill, Churchill watched through his field glasses from the rear armoured truck. At first, he saw only scattered individual figures silhouetted against the skyline. Then three wheeled shapes appeared on the crest, followed almost immediately by flashes from guns and a volley of fire from the Boer rifles. The Boers had allowed the train to close to about 600 yards before opening fire with two large field guns, a Maxim pom-pom gun, and riflemen positioned along the ridge. Shells began crashing down around the train, and shrapnel struck the armoured sides.10Winston S. Churchill, My Early Life: A Roving Commission (London: Thornton Butterworth, 1930), 245.
The British response played directly into the Boer ambush. The driver instinctively opened the regulator and accelerated. The train raced past the Boer position, rounded the curve beyond the hill and descended a gradient. On the line ahead was a huge stone, perfectly placed to catch the train at full speed.11Churchill, London to Ladysmith via Pretoria, 82.
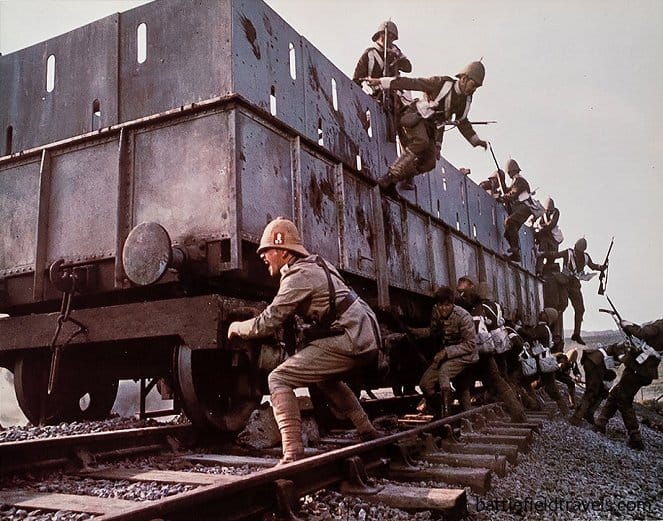
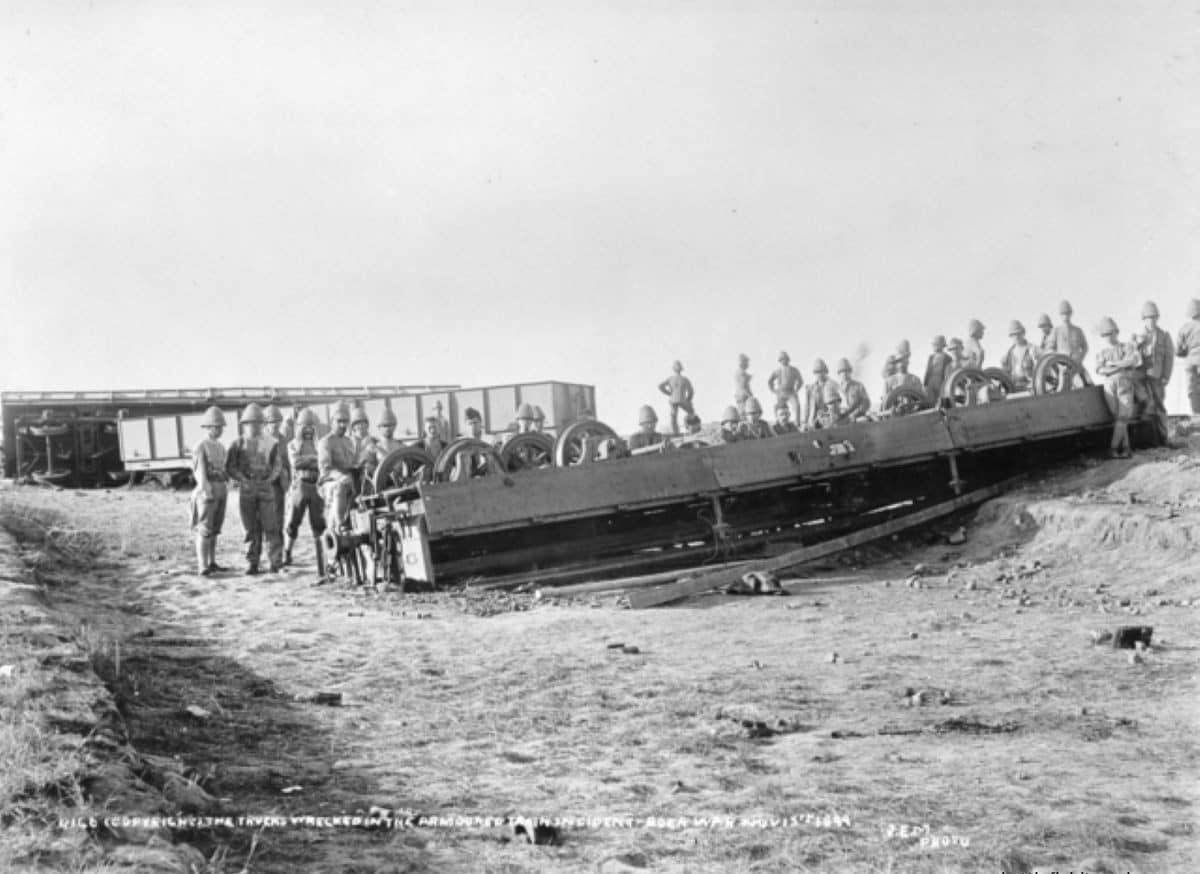
The result was immediate and catastrophic. The leading truck carrying the tools and repair parts was thrown from the rails and overturned. The next armoured car, carrying men of the Durban Light Infantry, continued another twenty yards before rolling onto its side and scattering its occupants. A third wagon slewed across the track, partly on and partly off the rails. The locomotive and the remaining trucks stayed on the tracks, but the line ahead was now blocked by wreckage.

Immobilised and under fire
The Boers now shifted their guns and resumed firing from about 1,300 yards. Rifle fire spread along the hills until the wreck was effectively engaged from three sides, while another field gun opened from high ground on the opposite side of the railway. The small British naval gun replied briefly, but after only three rounds a Boer shell struck its barrel and smashed the trunnions, putting it out of action.
The armoured train’s fundamental weakness was now apparent. As long as it was mobile, it was hard to hit with artillery, and the armoured plate offered protection against rifle fire. Once immobilised, it was an easy target for every Boer weapon. Churchill thought that a direct shell hit could penetrate the sides easily enough to kill everyone inside.

Clearing the line under fire
Churchill and Haldane’s plan
Churchill left the comparative shelter of the rear truck and moved forward along the railway to inspect the damage. As he passed the locomotive, a shrapnel shell burst overhead. The civilian driver was wounded in the face by a fragment and initially abandoned the cab, protesting that he had not been employed to be killed by artillery fire. Churchill persuaded him to return by promising that his conduct would be recognised with a gallantry award. The driver climbed back aboard and remained at his post through the rest of the action.12Churchill, London to Ladysmith via Pretoria, 84.
At the wreck, Churchill found the Durban Light Infantry taking what cover they could behind overturned wagons and in the shallow drainage alongside the track. Boer riflemen were largely concealed behind the crests of the surrounding hills, making effective return fire difficult.
Churchill ran to the rear armoured truck to speak with Captain Haldane. The two agreed on a simple division of labour. Haldane and the Dublin Fusiliers would try to suppress the Boer guns and riflemen; Churchill would organise an attempt to clear the railway. According to Churchill, the Fusiliers’ fire was effective enough to disturb the Boer gunners’ aim, although several shells passed straight through the armour of their truck.

Clearing the wreckage
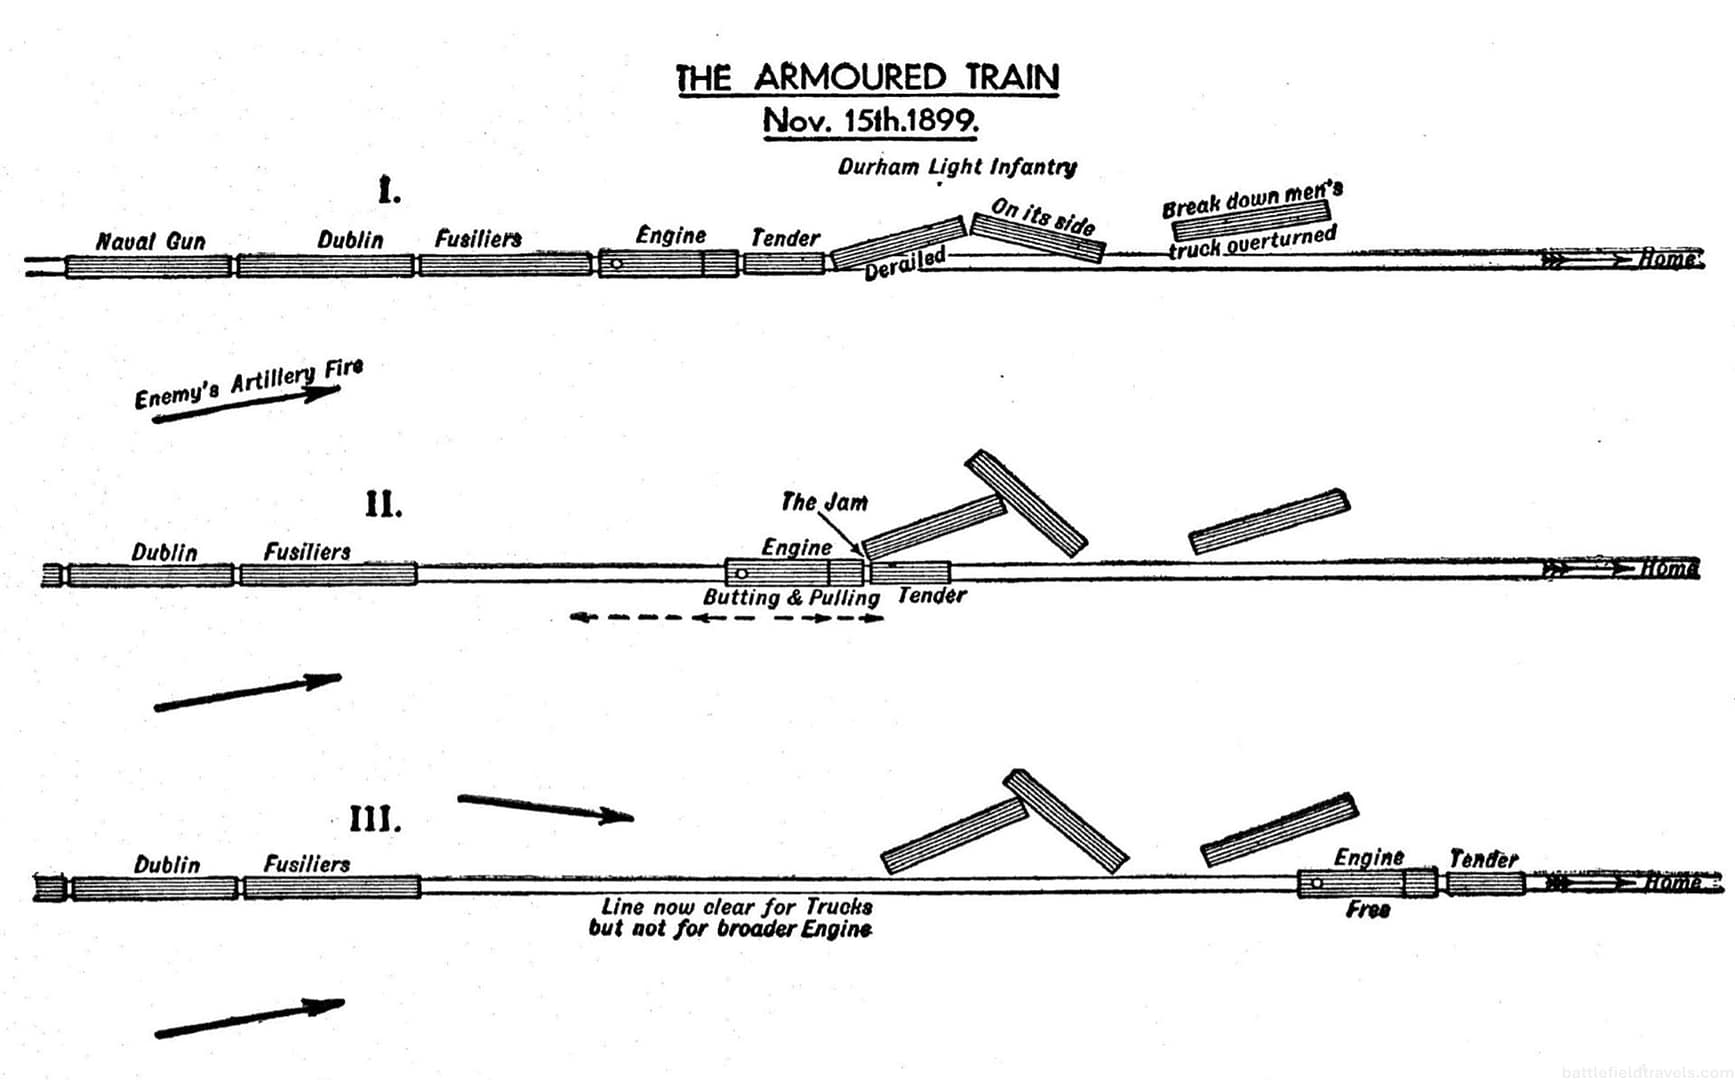
The problem on the track was mechanical rather than tactical, but under fire it became extraordinarily difficult. The partially derailed wagon had to be separated from the overturned truck, dragged backwards, and then forced completely clear of the rails. The locomotive repeatedly struggled for traction while Churchill called for men to come out from cover and push. Twenty volunteers were requested but only nine actually exposed themselves, including the major of the Durban Light Infantry and several Dublin Fusiliers. With the engine pushing at the same time, they finally tipped the wagon aside.13Churchill, My Early Life, 249.
For a moment the line appeared clear. Then they discovered that the locomotive was slightly wider than its tender and could not get past the newly overturned wagon.
Again the locomotive reversed and pushed. Again the wreckage shifted only slightly. The more it moved, the more tightly the damaged wagons became jammed together. A second attempt to clear the blockage by hand failed. Eventually a spare coupling link was found, allowing the locomotive to haul part of the wreck backwards.
The engine breaks free. However…
Finally, after a Boer shell struck the front of the locomotive and set part of its woodwork alight, the driver applied more steam. The engine slammed into the obstruction and, with a grinding crash, the engine tore past the wreckage. The line south was open.
But the problem was not solved. Somehow, the engine had become de-coupled from the intact wagons. As the engine forced its way past the overturned wagon, the wagon fell back into its position blocking the line. The engine had no way to re-couple without forcing its way back again and risking being trapped again.15Churchill, London to Ladysmith via Pretoria, 91.
Retreat to Estcourt
Saving the wounded
Haldane decided that reversing the locomotive to recouple the troop wagons risked losing the only means of escape still available. The plan therefore changed: save the engine, load as many wounded men as possible aboard, and withdraw the remaining infantry on foot towards buildings near the station where they might establish another defensive position.
Wounded soldiers were crowded into the cab, the tender and even onto the cowcatcher. The locomotive itself was badly damaged—its woodwork burning and water leaking from pierced tanks—while Boer artillery continued firing. By this stage Churchill identified the main Boer guns as 15-pounders, supported by the Maxim pom-pom gun.16Churchill, My Early Life, 249.
As the engine began to withdraw, the infantry ran along beside it. However, without the protection of the armoured wagons, casualties increased rapidly. Churchill estimated that about a quarter of the force had been killed or wounded by this stage. Men became scattered along the railway and unit cohesion began to break down.
Churchill later described this seventy-minute struggle as one of the most intense experiences of his life: men working among twisted iron while shells exploded around them, bullets struck the wagons, and the locomotive itself absorbed repeated hits. Only a few inches of mangled metal separated escape from capture.
The survivors surrender
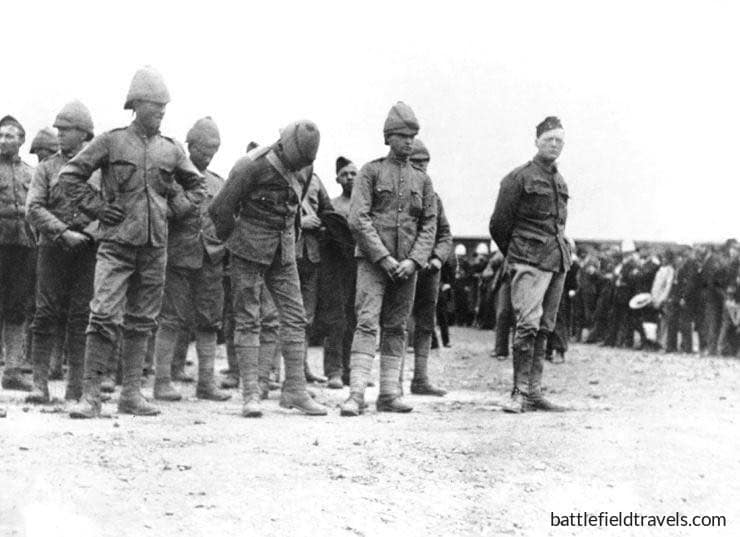
Churchill observed a wounded British soldier waving a white handkerchief in surrender. Boer horsemen immediately rode forward and called upon the scattered troops to surrender. Some soldiers continued firing. Most, however, eventually laid down their arms. A few escaped southwards.
Churchill was briefly aboard the escaping locomotive. After travelling roughly 500 yards south, he jumped down near the buildings where Haldane had intended the survivors to make another stand. He expected to find British soldiers rallying there. Instead, he found himself alone. He was confronted by two Boers and realised that he had left his Model 1896 Mauser pistol on the train engine while he had worked to free the wreckage. Churchill wrote “Death stood before me, grim sullen Death without his light-hearted companion, Chance”. He raised his hands and cried “Capivy”.17In the word ‘Capivy’, Churchill is referencing a well-known Victorian-era fox hunting novel ‘Handley Cross; or, Mr. Jorrocks’s hunt’ by Robert Surtees. The word is a Victorian slang word for ‘I confess’ or ‘I beg for mercy.’

Prisoner of the Boers
Taken into captivity
Fifty-six unwounded or slightly wounded British personnel were taken prisoner at the armoured train. Five were killed, ten seriously wounded were taken by the Boers to Ladysmith, and three severely wounded were kept with the Boer field ambulance. Of those who escaped, sixteen severely wounded were carried to safety on the train engine. Perhaps thirty unwounded men escaped of the 120 who had boarded the train that morning.
Churchill described being a prisoner, dependent for his continued existence on men who had moments before been trying to kill him, as an “extremely painful and humiliating experience.”18Churchill, London to Ladysmith via Pretoria, 98.
Journey through the Boer lines
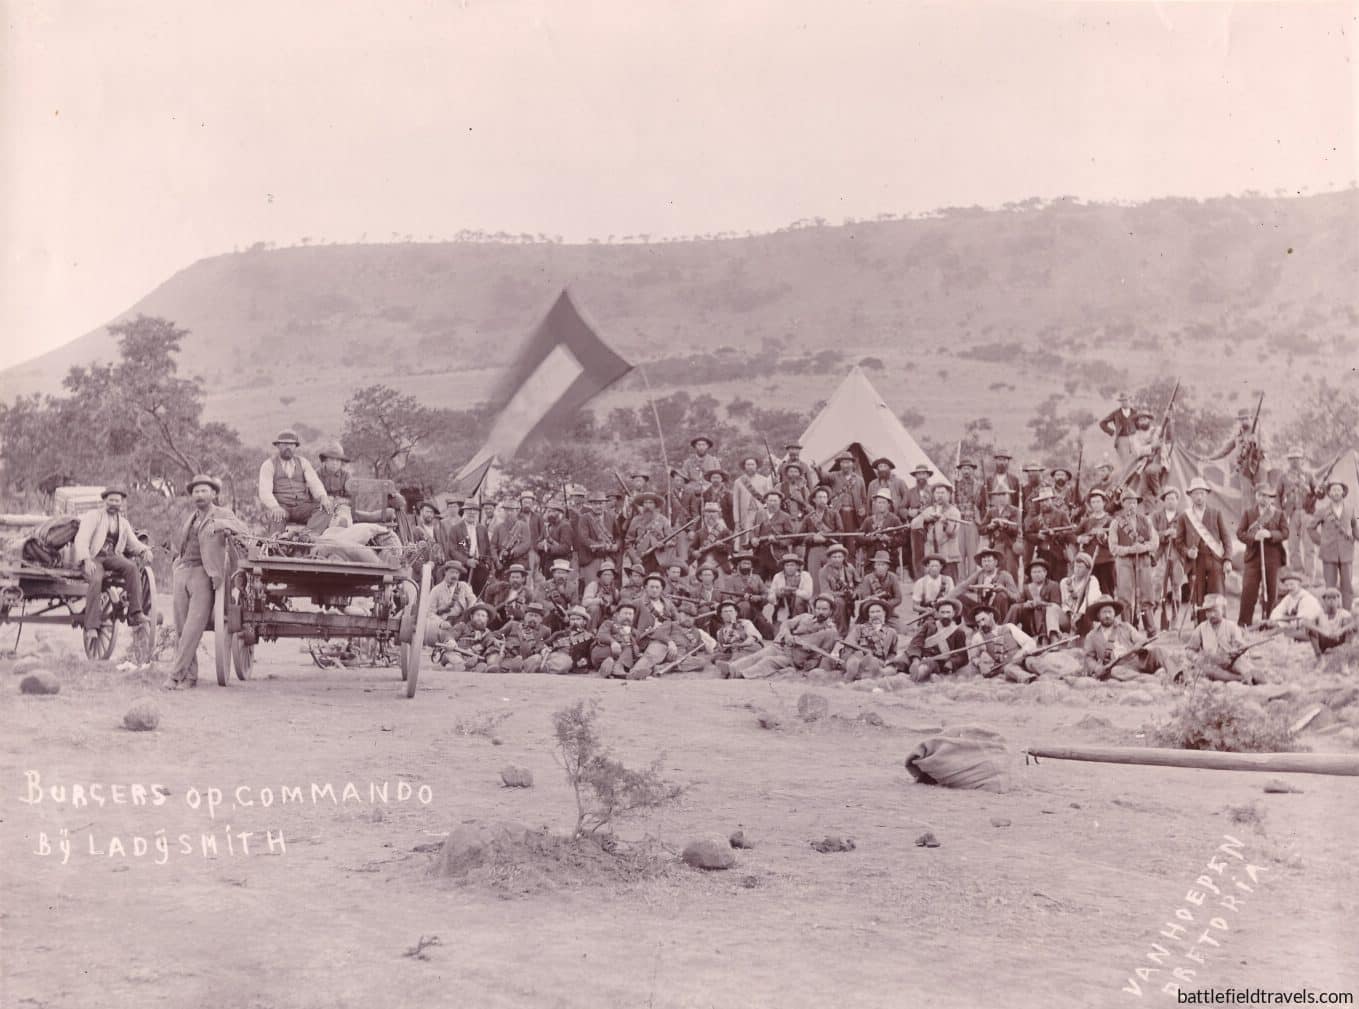
The prisoners were marched past the Boer artillery battery, and Churchill observed that the Boer attack had only involved about 300 men. As he marched further north, he saw that this had been only a detachment of a much larger Boer force he estimated to number about 3,000.19Churchill, London to Ladysmith via Pretoria, 102-103.
The prisoners halted for the night. Churchill presented his war correspondent credentials and requested to meet with General Joubert, the Boer commander. Some of the Boers recognised his name and asked if he was the son of Lord Randolph Churchill. Many of the Boers seemed particularly pleased to have the son of a British Lord as a prisoner. Churchill did not get his conversation with General Joubert, but he did engage with several English-speaking Boers, and came away with some admiration for the Boer spirit and commitment to their cause.20Churchill, London to Ladysmith via Pretoria, 104. Overnight, Churchill contemplated his first escape attempt—hiding beneath the forage scattered across the floor of the railway shed at Colenso and hoping the Boers would march away without counting their prisoners. But a guard entered before he could act.
The next morning, the prisoners recommenced their march northwards. They crossed the wagon bridge over the Tugela and progressed northwards through the Tugela Heights and into the hills. Breakfast consisted of scraps of the previous evening’s ox and rainwater collected from a puddle.
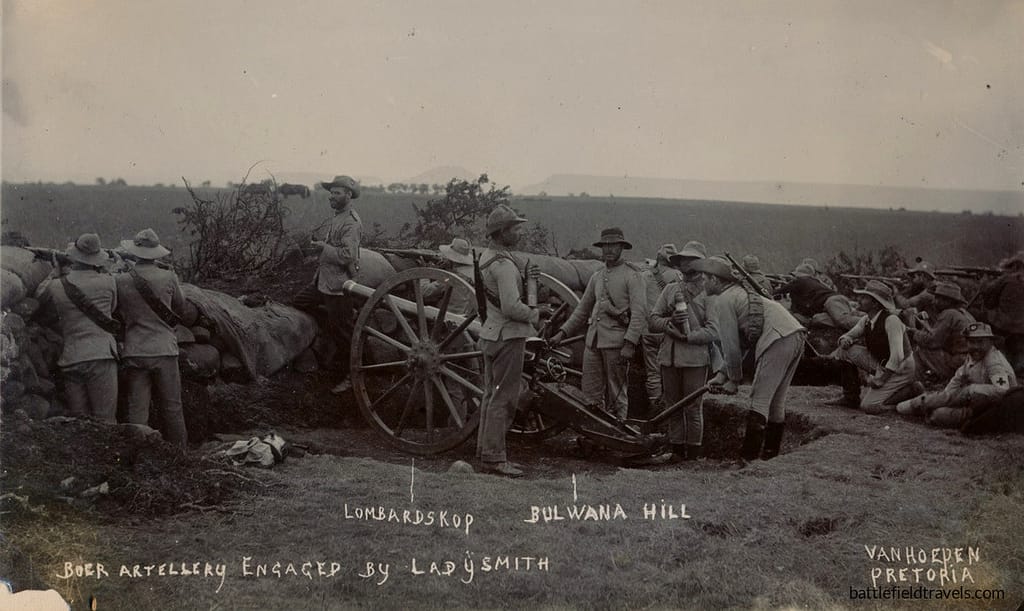
A tour through the Boer investment of Ladysmith
The column passed through Pieters and Nelthorpe towards the Boer investment lines around Ladysmith. As they moved deeper into the positions, groups of burghers gathered around the prisoners, questioning and teasing them about the course of the war. Haldane and Churchill could hear the heavy guns bombarding Ladysmith and see the smoke hanging over the surrounding heights.21James Aylmer Lowthorpe Haldane, How We Escaped from Pretoria (Edinburgh and London: William Blackwood and Sons, 1901), 6-12.
This was an unusual perspective on the siege. Only days earlier Churchill had been south of the Tugela trying to determine what the Boers were doing. Now, as their prisoner, he was walking directly through their positions.
The journey also began to change his impression of the enemy. Churchill had expected rough treatment. Instead, during the march from the battlefield a Boer had noticed him standing hatless in the rain and thrown him a captured British soldier’s cap. Churchill recorded his surprise that his captors were not the brutal figures he had expected from some of the pre-war British literature.
Churchill’s conversations with the Boers
There was plenty of confidence among the Boers. At the positions around Ladysmith, burghers predicted the imminent fall of the besieged town, as well as Mafeking and Kimberley. Churchill argued back, insisting that Britain possessed resources the republics could not ultimately match: “If necessary, they will send three hundred thousand men and spend a hundred millions”.22Churchill, London to Ladysmith via Pretoria, 116. The Boers remained supremely confident but asked, “Where is Buller?” and “When is Buller coming?” Churchill believed they might not be as confident of victory as they claimed.
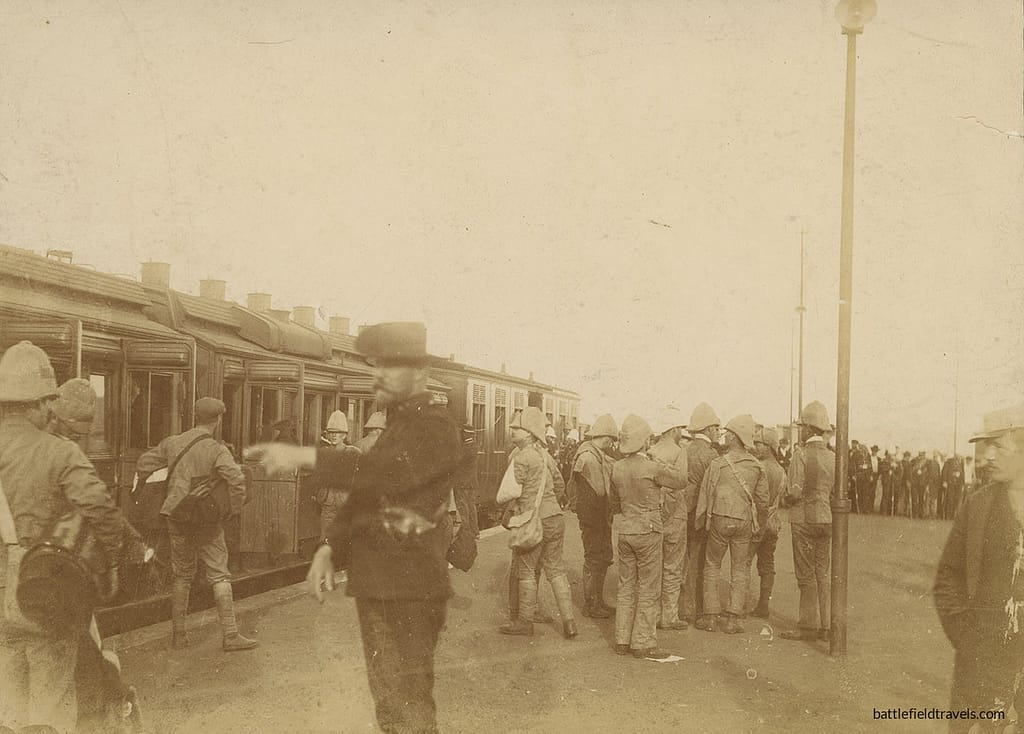
At Elandslaagte, the prisoners boarded a train for Pretoria. Captain Haldane pointed out to Churchill the ridge of Elandslaagte where a British force had defeated a Boer force of German and Dutch volunteers a few weeks earlier. Haldane had been lightly wounded in the battle. At several stops on the way to Pretoria, Churchill noted the efficiency of Boer mobilisation, including the militarised train stations that had been modified for loading and unloading mounted troops and their equipment.
Prisoner or War Correspondent?
Churchill argues his case
Churchill’s case was genuinely awkward. He was accredited to the Morning Post as a civilian correspondent. He had not fired a weapon during the Chieveley action and was unarmed when captured. The civilian railway officials and members of the breakdown gang who had worked alongside him to clear the wreck were not treated in the same way as combatants. Churchill therefore argued that he should also be released.
His case rested on a narrow distinction. He maintained that his activity during the battle had been confined to clearing the railway, the same essential task performed by the civilian railwaymen. He wrote to both the Transvaal Secretary of War and General Joubert arguing that because the railway workers were regarded as non-combatants, he should receive the same treatment.23Churchill, London to Ladysmith via Pretoria, 174-175.
The Boer authorities had an equally obvious counterargument. Churchill might not have fired a shot, but he had hardly behaved as a detached observer. He had worked with Haldane during the battle, organised men to clear the obstruction and played a conspicuous role in saving the locomotive and withdrawing wounded soldiers. His Mauser pistol, although left in the locomotive when he was captured, also complicated any claim of being an unarmed civilian correspondent.
And there was another factor. He was Winston Churchill, son of the late Lord Randolph Churchill. His identity had caused immediate excitement among his captors. Churchill himself suspected that the Boer authorities regarded him as a useful hostage rather than just another newspaper correspondent. His appeals achieved nothing while he remained in captivity.24Churchill, My Early Life, 258.
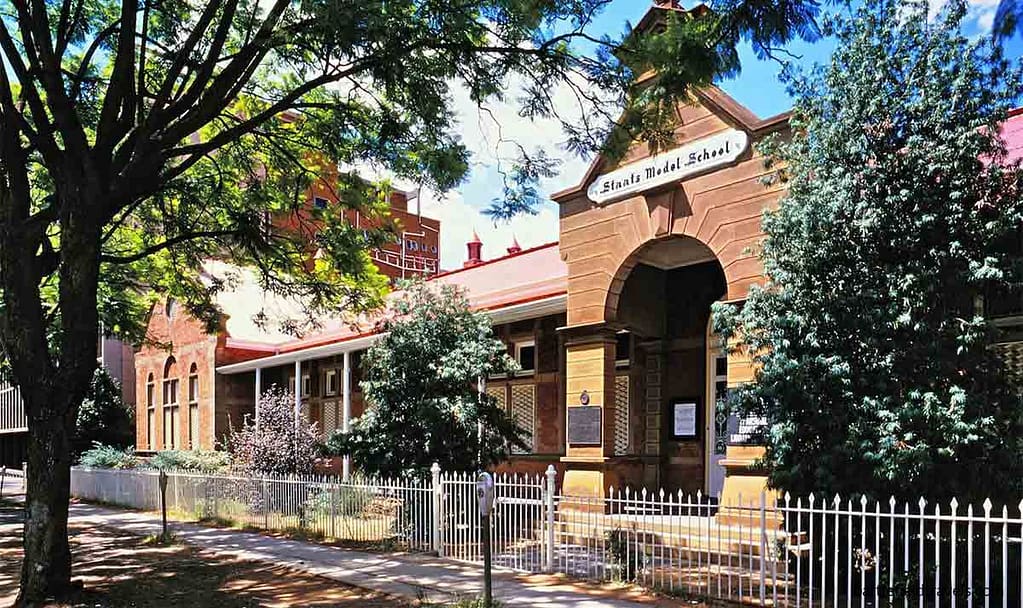
Officer’s prison camp at the Staats Model School
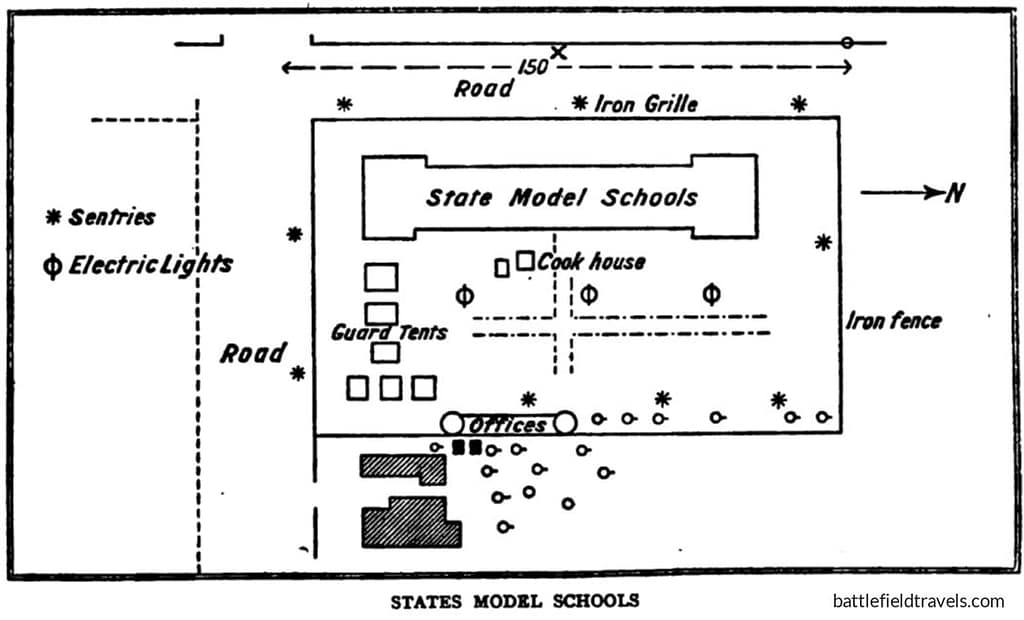
In Pretoria, Churchill and the captured British officers were confined in the Staats Model School. The school comprised twelve large classrooms of which seven or eight were occupied by British officer prisoners. The buildings were enclosed in a quadrangle bounded partly by an iron grille and partly by a corrugated-iron fence about ten feet high. Physically, Churchill thought the boundary presented little difficulty to a young and agile man.
The conditions were far from brutal. The officers were provided with a suit of clothes, new bedding and toiletries. With little convincing, Mr de Souza, the Boer Secretary of State for War, provided them with bottled beer and whiskey. Churchill later went out of his way to acknowledge that Boer treatment of the prisoners was humane. His objection was much simpler: he could not tolerate being confined while the war continued without him.25Churchill, London to Ladysmith via Pretoria, 152.
The problem was the guards. Armed sentries patrolled the inside of the perimeter at intervals of roughly fifty yards. Churchill considered bribery, but abandoned the idea after concluding that the guards could not be bought, at least not with the money available to him.
Almost from the moment of capture, escape became an obsession, “So I determined to take all hazards…”26Churchill, London to Ladysmith via Pretoria, 181. Churchill and other officers studied the sentries, their routes and their habits. Eventually they discovered a weakness. Near the school offices, the movements of the guards created brief moments when a short section of the perimeter wall could not be seen. It was not much of an opportunity, but it was enough.
Escape from Pretoria
Escape from the Staats Model School
By 12 December, Churchill had been a prisoner for almost a month. The first escape attempt had been planned for the previous evening, but the sentries refused to cooperate with the prisoners’ timetable. One guard remained directly opposite the only practical section of wall for two hours, and the attempt was abandoned. The following night Churchill concealed himself in one of the school offices and watched through a gap as the sentries moved around the quadrangle. Eventually two guards walked together and began talking with their backs turned.
It was the opportunity he had been waiting for. Churchill ran for the wall, hauled himself up and hesitated twice before finally committing himself. The sentries were only about fifteen yards away. He scrambled over the top and dropped into the garden of the neighbouring villa.27Churchill, London to Ladysmith via Pretoria, 185-186.
The escape plan, however, had scarcely extended beyond that point. Churchill had expected at least one other prisoner to follow him. Instead he found himself outside alone. Haldane’s attempt was blocked. By the time he attempted to follow Churchill, the sentry had returned to his post and remained there, watching the prisoners intently. Whatever arrangements had been made inside the prison had broken down almost immediately. Outside the wall, Churchill waited, but eventually had to decide whether to remain near the prison and risk recapture or continue alone. He chose to go.28Haldane, How We Escaped from Pretoria, 32.
On the streets of Pretoria
Passing within only a few yards of a sentry who probably knew him by sight, Churchill simply walked away. After about a hundred yards with no challenge behind him, he realised that he was genuinely free. For the moment.
Pretoria itself was still full of armed burghers. Churchill adopted the improbable tactic of walking openly down the middle of the streets, humming as he went, rather than trying to skulk through the shadows. Nobody challenged him. Gradually he reached the outskirts of the town and stopped to consider his situation. It was not encouraging.
Nearly 300 miles separated Pretoria from Delagoa Bay and Portuguese territory. He had no map, no compass, little food and could speak neither Dutch nor any African language. The items intended to support the escape, including his compass and provisions, remained with his companions inside the Staats Model School. Churchill quickly realised that walking nearly 300 miles was unrealistic. His new plan was simple in conception and extremely dangerous in execution: board the first moving train heading in approximately the right direction.30Churchill, London to Ladysmith via Pretoria, 191.
Churchill’s train journey
Stowaway
After walking for roughly two hours, he saw the signals of a station and hid beside the track, reasoning that a departing train would still be moving slowly enough for him to jump aboard.
Eventually a goods train appeared. Churchill waited for the locomotive to pass, ran alongside the wagons and grabbed for a handhold. He missed the first time but finally caught hold and pulled himself onto a wagon, concealed himself amongst the cargo of sacks, and fell asleep. During the night, he decided to leave the train, hide during the daylight hours, and board another train later. Before dawn broke, he climbed back onto the couplings and jumped. When daylight broke, he was relieved to find that the train had been running east towards the rising sun and Portuguese territory. He had found the right line.31Churchill, London to Ladysmith via Pretoria, 195.

Hiding by day, moving by night
Churchill found water in a gully and then climbed into a small grove overlooking the railway, where he remained hidden for the entire day. He had no idea where he was. That, as Churchill observed, had one advantage: neither did anybody looking for him.
From his hiding place he watched trains moving through the valley and identified a steep gradient where they slowed sufficiently to offer another opportunity to climb aboard. The day became a contest between concealment, thirst and impatience. He had only a few slabs of chocolate for food, and the heat became oppressive. A large vulture circling nearby provided what Churchill considered an unnecessarily ominous companion.
At darkness he returned to the railway and waited. No train came. Churchill eventually concluded, correctly he later learned, that the train he had boarded outside Pretoria was the only regular night service. He therefore began walking east along the line. Every bridge was guarded. Railway huts, settlements and stations forced him to make repeated detours across the veldt. The full moon made concealment difficult, while wet grass, bogs and long periods without food rapidly exhausted him.32Churchill, London to Ladysmith via Pretoria, 198-200.
Churchill’s escape is detected
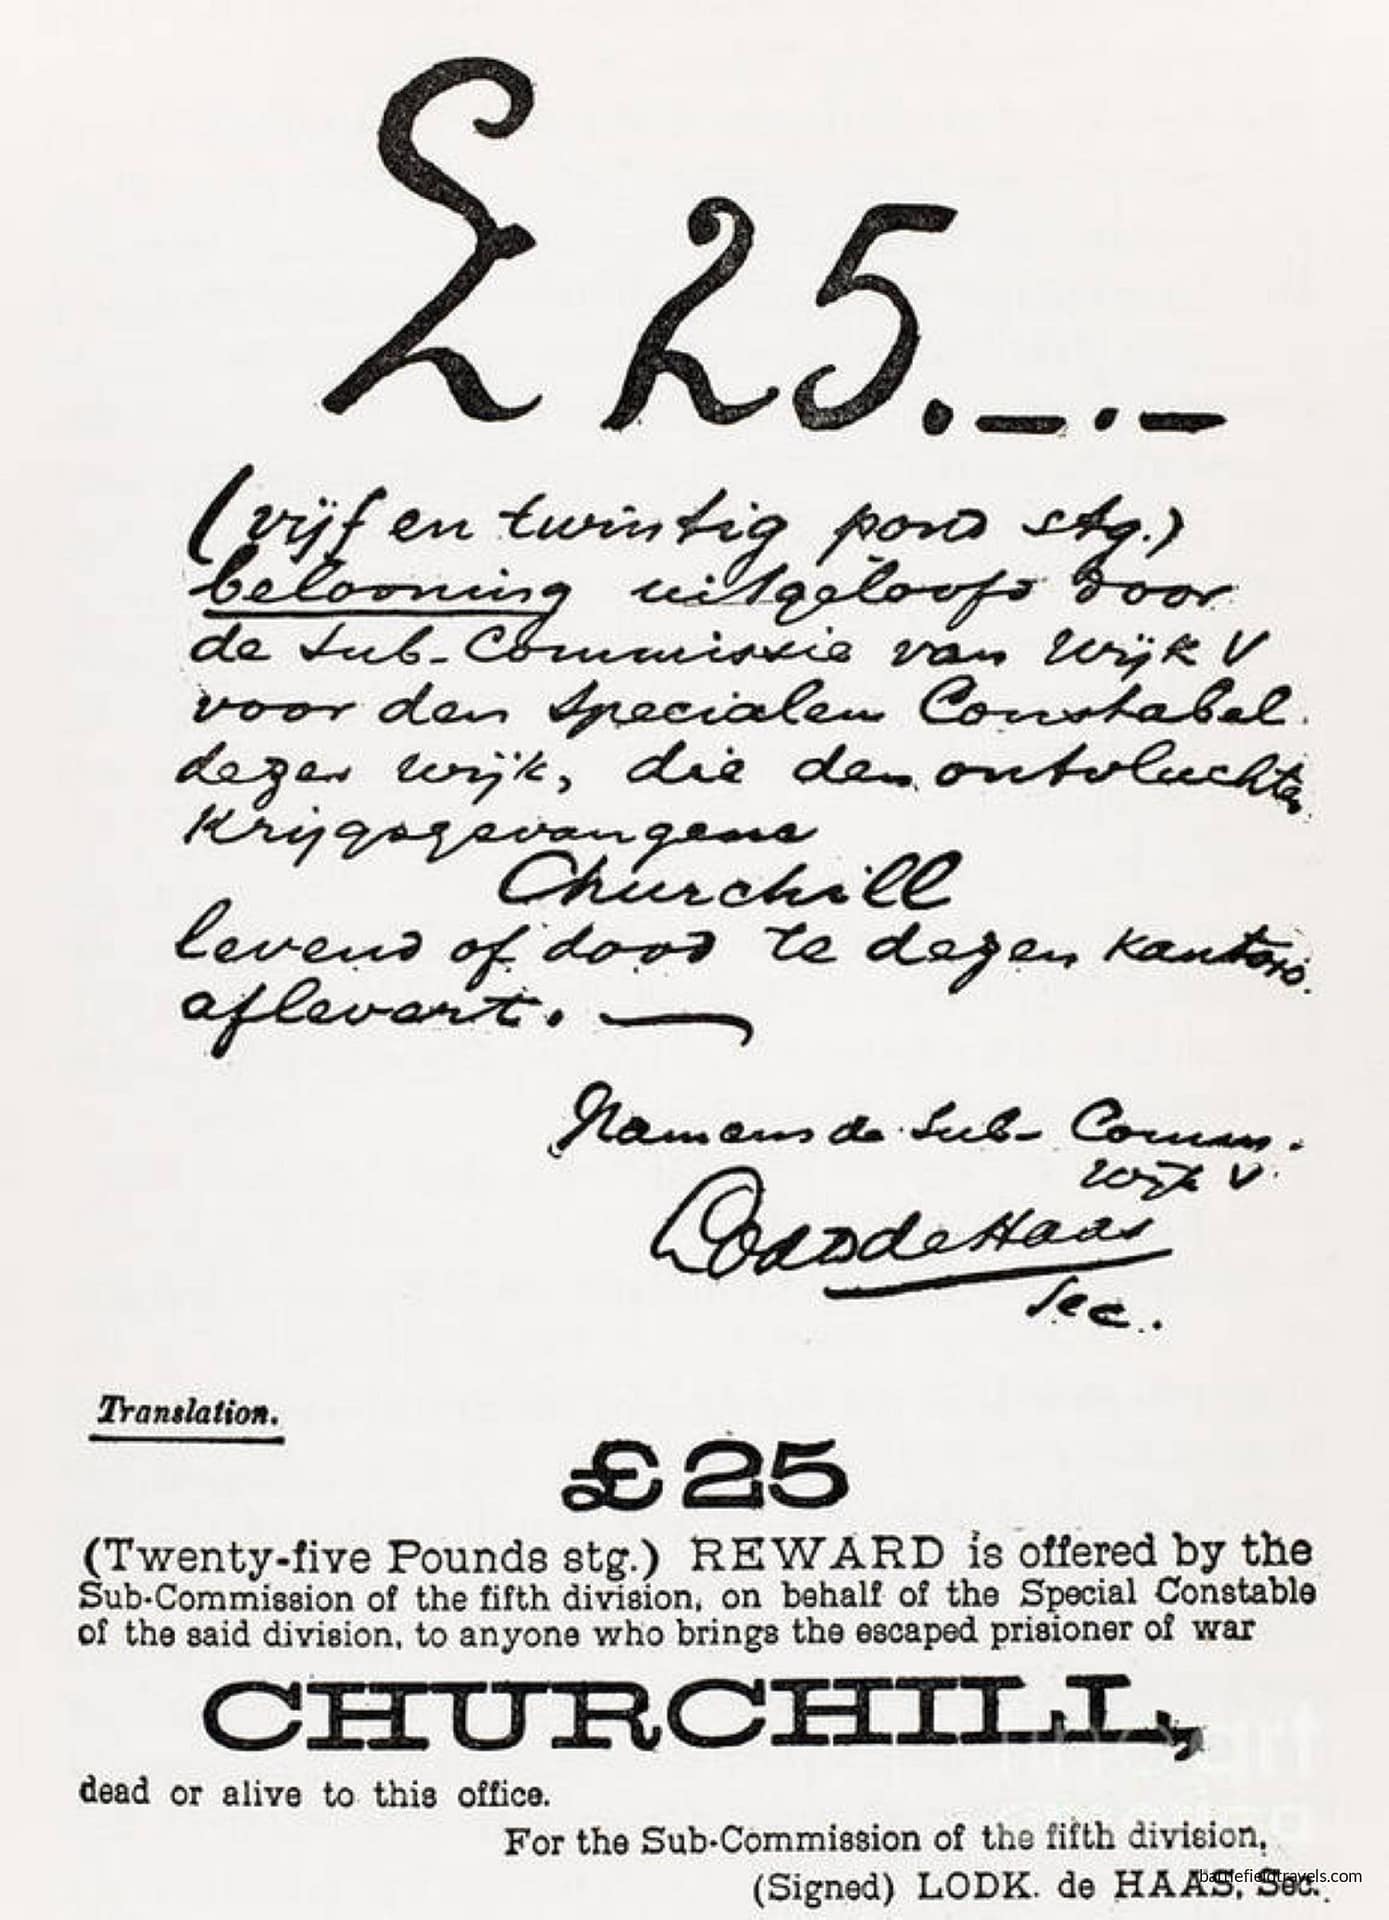
Meanwhile, the Boers had discovered his escape. Telegram messages containing his description went out along the railway system. Churchill later wrote that thousands of photographs were circulated and trains were searched as the authorities tried to prevent him reaching Portuguese territory.
Churchill continued east. By his contemporary account, he spent several days moving mostly at night, obtaining food where he could and hiding during daylight. By the fifth day he believed he had passed Middelburg and was somewhere along the railway towards Lourenço Marques (now Maputo), capital of Portuguese East Africa.
At this point, however, there is an important limitation in Churchill’s 1900 account. He deliberately withheld a crucial part of the escape story. In the introductory note to London to Ladysmith via Pretoria, Churchill explained that the safety of another man depended on his silence, and that he had therefore omitted “an essential part” of the escape.33Churchill, London to Ladysmith via Pretoria, viii. He promised to fill the gap only after British forces had occupied Bloemfontein and Pretoria and the individual concerned was no longer at risk. That missing episode is precisely the part involving the assistance that ultimately enabled Churchill to complete his escape.
John Howard and the mine
A stroke of good fortune
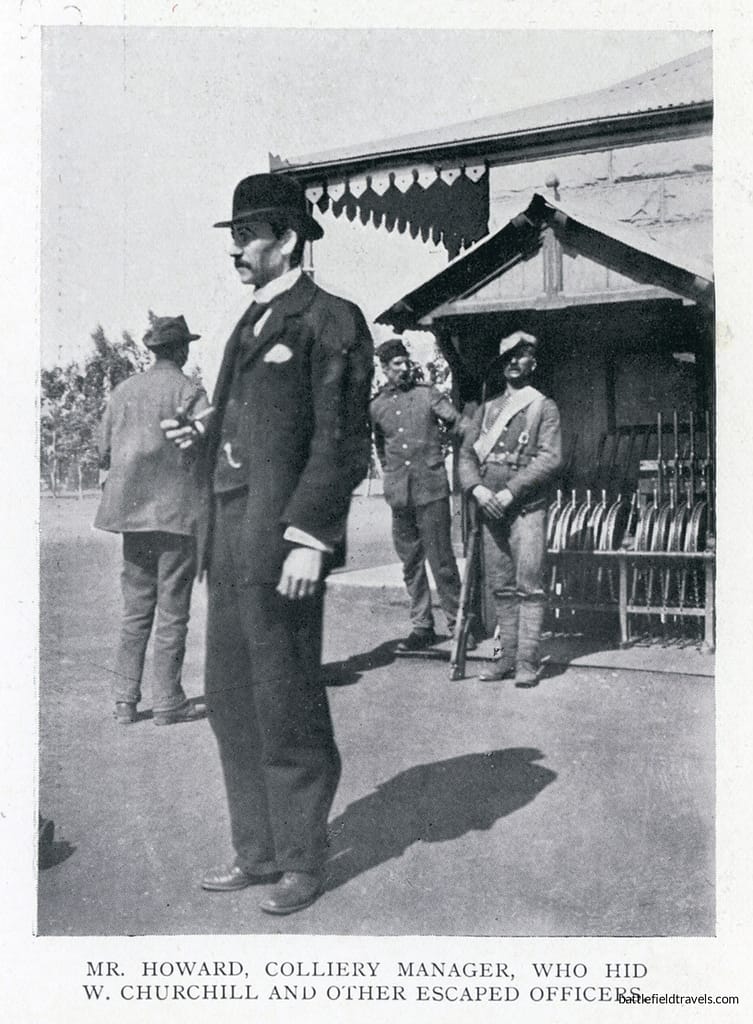
The man Churchill could not identify in 1900 was Mr John Howard, the British manager of the Transvaal and Delagoa Bay Colliery. After leaving the railway and spending days moving eastwards, Churchill eventually approached Howard’s house in the Witbank district. By extraordinary good fortune, he had found one of the relatively few men in the Transvaal both willing and able to help him.34Churchill, My Early Life, 282.
Hiding out in the mine
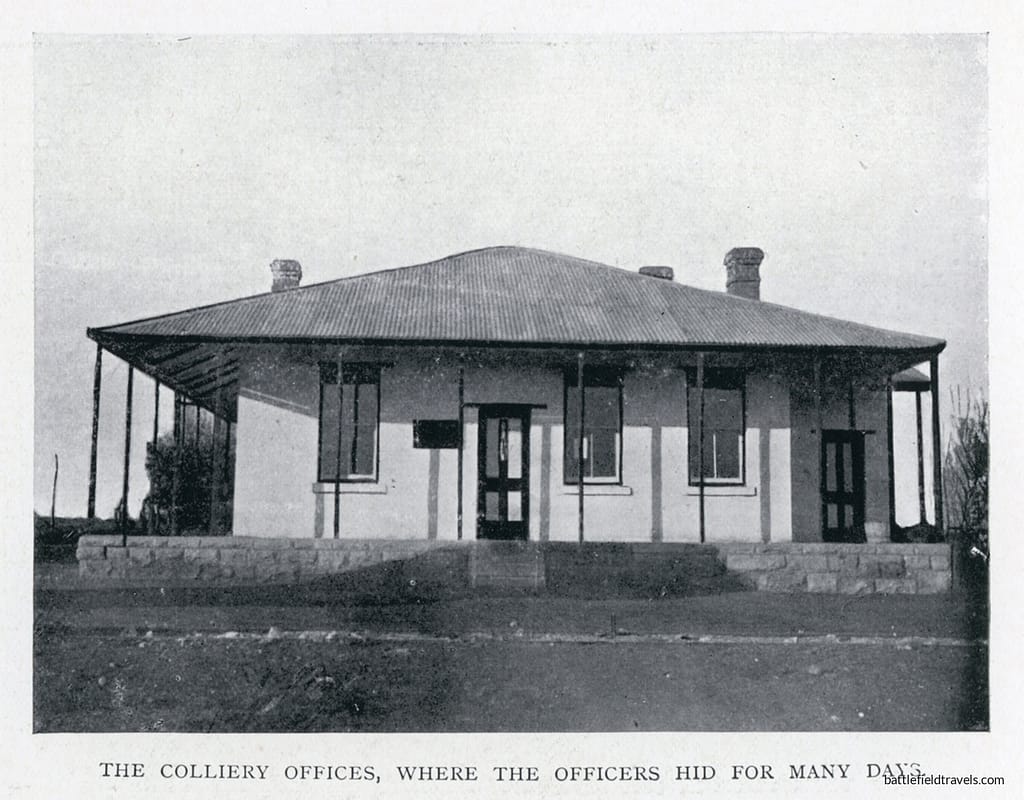
Churchill was taken into the mine workings and concealed underground, where he spent roughly a day and a half in a newly constructed stable intended for pit ponies. Howard later brought him food and books, while plans were made to move him farther east without attracting attention.35Churchill, My Early Life, 286.
The mine gave Churchill something he had lacked since leaving Pretoria: a secure hiding place. It also gave him allies. Howard enlisted the help of local storekeeper Charles Burnham, and arrangements were eventually made to smuggle Churchill aboard a freight train heading towards Lourenço Marques in Portuguese East Africa. Churchill had escaped from Pretoria by train. Now another train would carry him out of the Transvaal.
Train to Portuguese East Africa
On 19 December Churchill was concealed aboard a goods train leaving Witbank. He was hidden in a hole between wool bales at the end of a truck, just wide enough for him to squeeze into. By hiding Churchill within a commercial consignment, it was hoped the train could pass Boer searches without revealing its passenger.36Churchill, My Early Life, 292.
For the next stage of the journey he was entirely dependent on the railway continuing east and on the search parties failing to discover him. The Boer authorities were now actively hunting for their most famous escaped prisoner. His description had been circulated along the railway, trains were being searched, and reports of the escape had attracted considerable public attention. And yet the freight train continued towards the frontier.
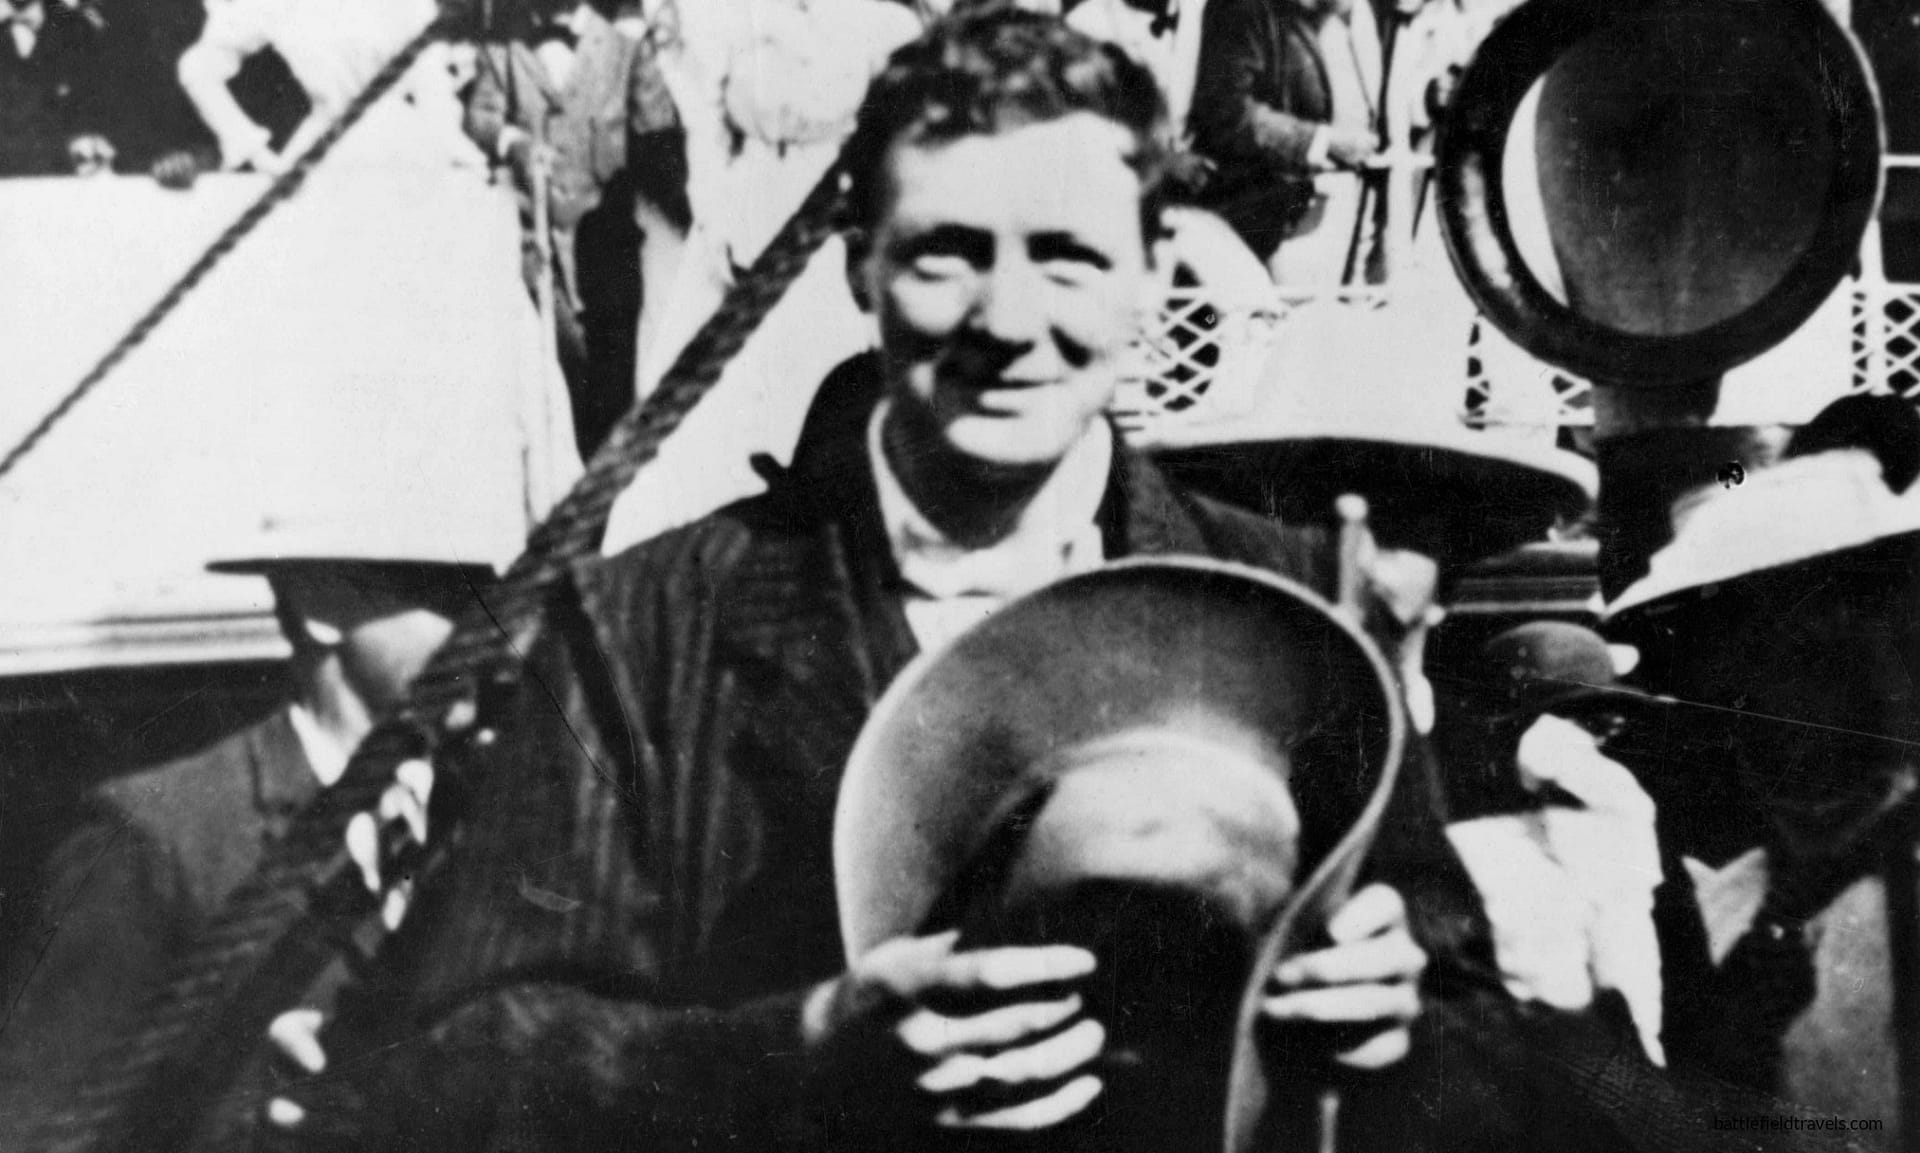
On 21 December 1899, Churchill crossed into Portuguese East Africa and arrived at Lourenço Marques. He made his way to the British Consul and asked to meet with the Secretary, who was absolutely not expecting to see him. He had escaped the South African Republic. Two days later he was back in British territory at Durban. The armoured-train incident had begun as a failed reconnaissance patrol outside Chieveley. Five weeks later it had become an international adventure story.37Churchill, My Early Life, 296.
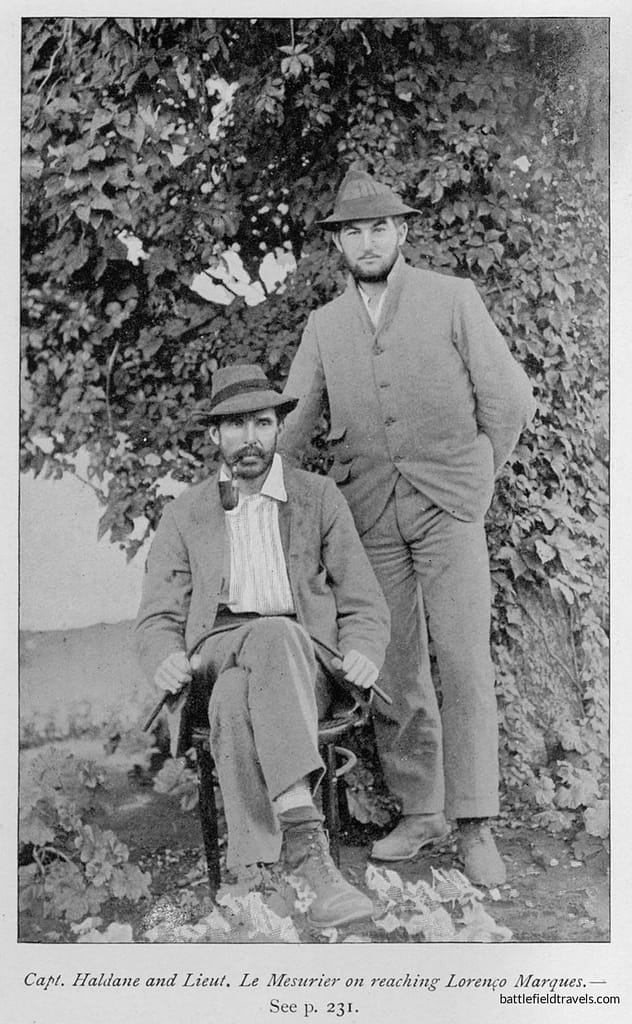
Postscript: Captain Haldane and Lieutenant Le Mesurier escape
After Winston Churchill’s escape, security at the Staats Model School was tightened, but the that did not inhibit further escape attempts. On 27 February 1900, Captain Aylmer Haldane of the Gordon Highlanders, Lieutenant Le Mesurier of the Dublin Fusiliers, and Sergeant Major Brockie of the Imperial Light Horse successfully escaped and made their way via a similar route to Churchill, including being hidden by Mr John Howard at the Colliery House.38Haldane, How We Escaped from Pretoria, 103-113.
The Churchill legend
The armoured train incident in Churchill’s mythos
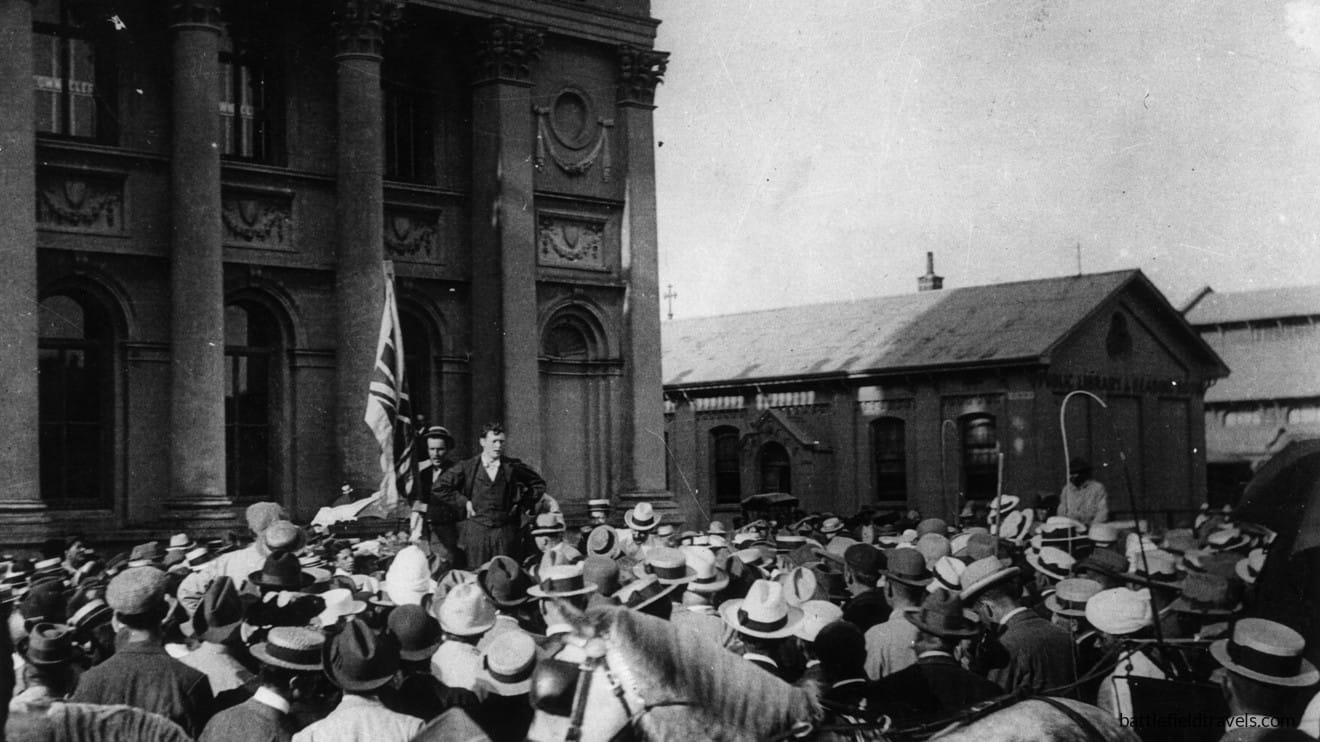
When Churchill returned to Natal, his reputation was more than just a correspondent who had escaped from captivity. He was now a public figure whose exploits were already being reported across the Empire. He recorded that “I reached Durban to find myself a popular hero.”39Churchill, My Early Life, 297. The episode contained almost every ingredient that would later define the popular image of Churchill: personal danger, physical courage, improvisation, enormous self-confidence, a willingness to ignore conventional boundaries, and an extraordinary capacity to turn misfortune into opportunity. There was also a considerable element of luck.
At Chieveley, Churchill survived artillery and rifle fire, escaped injury while clearing the wreckage and then happened to leave his pistol in the locomotive before being captured. In Pretoria he crossed the prison wall at the one moment the guards were looking elsewhere. Outside the city he found the correct railway without a map. He managed to board a moving freight train in darkness. Most remarkably of all, when he finally sought help, he happened upon the house of one of the relatively few British citizens still in a position to assist him.
Churchill himself never disguised the role of chance in the adventure. But chance alone does not explain it. He repeatedly placed himself in situations where chance had an opportunity to work. That combination—risk, improvisation and extraordinary good fortune—became part of the Churchill story long before Downing Street and the Second World War.
Churchill returns to the war
There is one final twist. When Churchill returned to Natal, he went back to the war rather than home.
Six weeks after the Chieveley ambush he arrived again at Frere. His tent was pitched beside the same railway cutting down which he had fled from Boer marksmen, only about fifty yards from the place where he had surrendered. The hills that had been covered with Boer riflemen in November were now occupied by British pickets, while a large British army filled the surrounding ground. He had come full circle. And within weeks he would be watching another British disaster unfold in the Battle of Spion Kop.
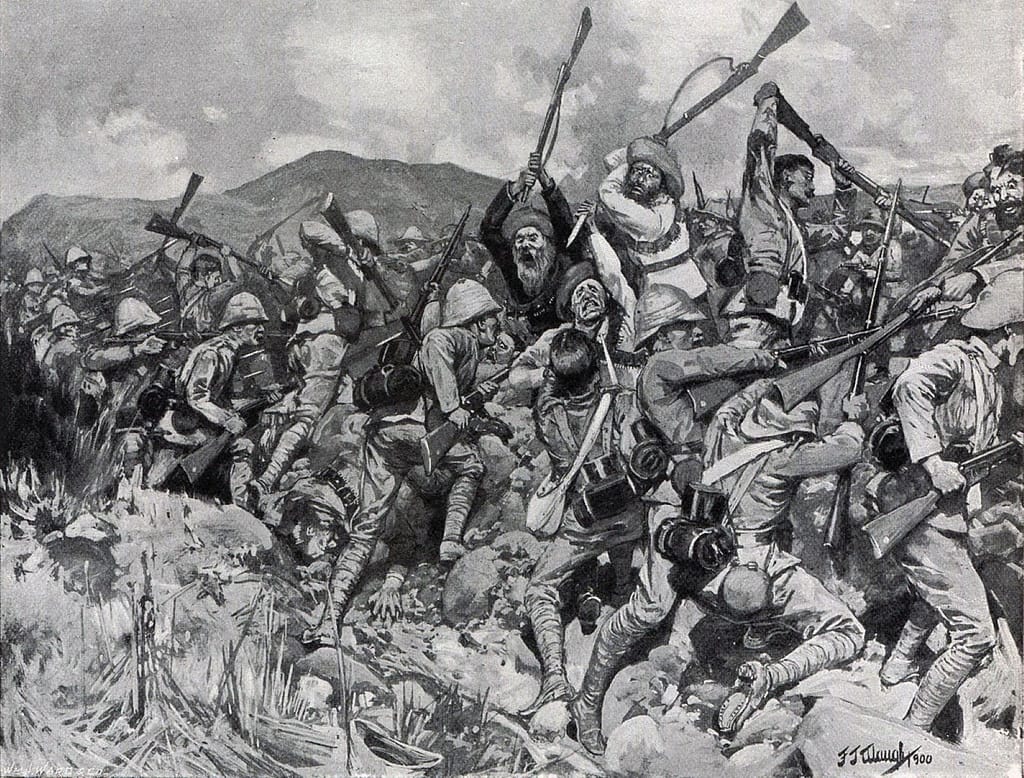
Battlefield Today – Churchill and the Armoured Train
Walking the ground at Chieveley
June 2011. Chieveley, KwaZulu-Natal. More than a century after the ambush, I came to Chieveley to find the ground for myself. This is not one of the great battlefields of the Anglo-Boer War. There are no sweeping defensive positions like Spion Kop, no vast battlefield spread across kilometres of ridges and kopjes. The action was concentrated around a railway line, a bend in the track and the low rolling ground surrounding it. But that is precisely what makes Chieveley interesting.
Standing beside the railway, the first thing that struck me was how ordinary the terrain appeared. The country is open and gently undulating, broken by low rises and shallow folds in the ground. Churchill had described this same landscape in November 1899 as “open, undulating, and grassy.” More than a century later, that was still an apt description.
The distinct vulnerability of an armoured train
Conceptually, it is easy to appreciate the great mobility an armoured train offered by comparison with the walking infantryman or the riding cavalryman. However, while the train could move quickly, it was constrained to an entirely predictable rail line. The surrounding veldt belonged to the Boers. Mounted men could disappear behind a low rise, move parallel to the railway unseen, and reappear farther along the line.
Churchill had experienced exactly that. On the outward journey towards Chieveley, the countryside appeared deserted. Boer commandos were nevertheless moving behind the folds of ground. Once the train had passed, they could occupy the railway behind it and prepare the obstruction that would turn its speed against it.
Walking the site as a military officer, I found myself looking less at the railway line and more at those low rises around it. None of them are particularly dramatic. They do not need to be. A few metres of vertical separation are enough to conceal mounted men from observers travelling along the railway. Once the train reversed towards Frere, the Boers controlled both the surrounding terrain and the point through which the British had to pass. The train had nowhere else to go.
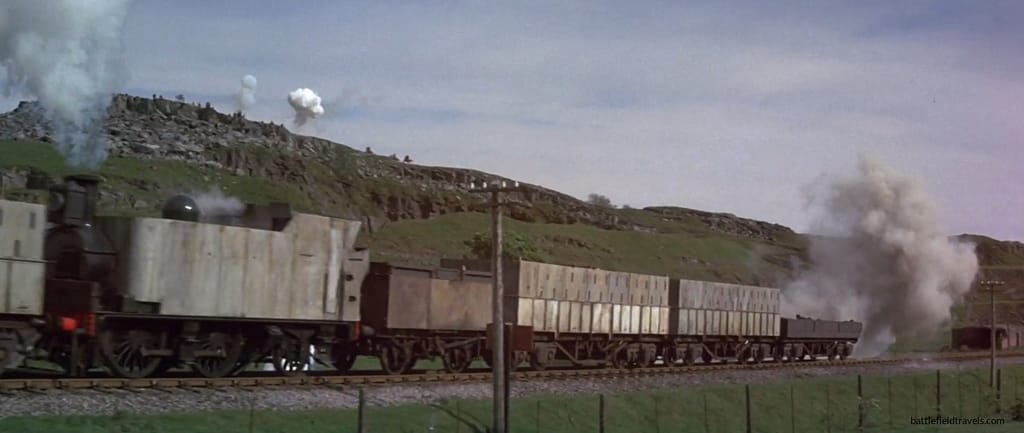
Young Winston depiction versus the actual terrain
There was another reason I wanted to see Chieveley. Like many of my generation, one of my visual impressions of the incident came from the 1972 film Young Winston, starring Simon Ward as the young Churchill. It provides a wonderfully dramatic depiction of the armoured-train ambush. The railway appears confined within a substantial cutting, with Boer riflemen and artillery dominating the British from the heights above.
Standing at Chieveley, I realised that the landscape was nothing like that. There are local depressions and changes in level along the railway. Churchill himself described scrambling from a railway cutting into a small hollow while attempting to escape. But the battlefield is not the deep, dominating corridor portrayed in the film. The wider terrain is far more open and subtle.
The Boers did not require spectacular commanding heights. They exploited small folds in otherwise open country, the fixed alignment of the railway, and the predictable reaction of a train suddenly coming under fire. Once the wagons derailed, the British advantage in speed was immediately nulled.
Finding Churchill at Chieveley
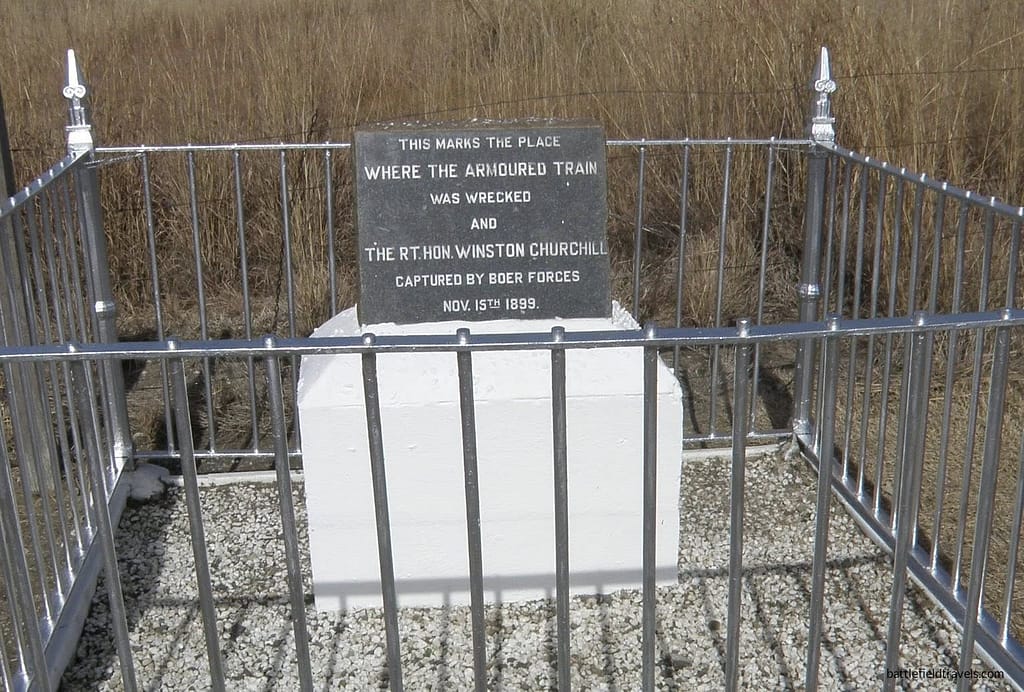
Today, a memorial beside the railway recalls Churchill’s involvement in the incident. I stopped there during my visit, photographed the monument and walked around the surrounding ground trying to relate what I could see to the descriptions of November 1899. I remember thinking at the time that there was something slightly incongruous about finding a memorial to Winston Churchill in this quiet corner of KwaZulu-Natal.
In November 1899 Churchill was not yet the statesman whose name would become inseparable from the Second World War. He was 24 years old, ambitious, adventurous and working as a newspaper correspondent. Here, beside this railway, he helped clear a wrecked train under Boer artillery and rifle fire, was captured, and began a chain of events that would transform him into a public figure. His imprisonment and escape ensured that the story became part of the Churchill legend.
Found this useful? Buy me a coffee — it helps fund future battlefield research


Authored by Mick Prictor, a retired military officer with 40 years’ service, and a military historian specialising in terrain-focused analysis of tactics, doctrine, and command decision-making in land warfare. His work draws on extensive battlefield fieldwork—more than 280 sites worldwide—and one of the world’s largest private collections of historic military arms, uniforms, and equipment. About me
📚 Notes and References
Notes
- 1Winston Spencer Churchill, London to Ladysmith via Pretoria (London: Longmans, Green and Co., 1900), 49-50. ↩︎
- 2Churchill, London to Ladysmith via Pretoria, 51. ↩︎
- 3Churchill, London to Ladysmith via Pretoria, 52. ↩︎
- 4Churchill, London to Ladysmith via Pretoria, 53. ↩︎
- 5Churchill, London to Ladysmith via Pretoria, 54. ↩︎
- 6Churchill, London to Ladysmith via Pretoria, 77. ↩︎
- 7A. C. Martin, The Durban Light Infantry: The History of the Durban Light Infantry, Incorporating That of the Sixth South African Infantry, 1915–1918, vol. 1, 1854–1934 (Durban: Headquarter Board of the Durban Light Infantry in cooperation with the Regimental Association, 1969), 61. ↩︎
- 8Churchill, London to Ladysmith via Pretoria, 78. ↩︎
- 9Churchill, London to Ladysmith via Pretoria, 79. ↩︎
- 10Winston S. Churchill, My Early Life: A Roving Commission (London: Thornton Butterworth, 1930), 245. ↩︎
- 11Churchill, London to Ladysmith via Pretoria, 82. ↩︎
- 12Churchill, London to Ladysmith via Pretoria, 84. ↩︎
- 13Churchill, My Early Life, 249. ↩︎
- 14Churchill, My Early Life, 251. ↩︎
- 15Churchill, London to Ladysmith via Pretoria, 91. ↩︎
- 16Churchill, My Early Life, 249. ↩︎
- 17In the word ‘Capivy’, Churchill is referencing a well-known Victorian-era fox hunting novel ‘Handley Cross; or, Mr. Jorrocks’s hunt’ by Robert Surtees. The word is a Victorian slang word for ‘I confess’ or ‘I beg for mercy.’ ↩︎
- 18Churchill, London to Ladysmith via Pretoria, 98. ↩︎
- 19Churchill, London to Ladysmith via Pretoria, 102-103. ↩︎
- 20Churchill, London to Ladysmith via Pretoria, 104. ↩︎
- 21James Aylmer Lowthorpe Haldane, How We Escaped from Pretoria (Edinburgh and London: William Blackwood and Sons, 1901), 6-12. ↩︎
- 22Churchill, London to Ladysmith via Pretoria, 116. ↩︎
- 23Churchill, London to Ladysmith via Pretoria, 174-175. ↩︎
- 24Churchill, My Early Life, 258. ↩︎
- 25Churchill, London to Ladysmith via Pretoria, 152. ↩︎
- 26Churchill, London to Ladysmith via Pretoria, 181. ↩︎
- 27Churchill, London to Ladysmith via Pretoria, 185-186. ↩︎
- 28Haldane, How We Escaped from Pretoria, 32. ↩︎
- 29Churchill, London to Ladysmith via Pretoria, 182. ↩︎
- 30Churchill, London to Ladysmith via Pretoria, 191. ↩︎
- 31Churchill, London to Ladysmith via Pretoria, 195. ↩︎
- 32Churchill, London to Ladysmith via Pretoria, 198-200. ↩︎
- 33Churchill, London to Ladysmith via Pretoria, viii. ↩︎
- 34Churchill, My Early Life, 282. ↩︎
- 35Churchill, My Early Life, 286. ↩︎
- 36Churchill, My Early Life, 292. ↩︎
- 37Churchill, My Early Life, 296. ↩︎
- 38Haldane, How We Escaped from Pretoria, 103-113. ↩︎
- 39Churchill, My Early Life, 297. ↩︎
Sources on Churchill and the Armoured Train
Primary Sources – Memoirs and Published Personal Accounts
- Churchill, Winston Spencer. London to Ladysmith via Pretoria. London: Longmans, Green and Co., 1900.
- Churchill, Winston S. My Early Life: A Roving Commission. London: Thornton Butterworth, 1930.
- Haldane, James Aylmer Lowthorpe. How We Escaped from Pretoria. Edinburgh and London: William Blackwood and Sons, 1901.
- Official Despatches of General Sir Redvers Buller, in The London Gazette, March 1900.
- War Office. The Times History of the War in South Africa, 1899–1902, Vol. III (London: Sampson Low, 1906).
- Photographic archive: Ladysmith Siege Museum, KwaZulu-Natal; contemporary press images from Illustrated London News, Feb 1900.
Secondary Sources
- Burleigh, Bennet. The Natal Campaign (London: Chapman and Hall, 1900)
- Conan Doyle, Arthur. The Great Boer War (New York: McClure, Phillips & Company, 1902)
- Farwell, Byron. The Great Anglo-Boer War (New York: Harper & Row, 1976).
- Martin, A. C. The Durban Light Infantry: The History of the Durban Light Infantry, Incorporating That of the Sixth South African Infantry, 1915–1918. Vol. 1, 1854–1934. Durban: Headquarter Board of the Durban Light Infantry in cooperation with the Regimental Association, 1969.
- Nasson, Bill. The War for South Africa: The Anglo-Boer War 1899–1902 (Cape Town: Struik, 1999).
- Pakenham, Thomas. The Boer War (London: Weidenfeld & Nicolson, 1979).
- Surtees, Robert Smith. Handley Cross; or, Mr. Jorrocks’s Hunt. London: Bradbury, Agnew & Co., 1874.
Digital and Mapping Sources
- Google Earth Pro terrain data and historical overlays created by the author (June 2011 survey).
- OpenStreetMap contributors, KwaZulu-Natal Topography and Road Network, accessed 2025.
📚 Further Reading
This battle study nests within the broader analytical framework explored in the Research Hub, where operational methods, operating environments, armies, commanders, and weapons are examined across conflicts and eras. The links below connect related studies across the wider body of battlefield analysis on the BattlefieldTravels site.
⚔️ Explore all battle studies from the Anglo-Boer War 1899-1902
🏛️ Explore the museum of Anglo-Boer War historic artefacts
The book list for this conflict includes the leading campaign studies, memoirs, and operational analyses of the Anglo-Boer War, selected to complement this battlefield study.
📚Anglo-Boer War – Recommended Reading
🗞️ For updates on new battlefield studies and research insights, you can subscribe to the Newsletter.
You may also like


🧭 Battlefield Travel Guide: Armoured Train Ambush at Chieveley, Natal (15 November 1899)
- Location: Chieveley–Colenso area, KwaZulu-Natal, South Africa — beside the historic railway between Estcourt and Colenso.
- Coordinates (Armoured Train Incident): 28°52′30.31″ S, 29°46′12.94″ E (approximately 28.8751° S, 29.7703° E).
Getting There
- The ambush site lies between Estcourt and Colenso, close to the R103 and the old Estcourt road. From the R103, turn towards the railway near Chieveley and follow the local road towards the battlefield marker.
- The site is easily combined with the Colenso battlefields to the north. Colenso is approximately 20 km south of Ladysmith and 40 km north of Estcourt.
- For a wider battlefield visit, Ladysmith makes a useful base for exploring Colenso, the Tugela battlefields and the sites associated with the siege and relief of Ladysmith.
Site Orientation
- Armoured Train Incident: a roadside plaque marks the area of the 15 November 1899 ambush. The railway remains the essential feature for understanding the action: the British patrol had travelled north through Frere and Chieveley before being attacked on its return towards Estcourt.
- Ambush terrain: study the railway, curves, cuttings and surrounding hills. The confined railway corridor demonstrates the vulnerability of an armoured train operating without mounted scouts on either flank.
- Chieveley: the nearby railway station and military cemetery help place the action within the wider British operations south of the Tugela during the opening phase of the Natal campaign.
- Colenso: continue north to the Tugela River to examine the ground over which General Sir Redvers Buller made his first major attempt to relieve Ladysmith on 15 December 1899.
Museums & Visitor Centres
- KwaZulu-Natal Battlefields Route: useful regional information for the Armoured Train Incident, Colenso, Ladysmith and the wider Tugela campaign.
- Ladysmith Siege Museum: the principal museum for understanding the Siege of Ladysmith and Buller’s attempts to break through the Boer positions along the Tugela. Its collections include maps, photographs, weapons and material relating to the 1899–1900 campaign.
- Colenso: several battlefield sites, monuments, cemeteries and surviving features around the town interpret Buller’s failed attack of 15 December 1899.
On-Site Experience
- The Armoured Train Incident site has limited on-site interpretation. The principal value is reading the surviving railway and surrounding terrain against Churchill’s and Haldane’s accounts of the ambush.
- Follow the railway corridor north towards Chieveley to understand the route taken by the patrol and why the train was so vulnerable once the Boers occupied the surrounding high ground and obstructed the railway behind it.
- At Colenso, visit the British gun positions and Clouston Koppie and study the Tugela River line. The ground provides excellent context for the military situation that had produced the armoured-train reconnaissance a month earlier.
- In Ladysmith, visit the siege positions around the town and the Platrand at Wagon Hill and Caesar’s Camp. These sites place Churchill’s capture within the larger story of the Boer investment of Ladysmith and the British campaign to relieve it.
Nearby Points of Interest
- Colenso Battlefield: scene of Buller’s disastrous first attempt to relieve Ladysmith on 15 December 1899. Important sites include the British gun positions, Clouston Koppie, Ambleside Military Cemetery and the Tugela crossings.
- Chieveley Military Cemetery: associated with No. 4 Stationary Hospital and containing the grave of Lieutenant Freddie Roberts VC, mortally wounded attempting to recover the abandoned British guns at Colenso.
- Ladysmith: the besieged town around which the Natal campaign revolved. The Siege Museum provides an excellent starting point before exploring surviving defensive positions.
- Wagon Hill & Caesar’s Camp: positions on the Platrand attacked by Boer forces on 6 January 1900; surviving battlefield features and memorials overlook Ladysmith.
- Spion Kop: west of Ladysmith and Colenso, scene of Buller’s second major attempt to break the Boer line in January 1900.
- Tugela Heights: the extensive battlefield east of Colenso where Buller finally broke through the Boer positions in February 1900, leading to the relief of Ladysmith.
Practical Tips
- The armoured-train site itself is a short visit; allow additional time to examine the railway and surrounding ground rather than expecting a developed battlefield park or visitor centre.
- Colenso and Ladysmith greatly expand the value of the visit. Allow at least half a day for the principal Colenso sites and additional time for the Ladysmith Siege Museum and surrounding siege positions.
- Some battlefield sites in KwaZulu-Natal cross private or rural land and access conditions can change. Check current access locally or through the KwaZulu-Natal Battlefields Route before travelling.
- Carry Churchill’s London to Ladysmith via Pretoria and Haldane’s How We Escaped from Pretoria, or extracts from them, when visiting the ambush site. Their descriptions make considerably more sense when read against the railway and surrounding hills.
FAQ: Armoured Train Ambush at Chieveley, Natal (15 November 1899)
Winston Churchill was captured following the ambush of a British armoured train near Chieveley in Natal on 15 November 1899. He had been travelling aboard the train as a war correspondent when Boer forces obstructed the railway and attacked the patrol. Churchill helped clear the line and organise the withdrawal before being captured.
Churchill was 24 years old when he was captured on 15 November 1899. He was working as a war correspondent during the Second Boer War and had travelled to Natal shortly before the siege of Ladysmith began.
Churchill and other captured British officers were held in the State Model Schools in Pretoria. The building had been converted into a prisoner-of-war camp for British officers and was guarded by armed Boer sentries.
Churchill escaped from the State Model Schools on the night of 12 December 1899 by climbing over the perimeter wall when the guards were distracted. Separated from the other officers involved in the escape plan, he continued alone, eventually hiding aboard a freight train and receiving assistance from British expatriate John Howard at a coal mine.
Churchill travelled roughly 400 kilometres from Pretoria towards the Portuguese East African frontier. After several days of hiding and travelling by train, he crossed into Portuguese territory and reached Lourenço Marques, modern Maputo in Mozambique.
No. Churchill and Captain Aylmer Haldane had been captured together after the armoured-train ambush and were imprisoned together in Pretoria, but Churchill escaped first and made his journey independently. Haldane and other British officers subsequently escaped from the same prison. Both later published accounts of their experiences.
Subscribe to Battlefield Travels and receive a free E-Book Battlefield Guide
Unlock expert battlefield analysis, campaign reconstructions, and historical insights drawn from firsthand exploration and primary sources.
🗺️ You’ll receive:
🎖️ Exclusive historical insights you won’t find elsewhere
📘 A free eBook: 10 Tips for Exploring Historic Battlefields
📰 New battlefield studies straight to your inbox as they are published

⚔️ Go deeper — Members get exclusive access to the Deep Research Collection, Field Notes, and monthly Research Dispatches. Try membership free for 7 days, cancel anytime. From $9/month.