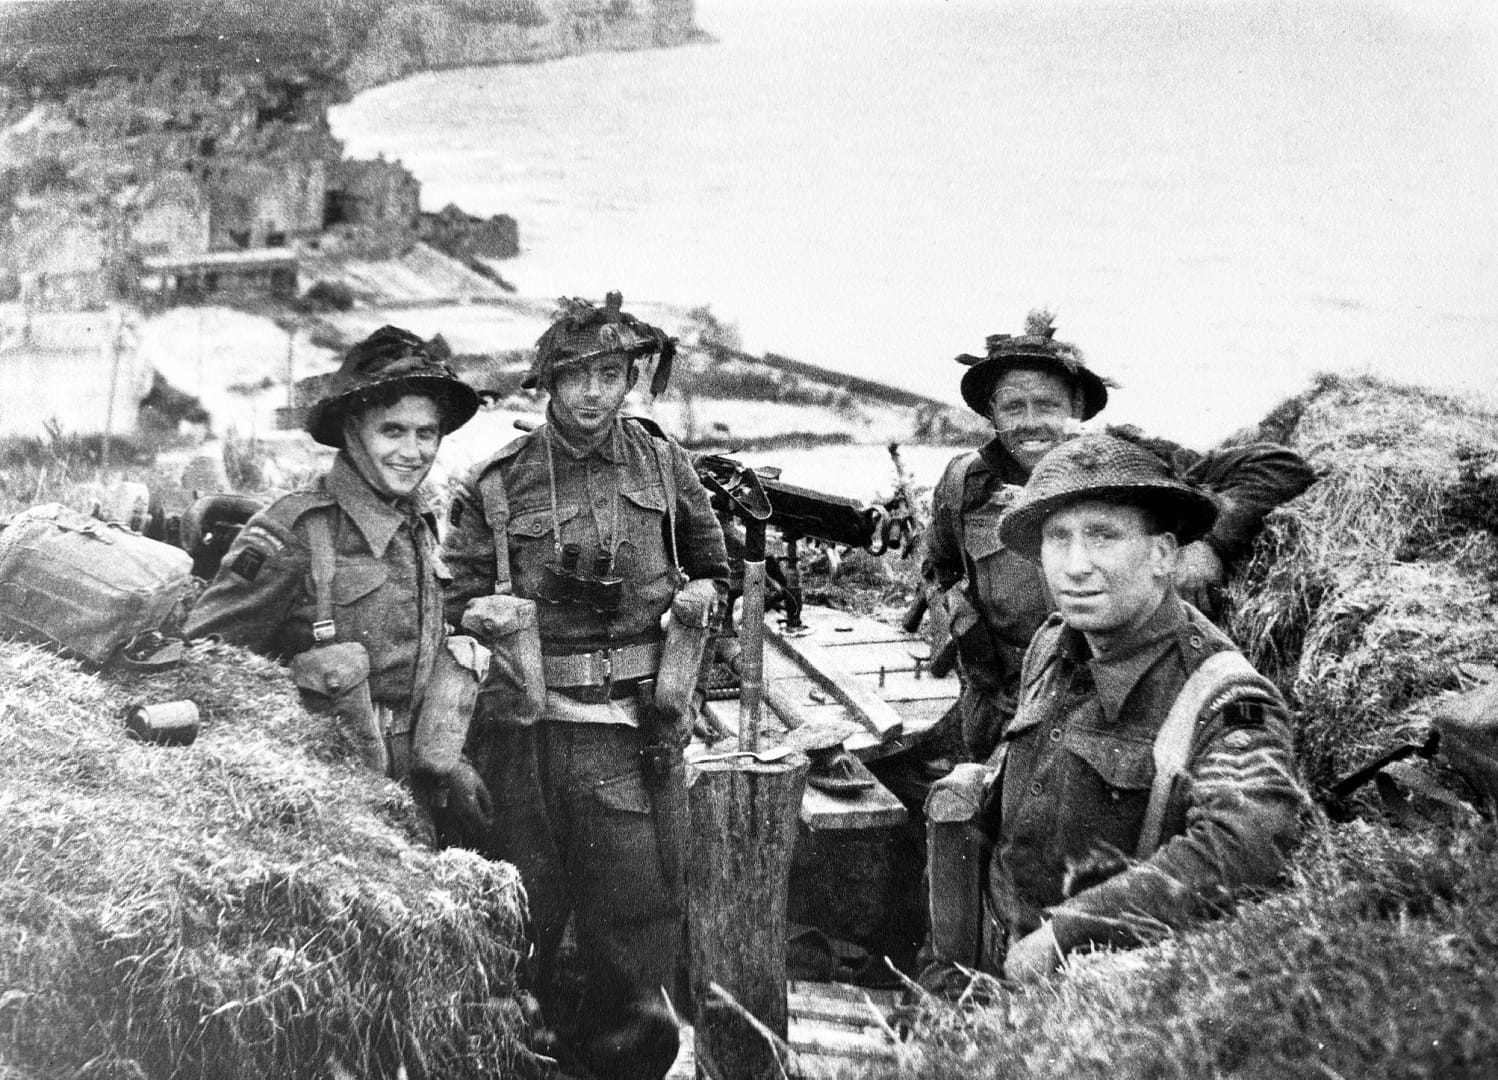
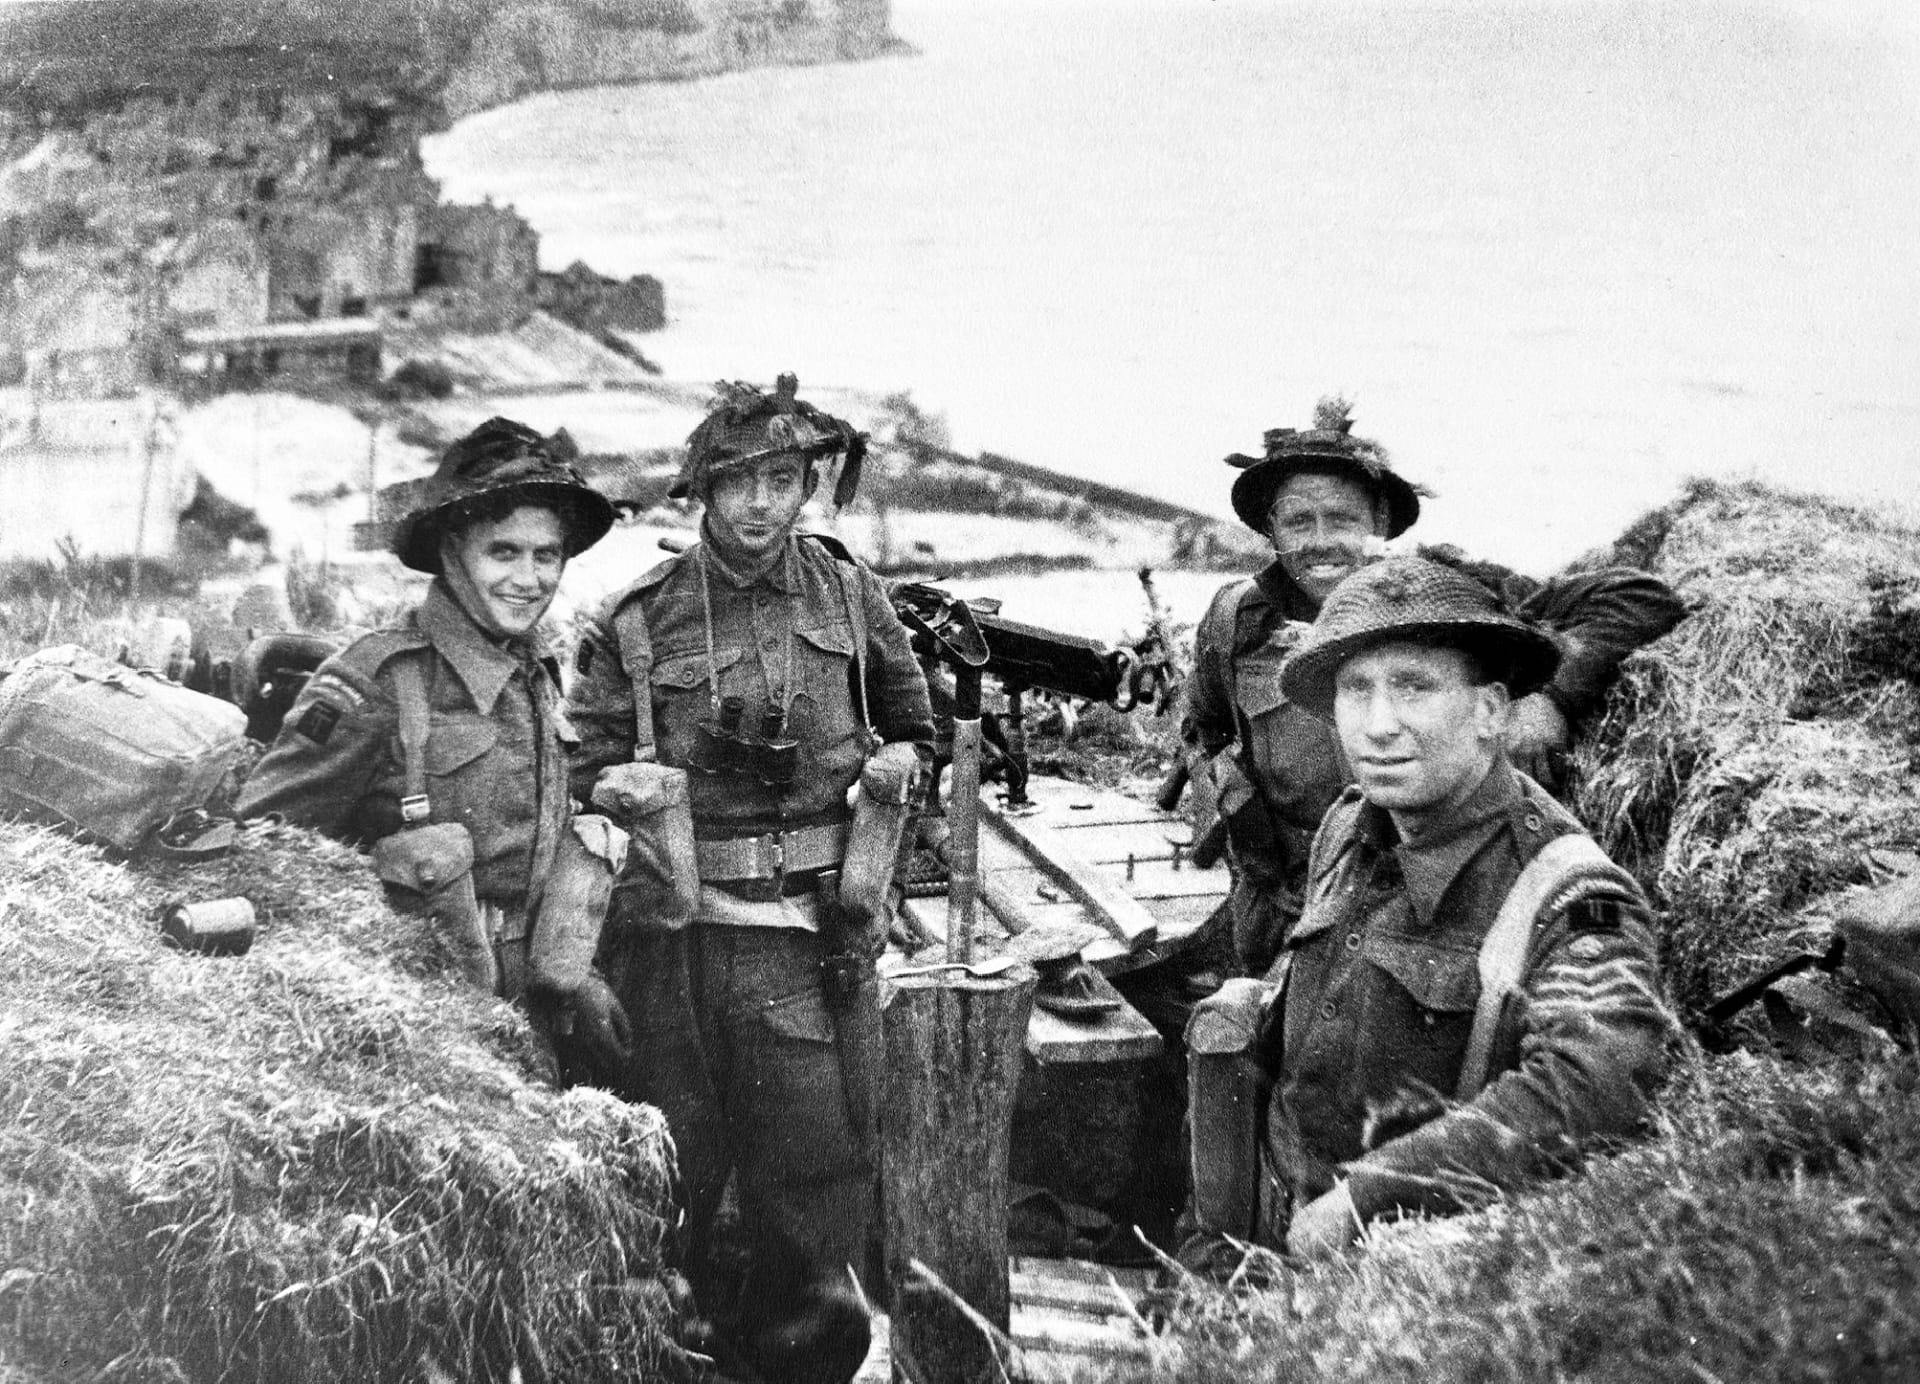
British forces seize the critical central sector of the Normandy beaches!
On 6 June 1944, the British 50th (Northumbrian) Infantry Division landed at Gold Beach, facing fortified villages and determined German resistance. By nightfall, they had secured a foothold, linked with Canadian forces at Juno, and pushed inland toward Bayeux. Within days, the artificial Mulberry harbour was providing vital sustainment to the Normandy campaign.
Key facts
Google Earth map – location of D-Day Gold Beach
Normandy series of battlefield studies
This article is part of a series exploring the D-Day airborne and amphibious battlefields on 6 June 1944 and the immediate aftermath. Click on the hotlinks to open the battlefield study.
Strategic Context – Operation OVERLORD
Allied grand strategy
By 1944, the Western Allies had resolved to open a second front in Europe. The Soviet Union had been carrying the main burden of the land war since 1941, suffering immense casualties. Stalin was pressing Roosevelt and Churchill for direct action in France to relieve pressure on the Eastern Front. The Anglo-American response was Operation Overlord, the cross-Channel assault designed to break into north-west Europe and defeat Nazi Germany.1Max Hastings, Overlord: D-Day and the Battle for Normandy (London: Michael Joseph, 1984), pp. 29–33.
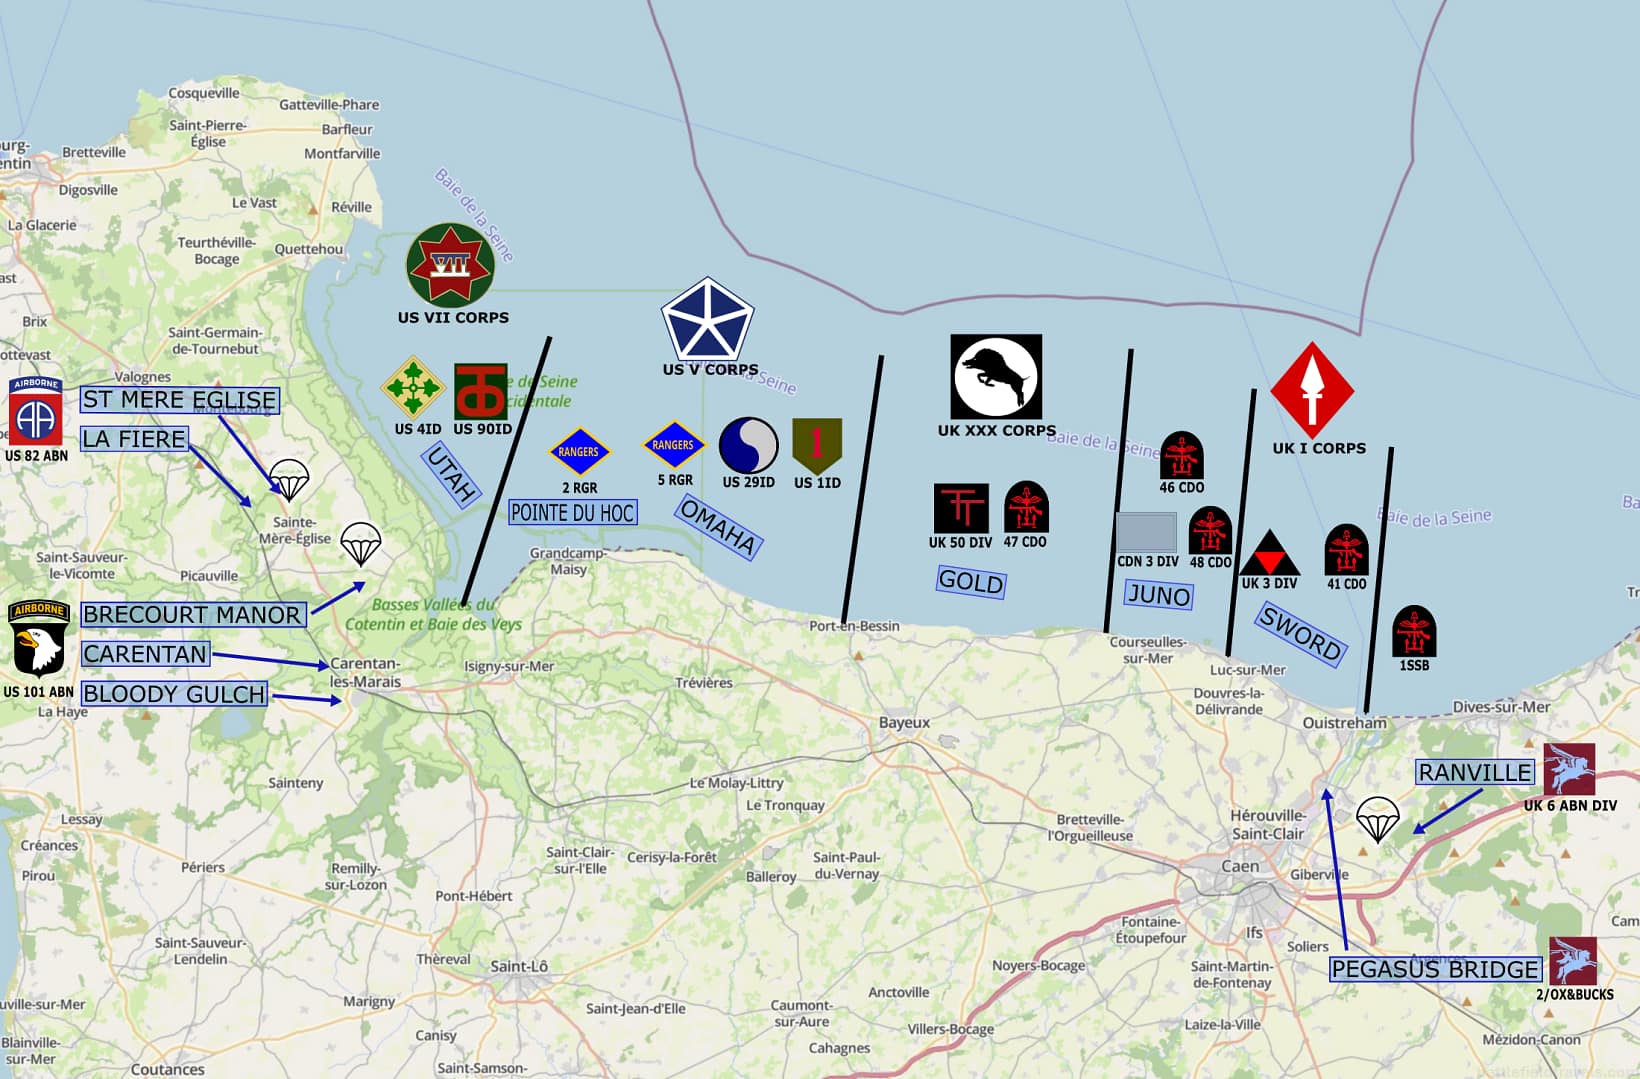
D-Day operational framework
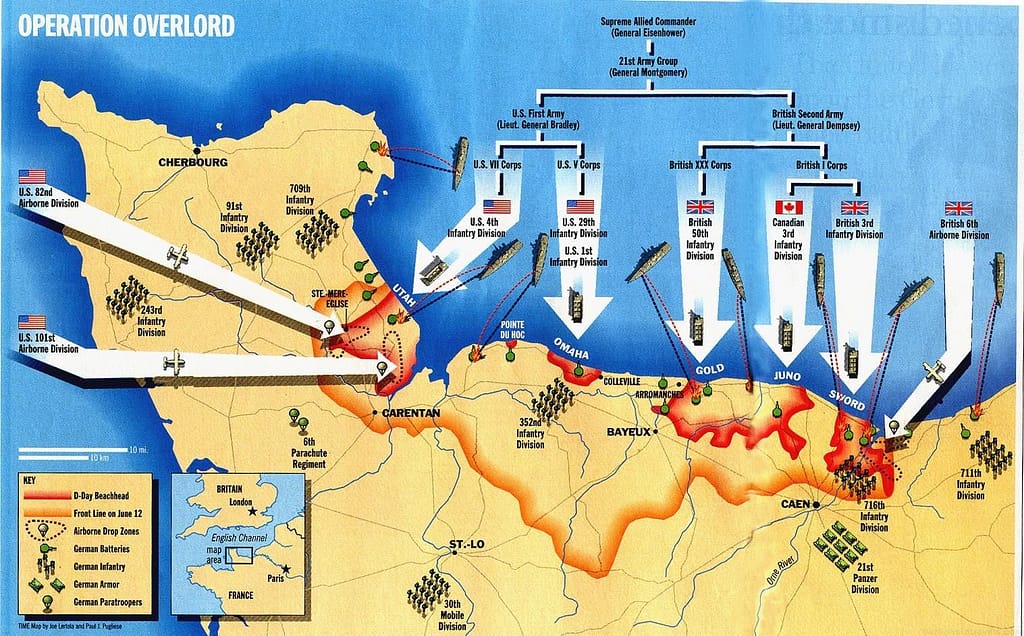
Gold Beach objectives
Strategic significance
Opposing forces at Gold Beach


 Allied forces (Gold Beach 6 June 1944)


 Allied forces (Gold Beach 6 June 1944)
The assault on Gold Beach was assigned to the 50th (Northumbrian) Infantry Division, commanded by Major-General Douglas Graham. This division had extensive combat experience from North Africa and Sicily, and it was reinforced for the Normandy operation with armour and specialised assault units.
The division’s assault brigades were:
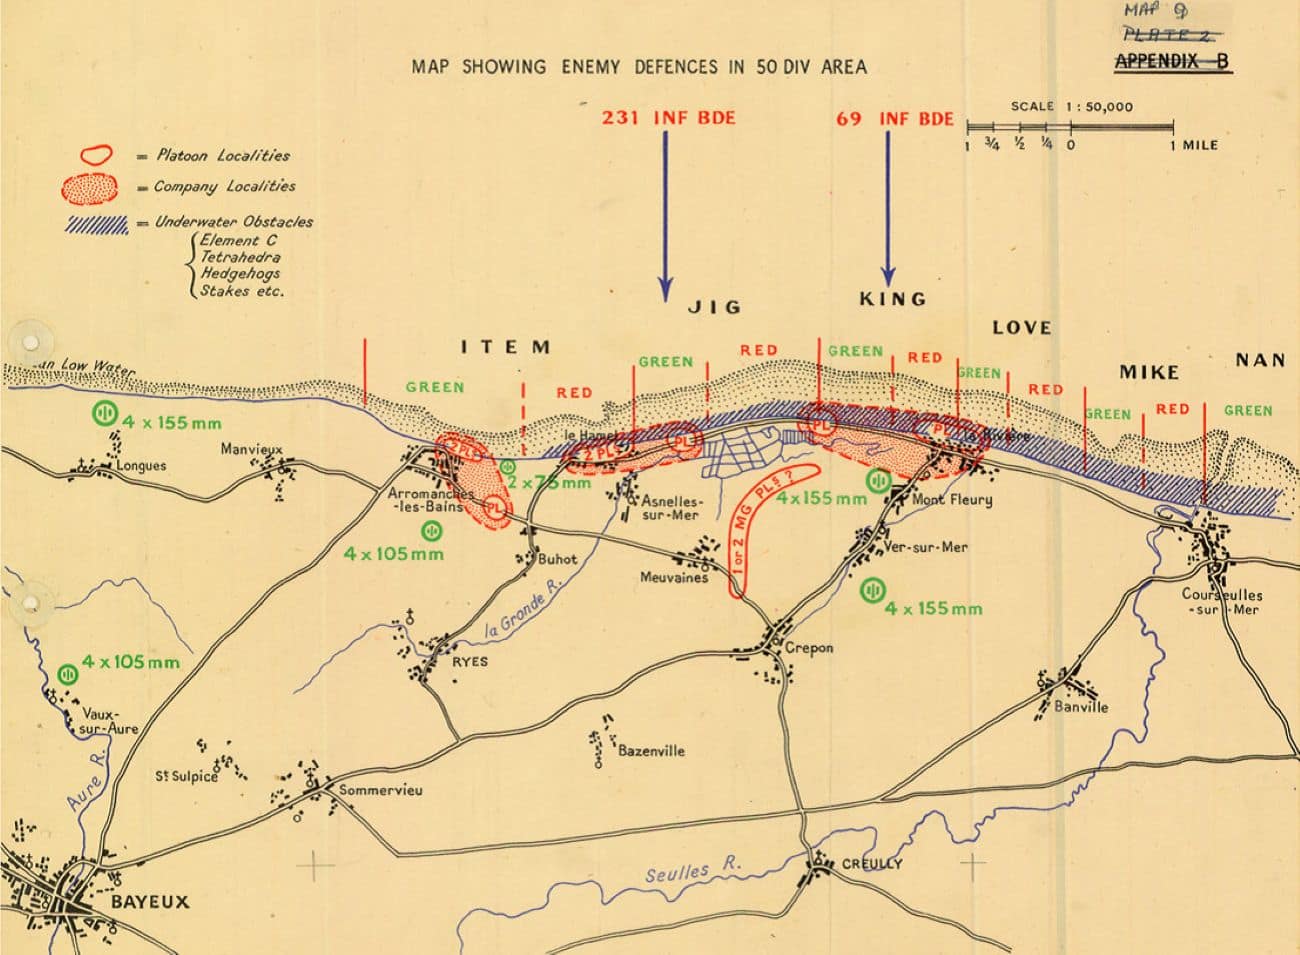
- 231st Infantry Brigade – tasked with landing in the western (Jig) sector, seizing Le Hamel and advancing on Arromanches.
- 69th Infantry Brigade – landing in the eastern (King) sector, assaulting La Rivière and pushing inland.
- 151st Infantry Brigade – held for later waves, to exploit initial gains and advance toward Bayeux.
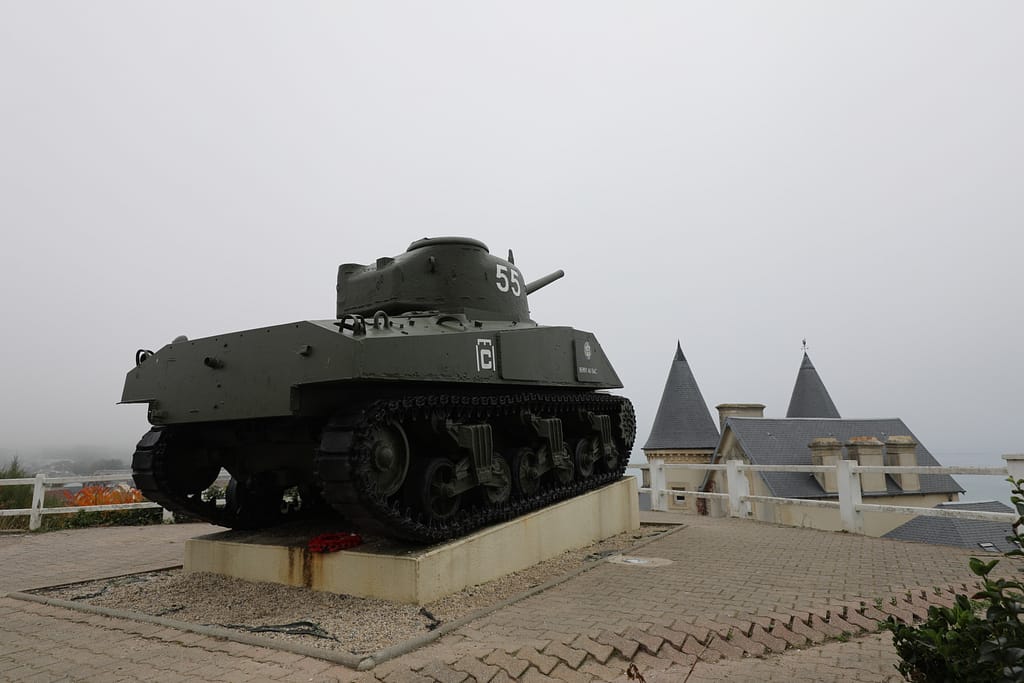
Armoured support was provided by 8th Armoured Brigade, equipped with Sherman tanks, including amphibious Duplex Drive (DD) variants. In addition, the division received attachments from 79th Armoured Division, commanded by Major-General Percy Hobart, which contributed specialised vehicles such as AVREs with petard mortars, flail tanks, and bridge-layers.
Supporting fires came from the Royal Navy Eastern Naval Task Force, which allocated battleships, cruisers, and destroyers to bombard the coastal strongpoints. Air support was coordinated through the RAF Second Tactical Air Force and the USAAF Eighth Air Force, tasked with suppressing German batteries and reserves.5David Fraser, And We Shall Shock Them: The British Army in the Second World War (London: Cassell, 1983), pp. 421–423.
 German forces
 German forces
The German coastal defences opposite Gold Beach were manned primarily by the 716. Infanterie-Division, commanded by Generalleutnant Wilhelm Richter. This was a static division, comprising older conscripts and troops from occupied territories. Its role was to man the strongpoints of the Atlantic Wall, including concrete bunkers, minefields, and beach obstacles.
In depth, elements of the 352. Infanterie-Division, one of the more capable German formations in Normandy, had been deployed across the Bayeux sector. Its battalions provided additional strength behind both Gold and Omaha Beaches, and some were committed forward during the fighting on 6 June.
German defensive dispositions included:
- Widerstandsnester (resistance nests) covering the beach exits at Le Hamel and La Rivière with machine guns, mortars, and field artillery.
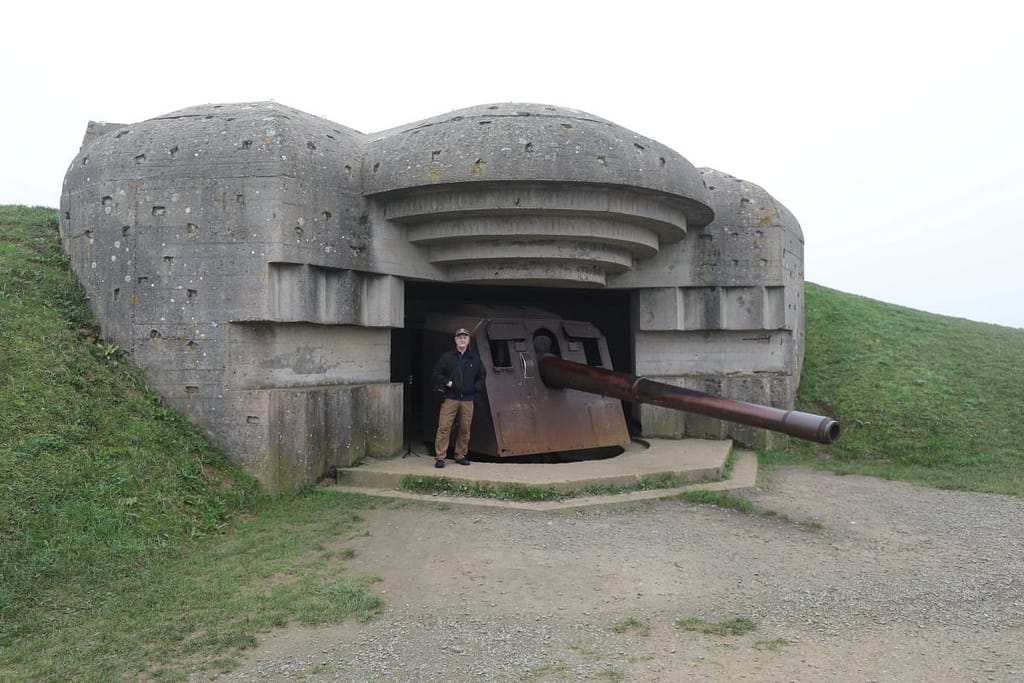
- Inland Batteries, some with 15cm and 10.5cm guns capable of firing onto the beachhead.
- Obstacles and minefields designed to disrupt landing craft and amphibious armour.
German doctrine emphasised holding the shoreline with fixed fortifications, followed by local counter-attacks using mobile reserves. However, Allied naval gunfire and air interdiction severely limited German ability to reinforce the coastal garrisons once the assault began.6Niklas Zetterling, Normandy 1944: German Military Organisation, Combat Power and Organisational Effectiveness (Winnipeg: J.J. Fedorowicz, 2000), pp. 66–71.
Terrain and beach analysis: Gold Beach
The coastal strip
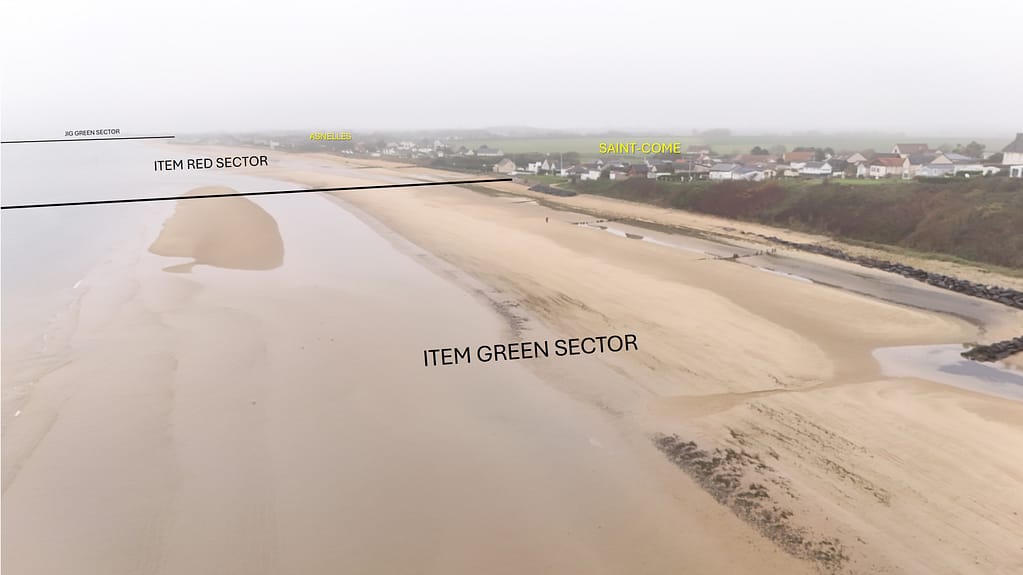
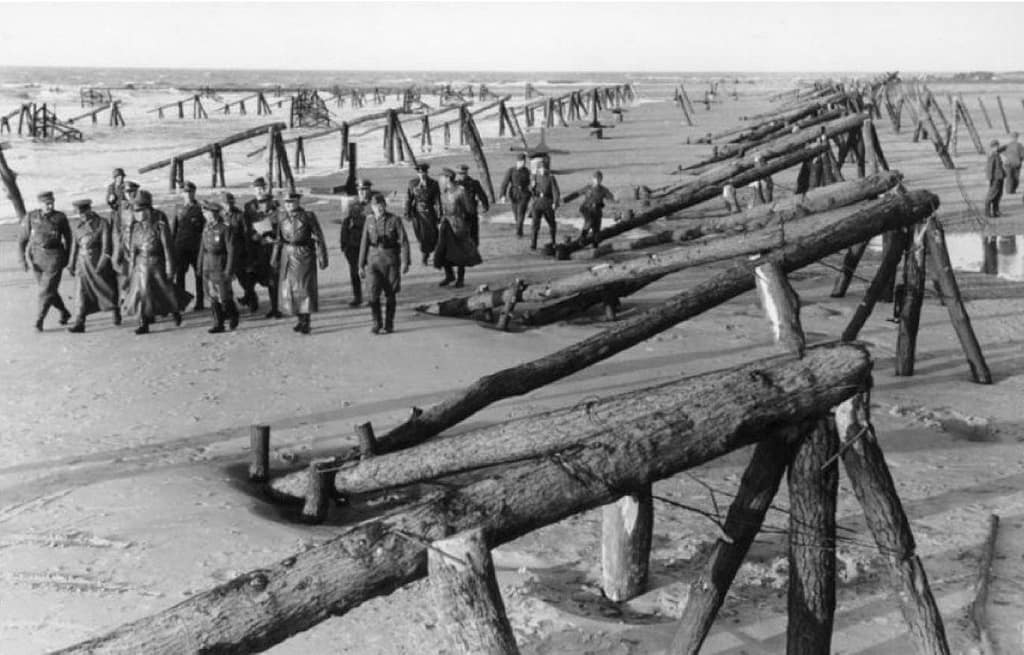
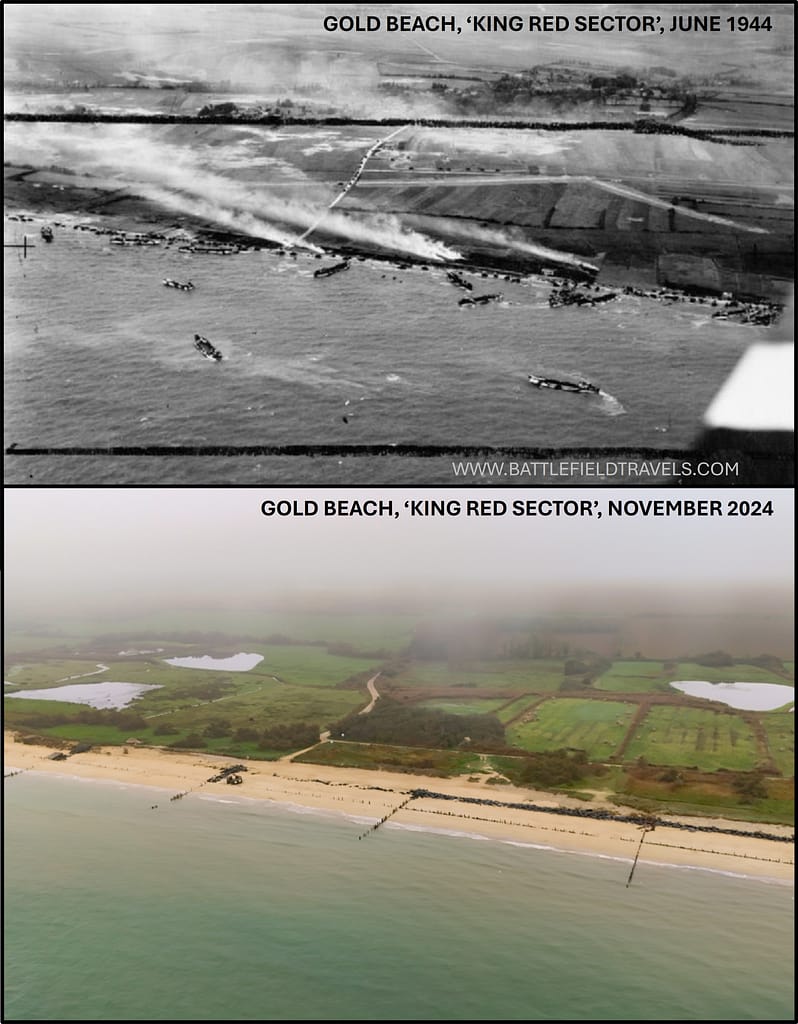
The Gold Beach landing zone stretched approximately 8 km between the villages of Le Hamel in the west and La Rivière in the east. The foreshore was broad and sandy, up to 300 m at low tide, but fronted by rows of wooden stakes, metal obstacles, and mined hedgehogs emplaced by the Germans to block landing craft. Beyond the tidal flat lay a narrow shingle bank and low seawall, restricting vehicle access and forcing assault engineers to clear specific gaps for follow-on waves.
Beyond the beach
Arromanches-les-Bains lay just west of the landing beaches and was chosen as the anchorage site for Mulberry ‘B’ because of its wide bay and natural cliffs providing protection from prevailing westerly winds. Ver-sur-Mer and La Rivière anchored the eastern end of the beach; both were small coastal communities with stone houses, which the Germans fortified as strongpoints.
Inland, the ground rose gently toward Bayeux, about 10 km from the coast, with a network of narrow country lanes and hedgerows typical of the Norman bocage. Streams and drainage ditches created natural choke points inland, further complicating the movement of armour and logistics7Chester Wilmot, The Struggle for Europe (London: Collins, 1952), pp. 303–305.
Channelling terrain
The principal exits from the beach were few and narrow. At Le Hamel, a walled embankment forced assault troops into confined approaches dominated by German bunkers. At La Rivière, a similar choke point existed where a road cut through the seawall. These restricted exits created natural killing zones, which the German defences exploited. Engineers and AVREs were required to breach seawalls and clear the obstacles before armour could move inland.
German obstacle belts at Gold Beach
German defensive construction followed Rommel’s aggressive doctrine to prevent Allied lodgement. Obstacle patterns included:
- Belgian Gates and steel hedgehogs to foul landing craft.
- Tetrahedra and mines buried in the tidal sand.
- Log stakes with mines attached, angled seaward to destroy landing craft on rising tide.
- Concrete bunkers and casemates positioned to deliver enfilade fire across the length of the beach, particularly at Le Hamel and La Rivière.
- Rommel’s ‘asparagus’ (vertical wooden stakes across potential Allied airlanding zones)
The effect was to break up any attempted landings and force the attackers into predictable approach corridors under direct fire, slowing progress and maximising attrition before the attackers could gain a foothold.
Phase 1 – Approach and Preliminary Bombardment (H-60 to H-0; ~06:25–07:25, 6 June 1944)
In the early hours of 6 June, assault convoys of the 50th (Northumbrian) Infantry Division approached their line of departure off the Normandy coast. The sea state was choppy, with crosswinds creating difficulty for navigation and for the launch of amphibious tanks. Despite conditions, most landing craft reached their start positions by H-60 minutes.
At 05:30, the naval bombardment commenced. Battleships HMS Warspite and HMS Ramillies engaged inland batteries, while cruisers and destroyers suppressed coastal strongpoints at Le Hamel and La Rivière. The weight of fire was substantial, but the accuracy of long-range bombardment against hardened bunkers was limited. Key casemates survived intact.
The RAF Bomber Command and USAAF heavy bombers had attacked the sector during the night, but cloud and navigation errors meant that many bombs fell too far inland to have any impact on the coastal defences. As the bombardment lifted, assault troops embarked in their landing craft and advanced toward the shoreline, seasick and heavily laden, preparing for their run into the beach8Antony Beevor, D-Day: The Battle for Normandy (London: Viking, 2009), pp. 92–97.
DD Sherman tanks of the 8th Armoured Brigade were launched from their LCTs offshore. Several foundered in the rough water; however, sufficient numbers reached the beaches to provide the infantry with direct fire support in the opening minutes.
⚔️ Go deeper — Members get exclusive access to the Deep Research Collection, Field Notes, and monthly Research Dispatches. Try membership free for 7 days, cancel anytime. From $9/month.
Phase 2 – Jig Sector (231st Infantry Brigade)
The western frontage, codenamed Jig Sector, lay opposite Le Hamel and the approaches toward Arromanches. The 231st Infantry Brigade, reinforced by armour and assault engineers, landed in successive waves from H-Hour (07:25).
Le Hamel strongpoint
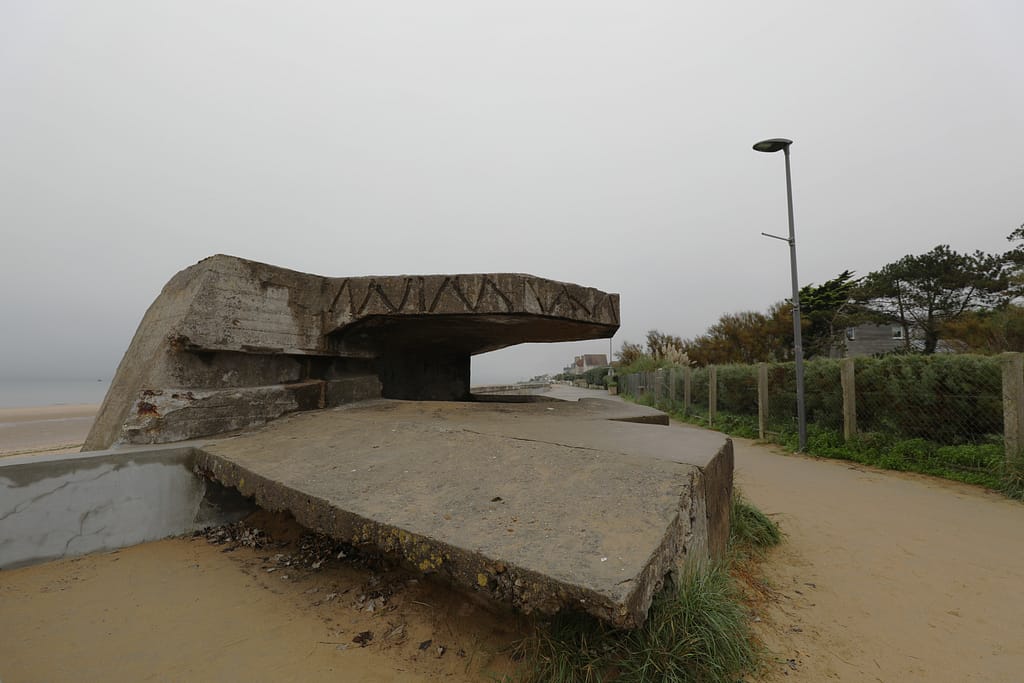
The defences at Le Hamel comprised a large casemate (WN38) armed with a 75 mm gun covering the beach in enfilade, supported by multiple machine-gun nests and mortar pits. German fields of fire swept the shingle bank and the narrow exit through the seawall. The opening waves of 1st Battalion, Hampshire Regiment took heavy casualties crossing the tidal flat. Infantry were pinned on the sand, using obstacles and shingle for cover while armour attempted to close.
AVREs (Armoured Vehicle Royal Engineers) of the 79th Armoured Division engaged the bunkers with petard mortars, while flail tanks cut lanes through minefields. Destroyers closed to within 3,000 yards, firing directly into embrasures at point-blank range. After several hours of close combat, the strongpoint was reduced, but only at significant cost.
Advance toward Arromanches
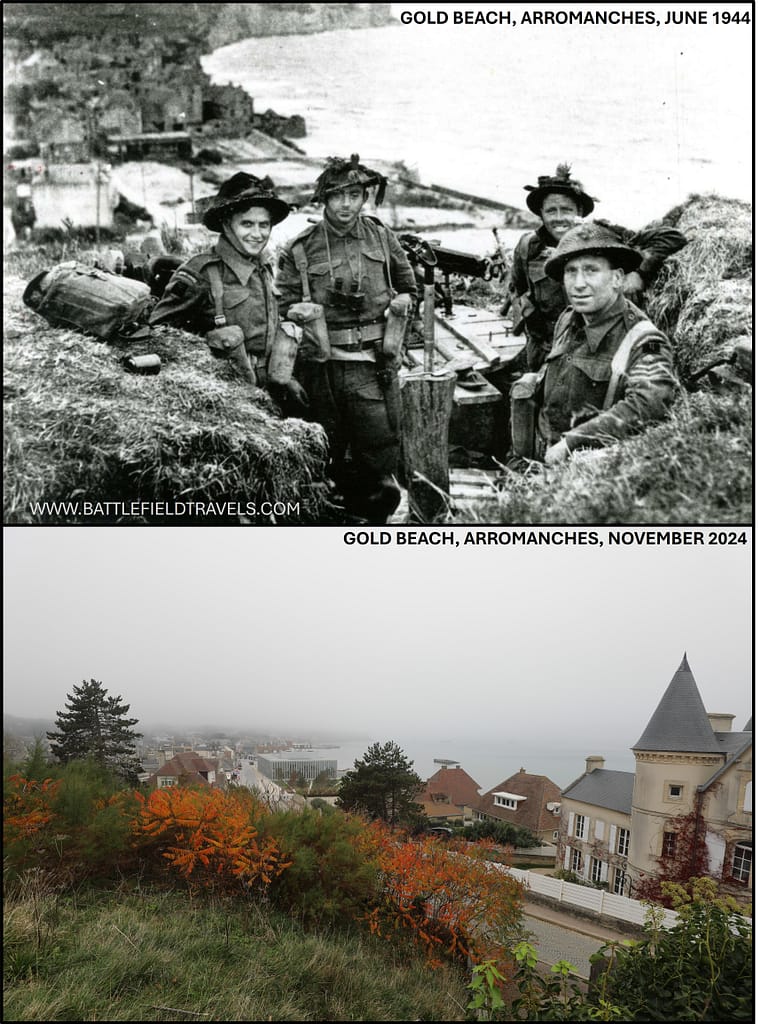
Once Le Hamel was cleared, brigade elements pushed inland. 1st Dorsets and 2nd Devons advanced through weakened German resistance, aiming to establish positions dominating the approaches to Arromanches-les-Bains. The timetable was behind schedule, but the brigade had secured the critical western exit by mid-day.9John Buckley, Monty’s Men: The British Army and the Liberation of Europe (New Haven: Yale University Press, 2013), pp. 68–74.
Phase 3 – King Sector (69th Infantry Brigade)
The eastern frontage, King Sector, lay opposite La Rivière and Ver-sur-Mer. Here, the 69th Infantry Brigade conducted the assault, supported by DD Shermans and specialist armour.
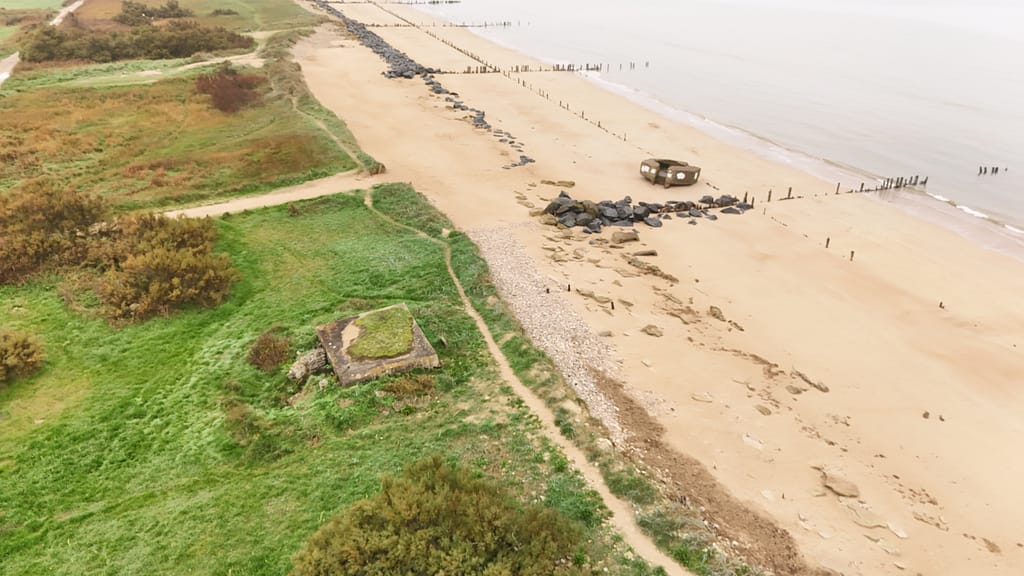
La Rivière strongpoint
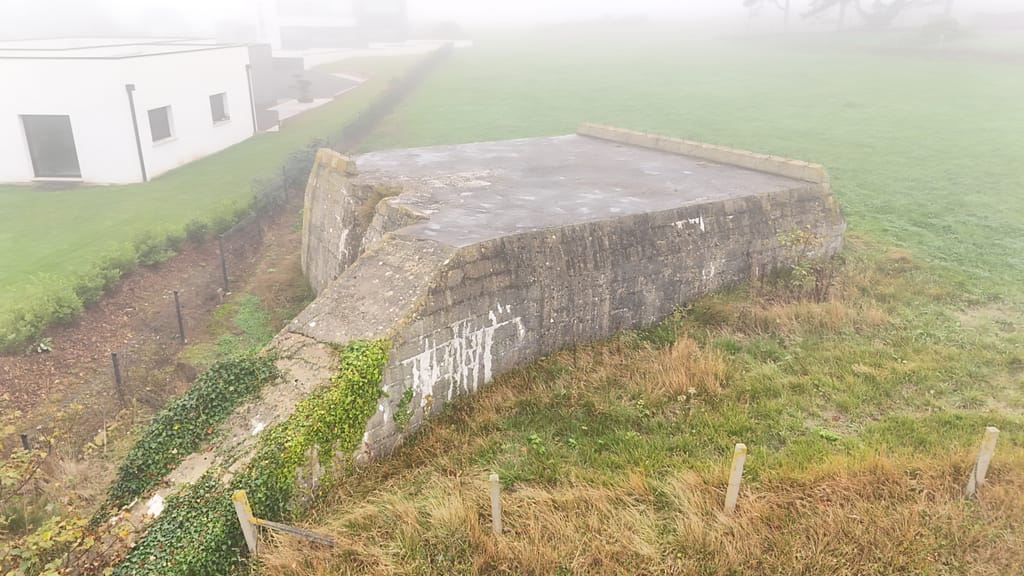
The beach exit at La Rivière was dominated by a fortified house and a casemate with machine guns sited to cover the road cut through the seawall. 6th Battalion, Green Howards suffered heavy fire on landing; casualties mounted as men attempted to reach the seawall with Bangalore torpedoes and demolition charges. Surviving DD Shermans provided covering fire, suppressing embrasures until engineers breached the exit.
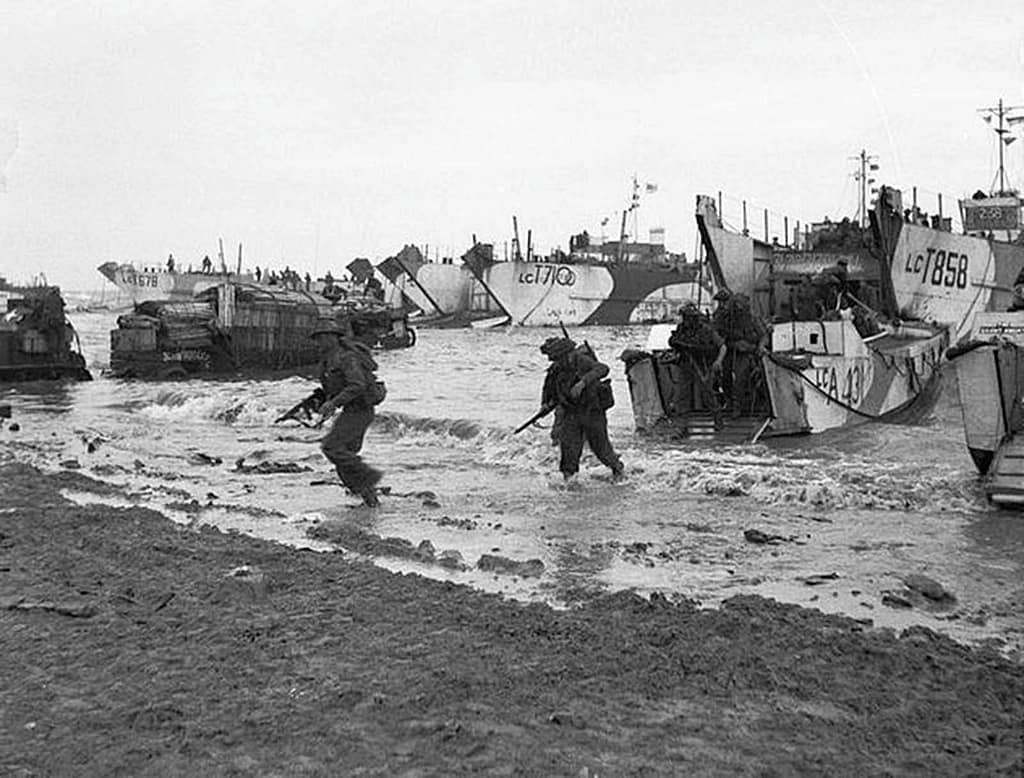
Ver-sur-Mer and the eastern approach
Further east, 5th Battalion, East Yorkshires landed under similar conditions, clearing smaller resistance nests and securing the high ground overlooking the beach. By late morning, 69th Brigade had forced the exits, enabling armour and supporting units to move inland toward the Bayeux road axis. German resistance remained stiff in pockets, but by noon the beachhead in King Sector was expanding in depth.10Carlo D’Este, Decision in Normandy (London: Collins, 1983), pp. 145–154.
Phase 4 – Consolidation on the beaches (Mid-Morning to Early Afternoon, 6 June 1944)
By mid-morning, the leading brigades had secured footholds at both Jig and King sectors. The task then shifted to clearing obstacles, organising exits, and preparing the beach for sustained reinforcement.
Royal Engineers worked under continuous sniper and mortar fire to cut lanes through minefields and seawalls. Beach Groups established traffic control points to separate incoming landing craft, casualty evacuation craft, and supply offload areas. Medical units converted cellars and temporary shelters for triage and surgery.
151st Infantry Brigade, landing in later waves, began moving inland once exits were secured. Elements of 8th Armoured Brigade supported both 231st and 69th Brigades, dispersing squadrons to cover multiple axes. This dispersion reduced mass but ensured armour was present at all key choke points. Congestion in the narrow Norman lanes created friction, with vehicles and infantry competing for the same routes.11L. F. Ellis, Victory in the West, Vol. I: The Battle of Normandy (London: HMSO, 1962), pp. 150–156.
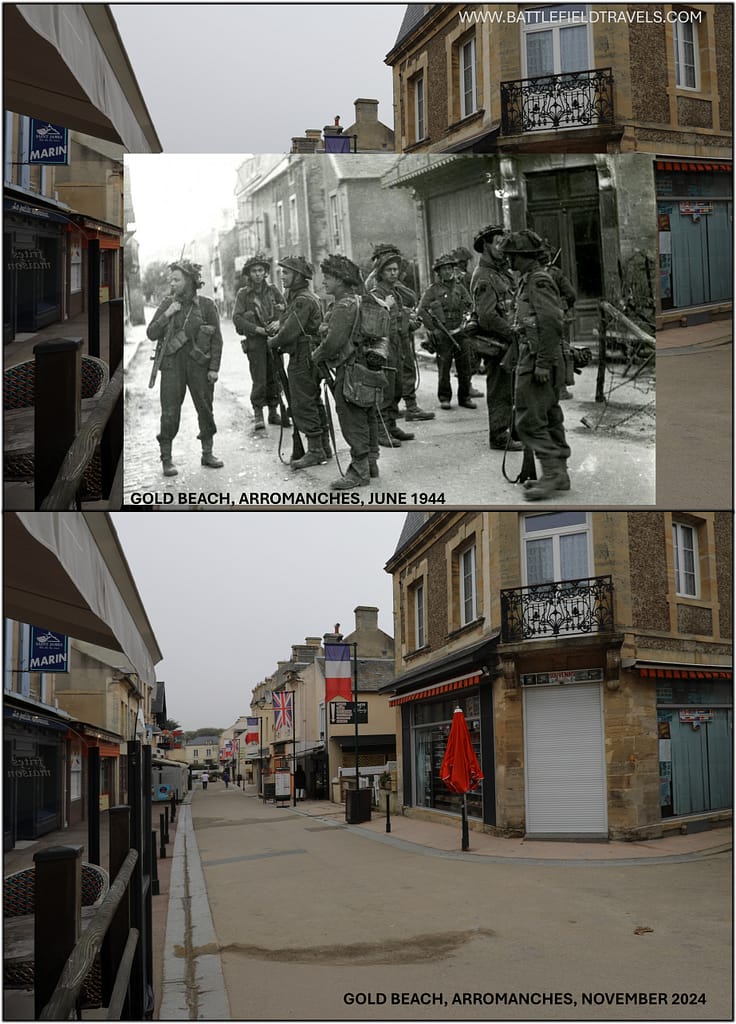
Phase 5 – German reactions (Late Morning to Afternoon, 6 June 1944)
The German 716. Infanterie-Division companies defending the beach frontage had been effectively destroyed or captured. Surviving elements fell back into the hinterland in disorganised groups.
In depth, battalions of the 352. Infanterie-Division attempted local counter-attacks. Reports from divisional command indicate piecemeal moves forward from Colleville-sur-Mer and Trévières, but these formations were fragmented by Allied interdiction. Naval gunfire support (NGFS) destroyers operating close inshore shelled assembly areas, while RAF Typhoons struck columns attempting to move along exposed roads.
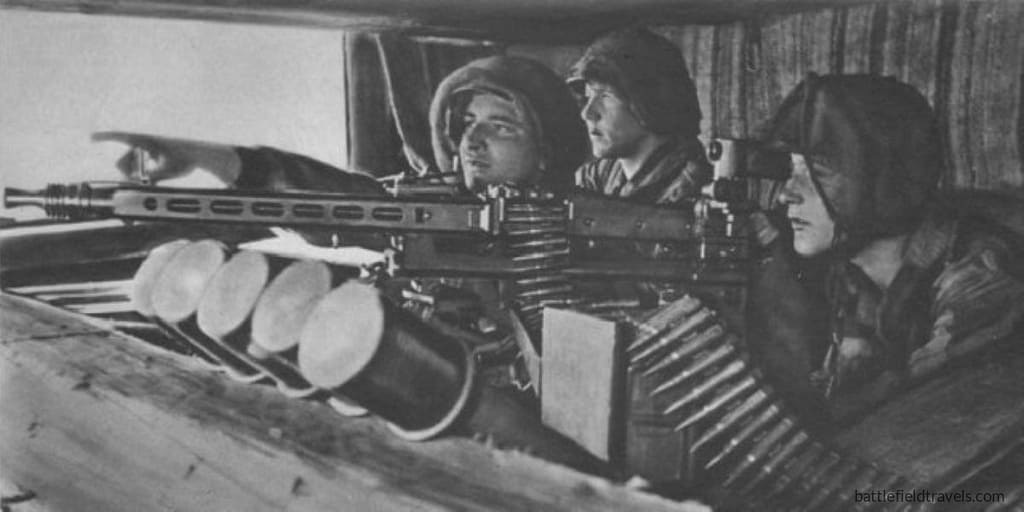
German doctrine prescribed a mobile counter-attack against the beaches before the Allies could consolidate. In practice, friction dominated:
- Communications: Field telephone lines had been severed by bombardment, forcing reliance on runners and radios, many of which failed.
- Command delay: Higher headquarters withheld panzer divisions until Hitler’s personal release was granted. By the time this was issued, daylight and Allied air superiority prevented rapid deployment.
- Fragmentation: The 352. Division’s battalions were distributed over a wide frontage, leaving no concentrated reserve to mount a coherent thrust.
As a result, German counter-measures against Gold Beach never developed into a serious threat. Local resistance continued, but the 50th Division expanded its lodgement steadily through the afternoon.12Niklas Zetterling, Normandy 1944: German Military Organisation, Combat Power and Organisational Effectiveness (Winnipeg: J.J. Fedorowicz, 2000), pp. 74–78.
Phase 6 – Inland advance from Gold Beach (Afternoon and Evening, 6 June 1944)
69th Brigade spearheaded the push toward Bayeux, advancing south along the main Caen–Cherbourg road. Progress was slowed by hedgerows, minefields, and scattered resistance from isolated German detachments, but no organised line barred the way. Patrols by evening were within sight of Bayeux’s cathedral towers. The town itself was formally liberated the following morning, 7 June.
231st Brigade pressed eastward toward Arromanches, overcoming minor opposition after the fall of Le Hamel. By late evening, British forces occupied ground overlooking the town, securing the anchorage site for Mulberry ‘B’. The town was cleared the next day, enabling preparations for the harbour’s assembly.
Meanwhile, 151st Brigade moved inland to reinforce the Bayeux axis. 8th Armoured Brigade fanned out to support the infantry, accepting delays from congested roads and minefields. The brigade’s presence, even dispersed across the length of Gold Beach, provided overwatch and fire support to advancing battalions.13John Buckley, Monty’s Men: The British Army and the Liberation of Europe (New Haven: Yale University Press, 2013), pp. 72–79.
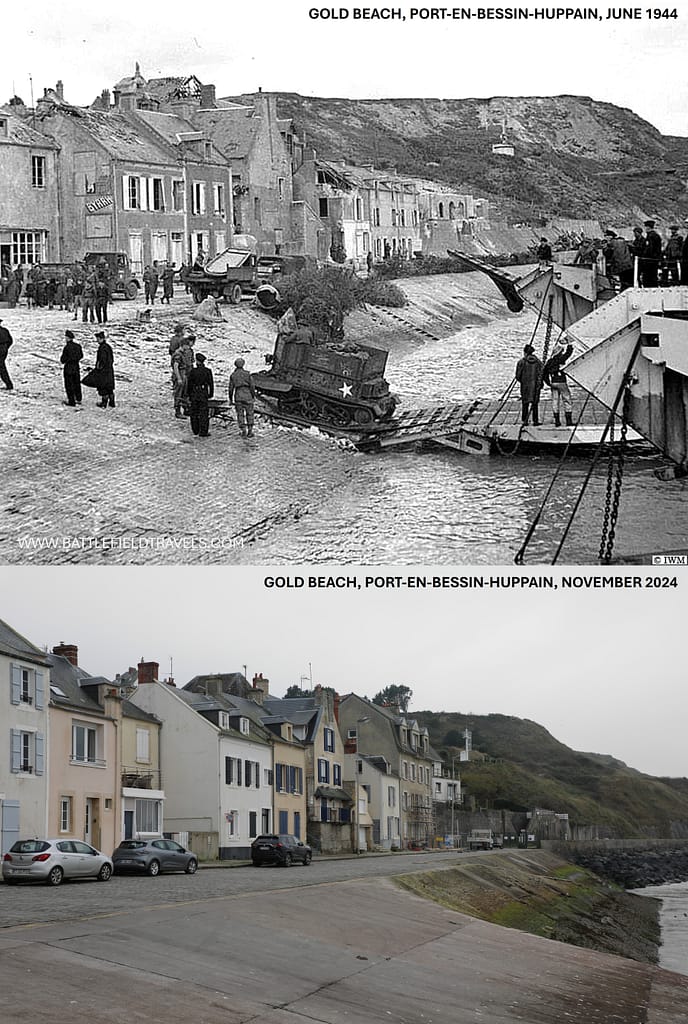
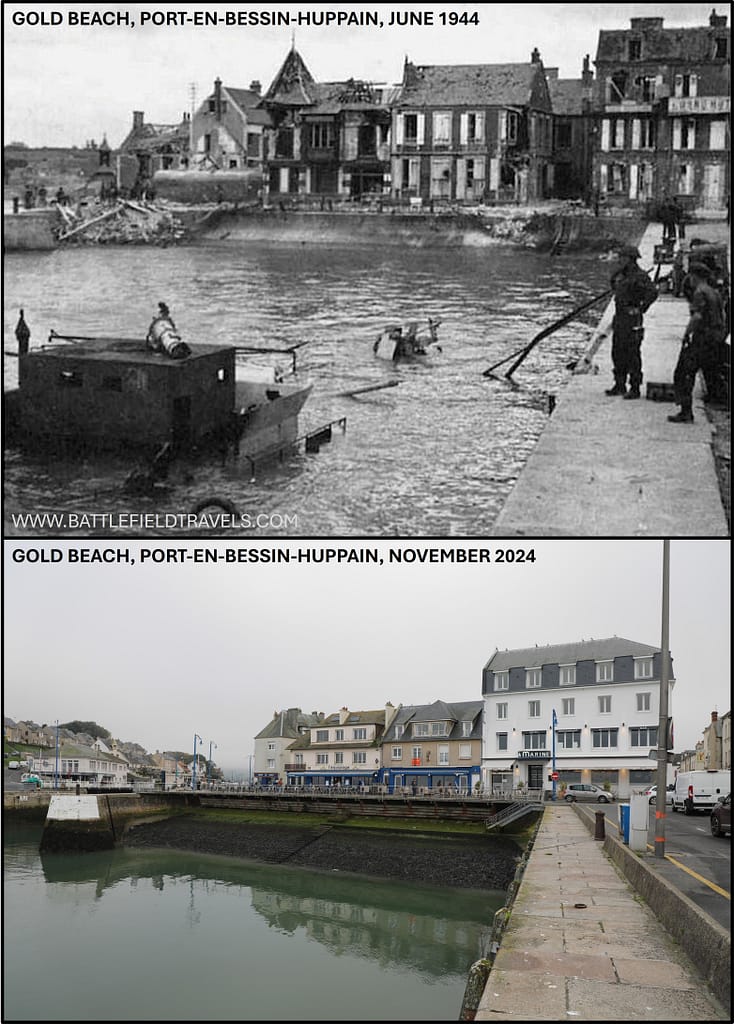
On the western flank, 47 Royal Marine Commando executed a separate mission to capture Port-en-Bessin, a small port linking the British sector to Omaha Beach. After two days of hard fighting, the port fell on 8 June, completing the lateral connection between U.S. and British forces.14Stephen Ambrose, D-Day, June 6, 1944 (New York: Simon & Schuster, 1994), pp. 286–292.
Phase 7 – Evening situation (Nightfall, 6 June 1944)
By nightfall, the 50th (Northumbrian) Division had secured a beachhead six miles deep and several miles wide. Casualties numbered around 1,000 killed, wounded, or missing, out of approximately 25,000 men landed.
Contact was established with 3rd Canadian Division advancing from Juno to the east, completing a continuous Anglo-Canadian frontage. To the west, the link with U.S. forces at Omaha was not yet firm but would be achieved with the capture of Port-en-Bessin.
German formations in the Gold sector were shattered. 716. Division ceased to exist as a coherent unit, and the 352. Division’s forward battalions were heavily depleted. German higher command failed to get panzer reserves to the sector in time. The Gold Beach lodgement was judged secure by the end of D-Day, and it provided the Allies with a central hinge for their Normandy bridgehead.15Antony Beevor, D-Day: The Battle for Normandy (London: Viking, 2009), pp. 115–118.
Outcomes and significance of Gold Beach landings
Bayeux: first major town liberated
By the morning of 7 June 1944, patrols of the 69th Infantry Brigade entered Bayeux against minimal resistance. German units had withdrawn to avoid encirclement, leaving the town largely intact. Bayeux’s capture was significant both tactically and symbolically.
- Tactically, it gave the Allies an immediate communications hub on the Caen–Cherbourg road, easing the movement of supplies and reinforcements.
- Symbolically, it became the first major French town liberated in Normandy, a morale boost for both Allied troops and the French population.
Arromanches and the ‘Mulberry B’ Harbour
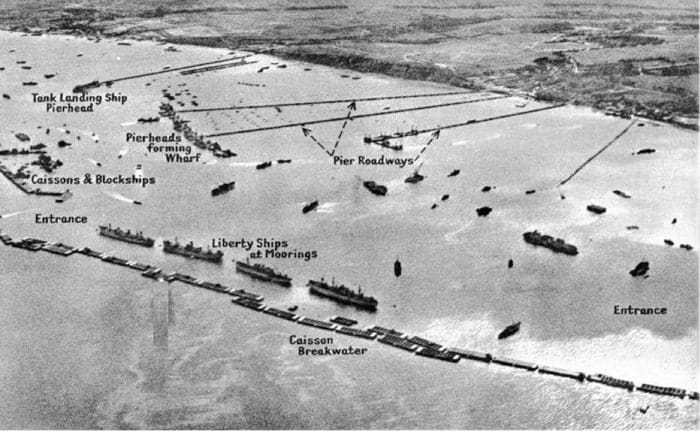
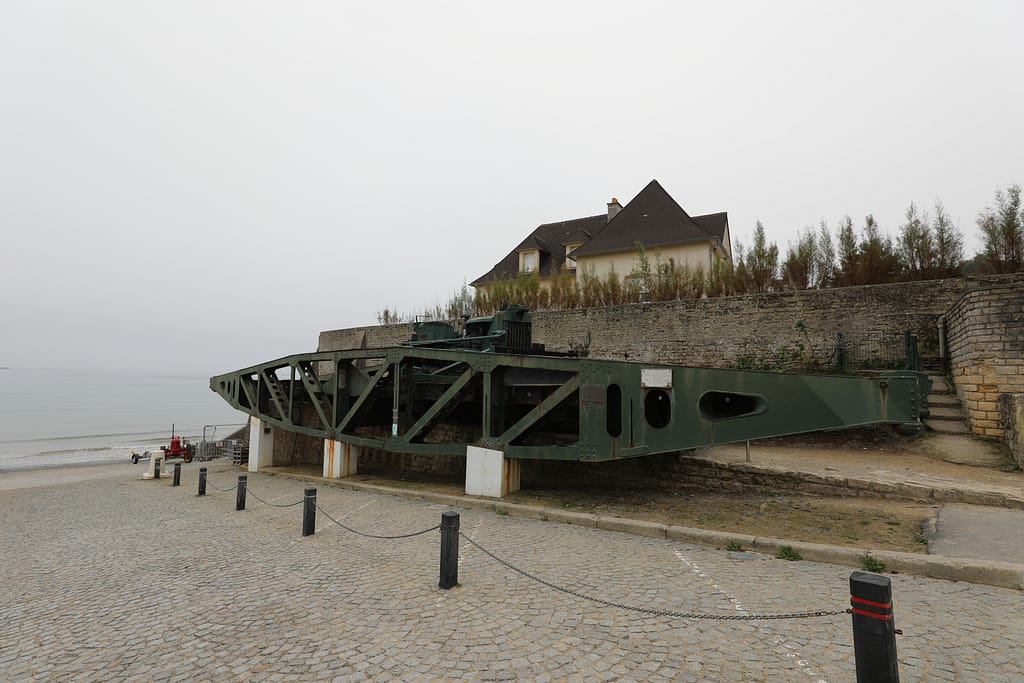
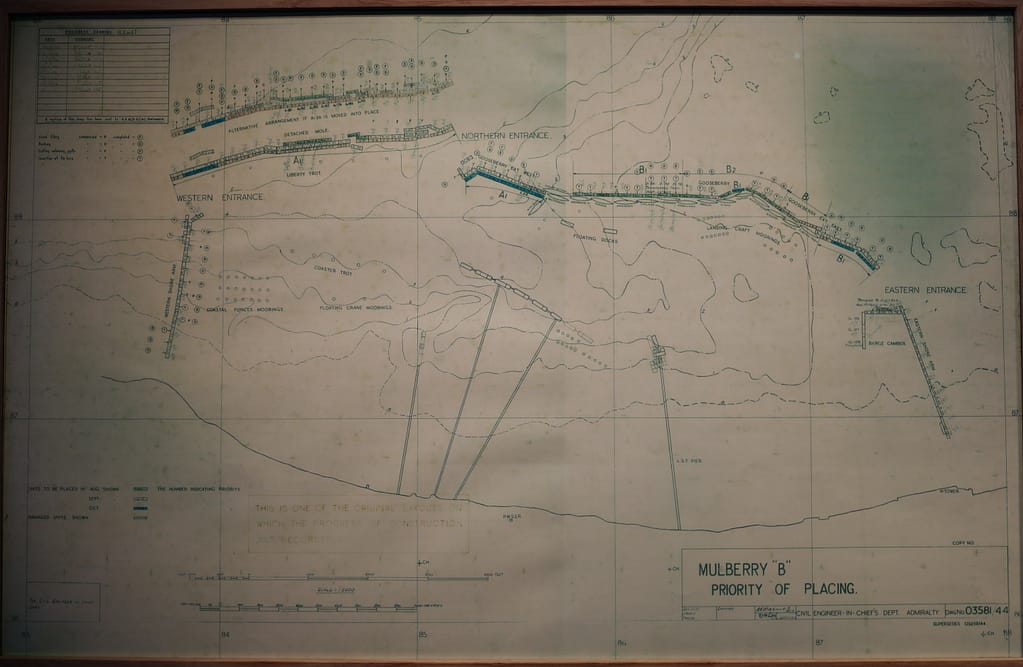
On the western flank, 231st Brigade secured positions overlooking Arromanches-les-Bains by the evening of 6 June, clearing the town the following day. This enabled engineers and naval units to begin work on Mulberry ‘B’, one of two vast prefabricated artificial harbours designed to supply the invasion force.
Technical Call-Out: ‘Mulberry B’ at Arromanches
- Comprised large concrete caissons (‘Phoenix’ units), floating roadways, and pierheads.
- Assembled offshore within days, handling 7,000 tons/day of supplies by mid-June, rising to 18,000 tons/day at peak.
- Survived the severe storm of 19–21 June that destroyed the American Mulberry at Omaha.
- Continued to operate until autumn 1944, sustaining British and Canadian armies until continental ports were opened.
The success of Mulberry ‘B’ at Arromanches ensured the Allies maintained logistical momentum in Normandy. Without it, the Allied armies would have faced severe supply constraints until Cherbourg was captured later in June.16Stephen Ambrose, D-Day, June 6, 1944 (New York: Simon & Schuster, 1994), pp. 420–425.
Operational and strategic effects
The capture of Gold Beach achieved all principal objectives of the 50th (Northumbrian) Division:
- Secured the beachhead and opened exits inland.
- Liberated Bayeux intact.
- Established contact with U.S. and Canadian sectors.
- Captured Arromanches for Mulberry harbour construction.
These successes anchored the Allied front in Normandy. From Gold, the British Second Army could advance toward Caen, fix German panzer divisions, and maintain cohesion with U.S. forces to the west. The operational depth gained through Bayeux and Arromanches created a secure foundation for the subsequent breakout battles of the summer.
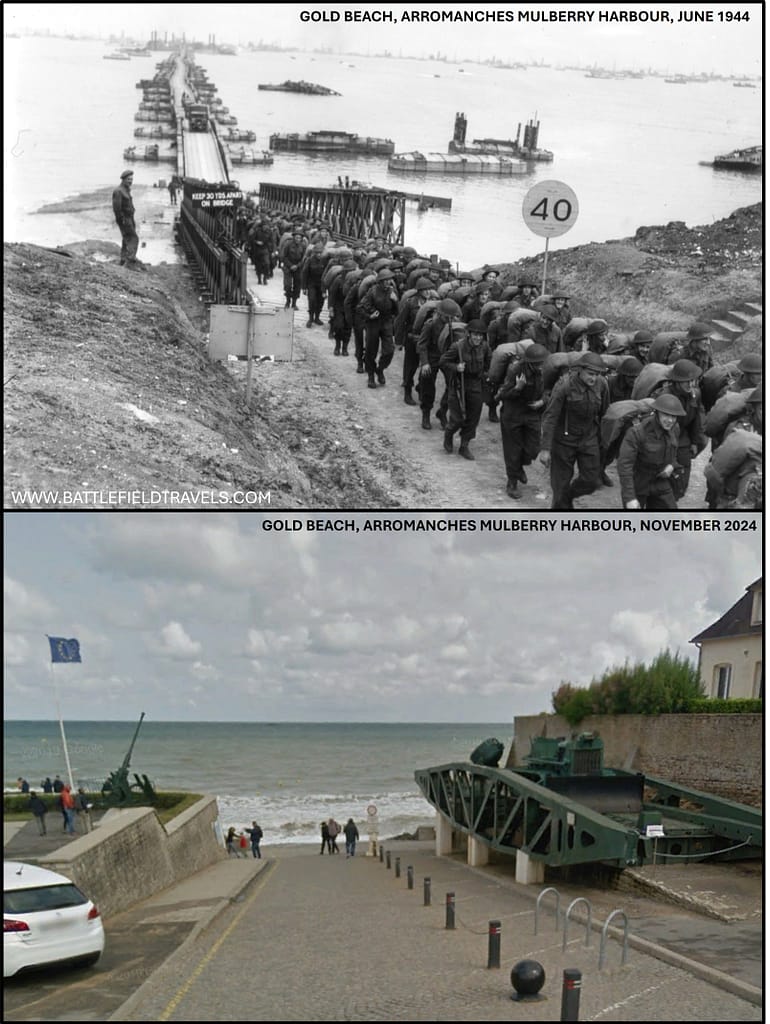
The Gold Beach battlefield today
Gold Beach and the seafront villages
The Gold Beach frontage runs across the villages of La Rivière, Le Hamel, and Asnelles. Walking the wide foreshore at low tide conveys the scale of ground the infantry had to cross under fire — a tidal flat up to 300 metres wide, with the shingle bank and seawall still visible in places. German bunkers remain above the beaches; several are battle-damaged, their concrete pitted by naval gunfire. At Le Hamel, the large casemate once covering the landing sector still dominates the beachfront.17Stephen Badsey, Normandy 1944: Allied Landings and Breakout (London: Osprey, 1990), pp. 34–36.
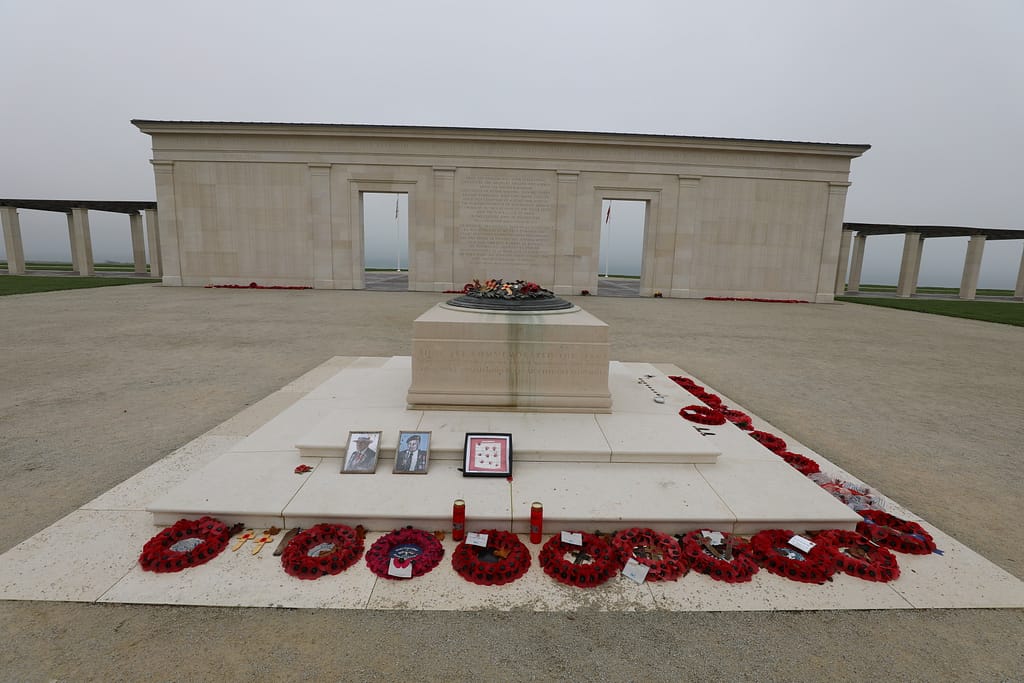
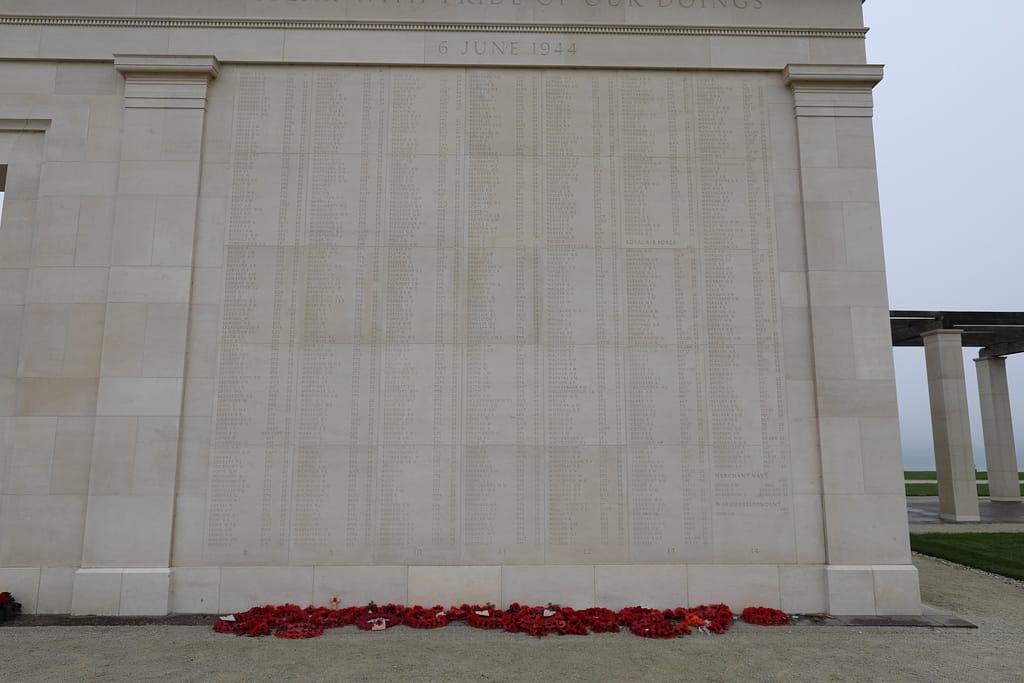
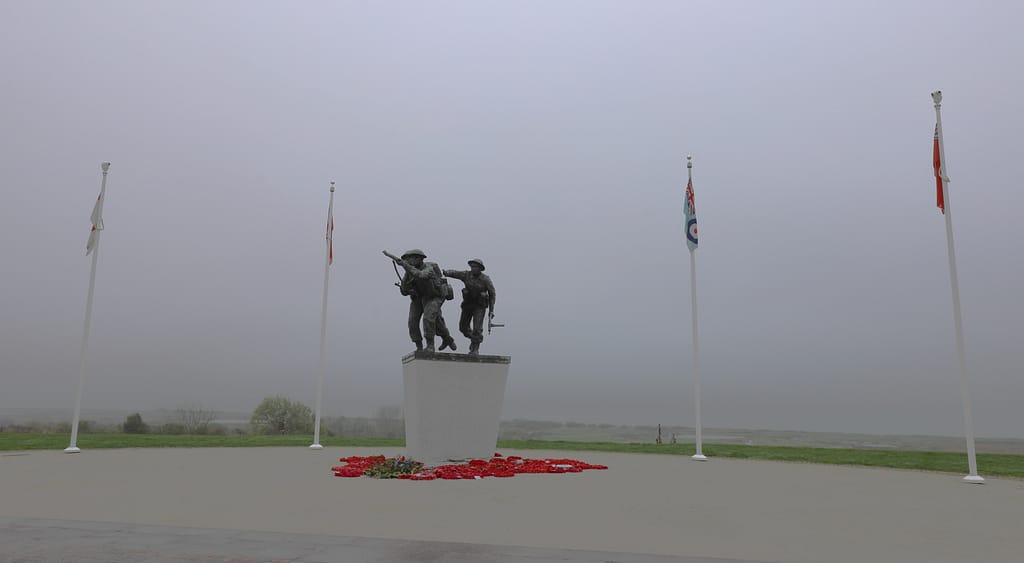
British Normandy Memorial
The British Normandy Memorial is a war memorial behind Gold Beach, near the village of Ver-sur-Mer. The Memorial records the names of the 22,442 servicemen and women under British command who fell on D-Day and during the Battle of Normandy in the summer of 1944.
Arromanches and the ‘Mulberry B’ remains
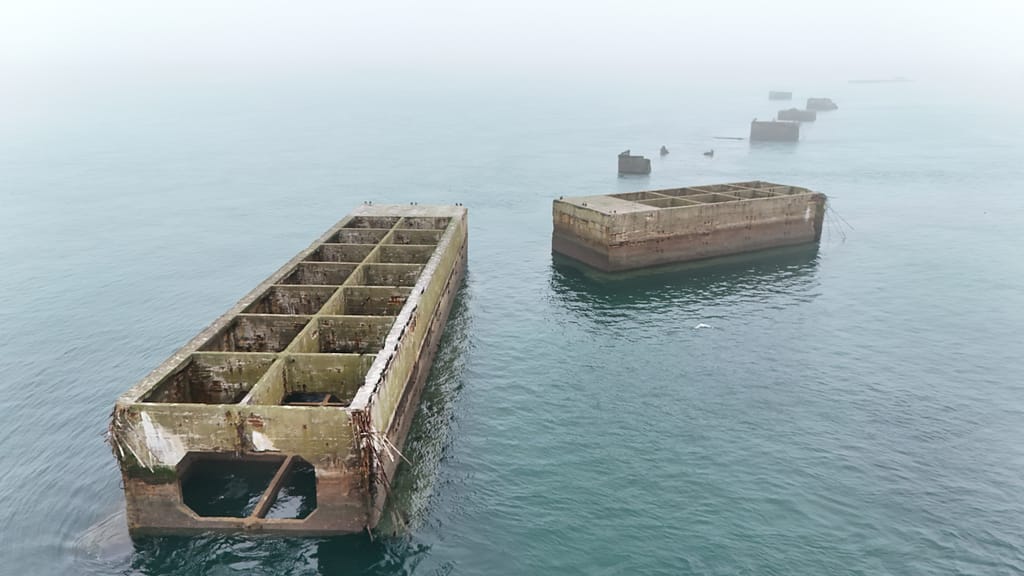
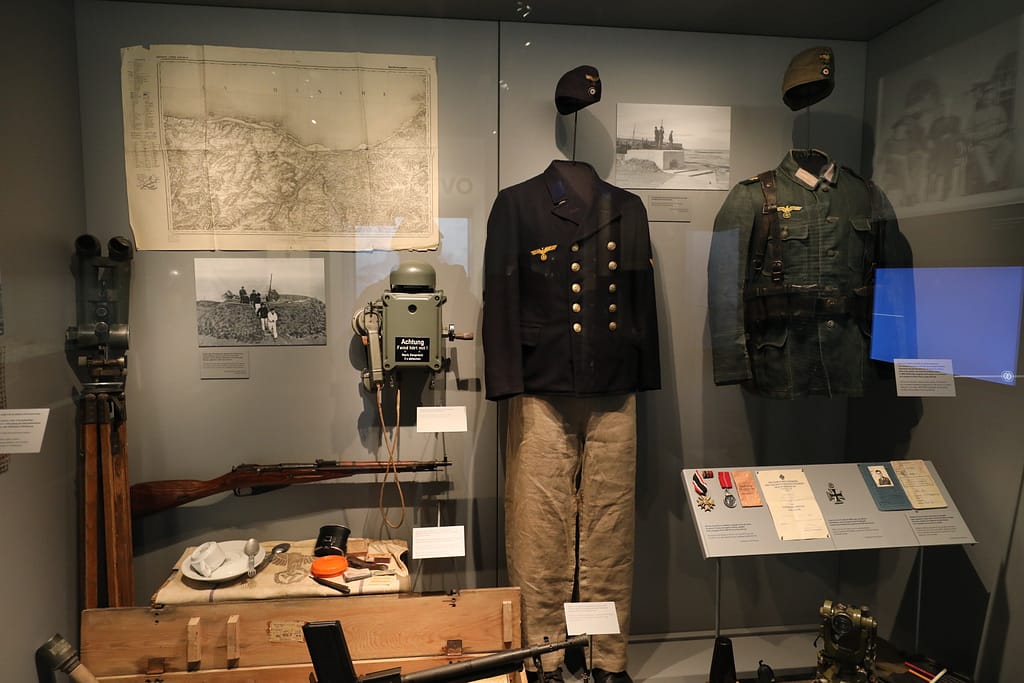
The most striking survivor is at Arromanches-les-Bains, just west of the Gold frontage. Offshore, the line of massive Phoenix caissons can still be seen, forming a broken arc across the bay. At low tide, sections of floating roadways and pierheads are exposed on the sands. From the clifftop viewpoint east of town, visitors gain the best perspective: the outline of the artificial harbour stretching across the Channel, now colonised by seabirds but still unmistakably man-made.
Musée du Débarquement
The Musée du Débarquement in Arromanches provides models and audiovisual displays explaining how the Mulberry harbour was constructed and operated. It is compact but essential, giving context to the remains visible offshore.18Chester Wilmot, The Struggle for Europe (London: Collins, 1952), pp. 303–305.
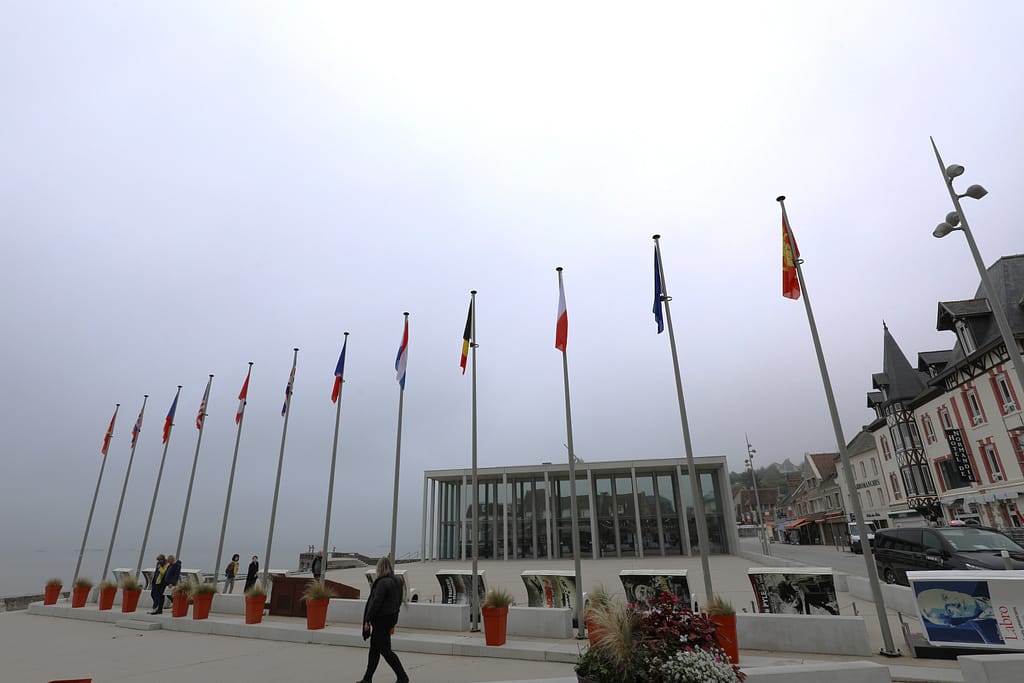
Bayeux and the inland advance
The route inland from the beach is today a quiet rural road leading to Bayeux. The town itself escaped serious wartime damage. Its medieval cathedral and timber-framed centre remain intact, offering a sharp contrast to the destruction that befell Caen later in the campaign. Bayeux also houses the largest Commonwealth War Cemetery in Normandy, where nearly 5,000 servicemen of the British Empire are buried. The cemetery and adjacent memorial provide a solemn counterpoint to the technical triumph of the Mulberry harbour.19John Buckley, Monty’s Men: The British Army and the Liberation of Europe (New Haven: Yale University Press, 2013), pp. 79–82.
Memorials and preservation
Gold Beach is less commercialised than Omaha, but its battlefield heritage is well maintained. Memorial plaques mark the key strongpoints at La Rivière and Le Hamel. Small local museums at Asnelles and Arromanches add further context. Walking the seafront or standing on the cliffs above Arromanches allows a clear appreciation of both the tactical difficulties of 6 June 1944 and the scale of the engineering achievement that followed.20L. F. Ellis, Victory in the West, Vol. I: The Battle of Normandy (London: HMSO, 1962), pp. 165–170.
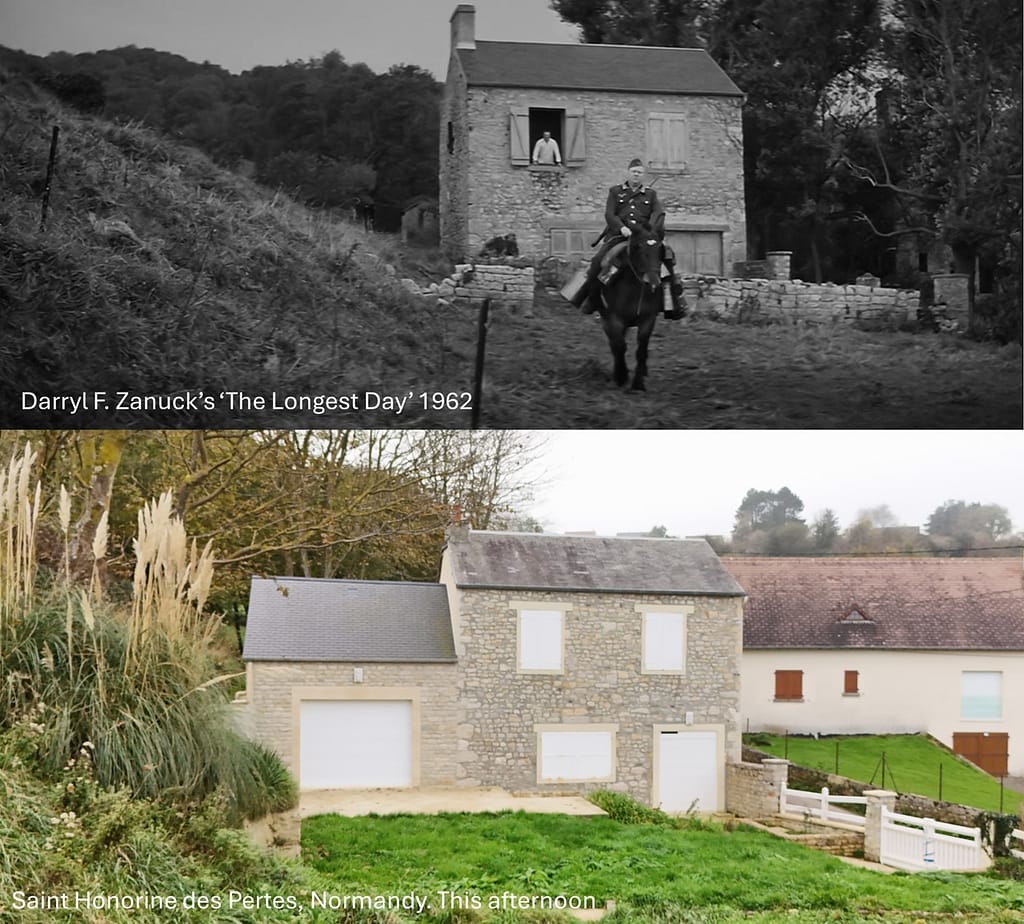
The Longest Day, Darryl F. Zanuck’s 1962 movie
Saint Honorine-des-Portes, between Omaha Beach and Gold Beach
Another historic photo match to a screenshot from Darryl F. Zanuck’s 1962 movie ‘The Longest Day’ about the D-Day invasion. Gert Frobe (who later played Auric Goldfinger in James Bond – Goldfinger) plays Unteroffizier Kaffeekanne (Sergeant Coffee Pot).
Unteroffizier Kaffeekanne rides his horse past this French house in Saint Honorine every morning to resupply the German soldiers in their bunkers in Normandy. The French householder hurls abuse him every day for making so much noise with his clanking utensils.
On 6 June 1944, Unteroffizier Kaffeekanne is one of the first to spot the enormous allied fleet off the coast, just before it unleashes a massive barrage
Additional Images of Gold Beach
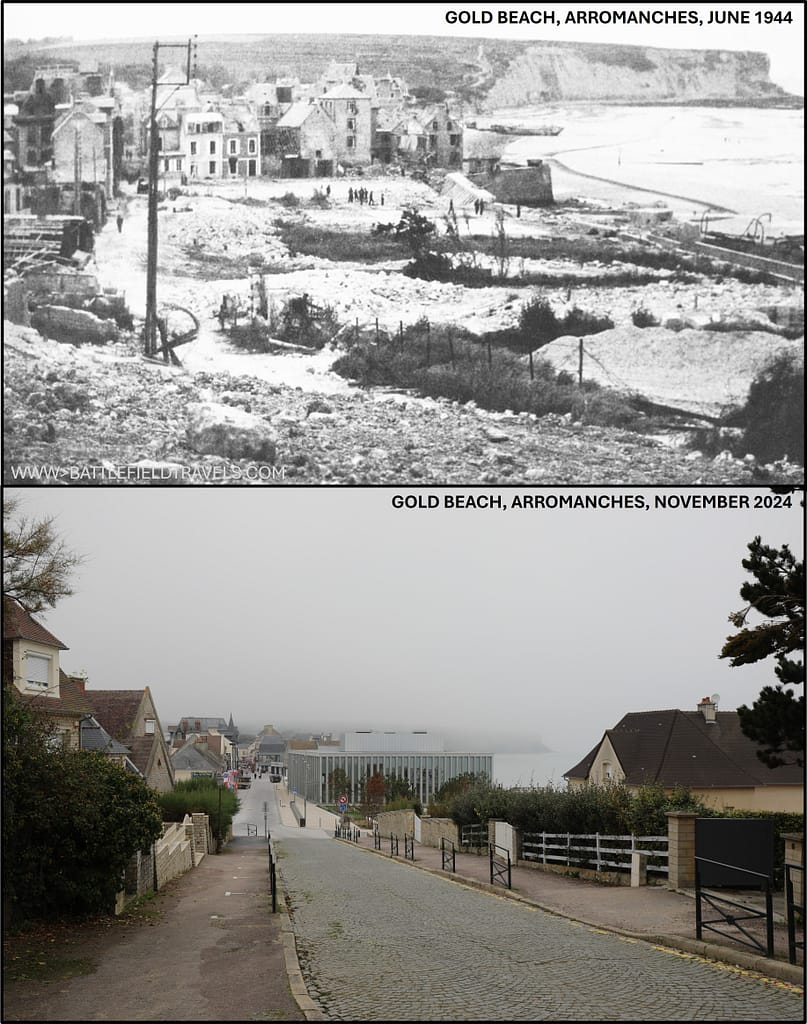
Arromanches
Found this useful? Buy me a coffee — it helps fund future battlefield research


Authored by Mick Prictor, a retired military officer with 40 years’ service, and a military historian specialising in terrain-focused analysis of tactics, doctrine, and command decision-making in land warfare. His work draws on extensive battlefield fieldwork—more than 280 sites worldwide—and one of the world’s largest private collections of historic military arms, uniforms, and equipment. About me
❓ Test Your D-Day Knowledge
Twenty questions covering the airborne operations, invasion beaches, commanders, forces and fighting of 6 June 1944.
20 questions · 60% to pass · expect a challenge
📚 Notes and References
Notes
- 1Max Hastings, Overlord: D-Day and the Battle for Normandy (London: Michael Joseph, 1984), pp. 29–33. ↩︎
- 2Carlo D’Este, Decision in Normandy (London: Collins, 1983), pp. 45–50. ↩︎
- 3Stephen Ambrose, D-Day, June 6, 1944: The Climactic Battle of World War II (New York: Simon & Schuster, 1994), p. 54 ↩︎
- 4Antony Beevor, D-Day: The Battle for Normandy (London: Viking, 2009), pp. 86–92. ↩︎
- 5David Fraser, And We Shall Shock Them: The British Army in the Second World War (London: Cassell, 1983), pp. 421–423. ↩︎
- 6Niklas Zetterling, Normandy 1944: German Military Organisation, Combat Power and Organisational Effectiveness (Winnipeg: J.J. Fedorowicz, 2000), pp. 66–71. ↩︎
- 7Chester Wilmot, The Struggle for Europe (London: Collins, 1952), pp. 303–305. ↩︎
- 8Antony Beevor, D-Day: The Battle for Normandy (London: Viking, 2009), pp. 92–97. ↩︎
- 9John Buckley, Monty’s Men: The British Army and the Liberation of Europe (New Haven: Yale University Press, 2013), pp. 68–74. ↩︎
- 10Carlo D’Este, Decision in Normandy (London: Collins, 1983), pp. 145–154. ↩︎
- 11L. F. Ellis, Victory in the West, Vol. I: The Battle of Normandy (London: HMSO, 1962), pp. 150–156. ↩︎
- 12Niklas Zetterling, Normandy 1944: German Military Organisation, Combat Power and Organisational Effectiveness (Winnipeg: J.J. Fedorowicz, 2000), pp. 74–78. ↩︎
- 13John Buckley, Monty’s Men: The British Army and the Liberation of Europe (New Haven: Yale University Press, 2013), pp. 72–79. ↩︎
- 14Stephen Ambrose, D-Day, June 6, 1944 (New York: Simon & Schuster, 1994), pp. 286–292. ↩︎
- 15Antony Beevor, D-Day: The Battle for Normandy (London: Viking, 2009), pp. 115–118. ↩︎
- 16Stephen Ambrose, D-Day, June 6, 1944 (New York: Simon & Schuster, 1994), pp. 420–425. ↩︎
- 17Stephen Badsey, Normandy 1944: Allied Landings and Breakout (London: Osprey, 1990), pp. 34–36. ↩︎
- 18Chester Wilmot, The Struggle for Europe (London: Collins, 1952), pp. 303–305. ↩︎
- 19John Buckley, Monty’s Men: The British Army and the Liberation of Europe (New Haven: Yale University Press, 2013), pp. 79–82. ↩︎
- 20L. F. Ellis, Victory in the West, Vol. I: The Battle of Normandy (London: HMSO, 1962), pp. 165–170. ↩︎
Resources & References
Primary & Official Histories
- L. F. Ellis, Victory in the West, Vol. I: The Battle of Normandy (London: HMSO, 1962).
- War Diaries, 50th (Northumbrian) Division & 231, 69, 151 Brigades, The National Archives (UK).
- Naval Staff Histories, Operation Neptune, Admiralty Records.
- RAF Second Tactical Air Force Operations Records, The National Archives (UK).
Secondary Sources (Cited in Footnotes)
- Ambrose, S. E. (1999). D-day, June 6, 1944: the climactic battle of World War II. Thorndike.
- Beevor, Antony. (2009). D-Day: The Battle for Normandy. Penguin Books
- Ryan, Cornelius (1959). The Longest Day: June 6, 1944. Simon and Schuster, New York.
- Hastings, Max (1984). Overlord : D-Day and the battle for Normandy. Simon and Schuster, New York.
- Georges Bernage, D-Day Landing Beaches: The Guide (Bayeux: Heimdal, 2009).
- John Buckley, Monty’s Men: The British Army and the Liberation of Europe, 1944–45 (New Haven: Yale University Press, 2013).
- Niklas Zetterling, Normandy 1944: German Military Organisation, Combat Power and Organisational Effectiveness (Winnipeg: J.J. Fedorowicz, 2000).
- Carlo D’Este, Decision in Normandy (London: Collins, 1983).
- Stephen Badsey, Normandy 1944: Allied Landings and Breakout (London: Osprey, 1990).
- Chester Wilmot, The Struggle for Europe (London: Collins, 1952).
- David Fraser, And We Shall Shock Them: The British Army in the Second World War (London: Cassell, 1983).
Recommended Additional Works
- Michael Reynolds, Steel Inferno: I SS Panzer Corps in Normandy (New York: Sarpedon, 1997).
- Ken Ford, D-Day 1944 (3): Gold & Juno Beaches (Oxford: Osprey Campaign Series, 2002).
- Terry Copp, Fields of Fire: The Canadians in Normandy (Toronto: University of Toronto Press, 2003).
- David French, Raising Churchill’s Army (Oxford: Oxford University Press, 2000).
Cartography & Terrain Analysis
- GSGS 4347 series 1:50,000 Normandy maps (Allied issue, 1944).
- Google Earth / IGN aerial overlays for foreshore, seawall exits, and Arromanches harbour remains.
📚 Further Reading
This battle study nests within the broader analytical framework explored in the Research Hub, where operational methods, operating environments, armies, commanders, and weapons are examined across conflicts and eras. The links below connect related studies across the wider body of battlefield analysis on the BattlefieldTravels site.
⚔️ Explore all battle studies from World War Two 1939-1945
🏛️Explore the museum of World War Two historic artefacts
The book list for this conflict includes the leading campaign studies, memoirs, and operational analyses of the D-Day landings, selected specifically to complement this battlefield study.
📚World War Two – Recommended Reading
🗞️ For updates on new battlefield studies and research insights, you can subscribe to the Newsletter.
Related Battle Studies, Museum Pieces & Reading Resources
 ⚔️ D-Day: Brecourt Manor assault, Easy Company, 506th PIR,
6 June 1944
 ⚔️ D-Day: Sword Beach landings,
6 June 1944
 ⚔️ D-Day: Utah Beach landings,
6 June 1944
 📝 🔒Field Note: XXX Corps Orders, Leopoldsburg, Belgium, 15 Sep 1944
 ⚔️ D-Day: Juno Beach landings,
6 June 1944
 ⚔️ D-Day: Omaha Beach landings,
6 June 1944
🧭 Battlefield Travel Guide: Gold Beach
Getting There
- Nearest Towns: Arromanches-les-Bains (Mulberry harbour site), Asnelles, Ver-sur-Mer.
- Access: From Bayeux (~10 km), take D6/D516 north; the coastal road D514 links the whole sector.
- Parking: Lots in Arromanches near the museum and seafront; additional parking in Asnelles and Ver-sur-Mer.
Site Orientation
- Sectors: JIG (west, near Asnelles) and KING (east, toward Ver-sur-Mer).
- Key Landmarks: Remains of Mulberry “B” harbour off Arromanches; Hillman and Morris strongpoints inland; memorials to the 50th (Northumbrian) Division.
- Best Vantage Points: Arromanches cliffs for a sweeping view of Mulberry harbour; Ver-sur-Mer British Normandy Memorial overlooking KING sector.
- Walking Routes: Seafront promenade at Arromanches; coastal paths east/west; inland trails to German strongpoints.
Museums & Visitor Centres
- On-site: Musée du Débarquement (Arromanches) — focused on the Mulberry harbour.
- Nearby: British Normandy Memorial (Ver-sur-Mer); Atlantic Wall Museum at Longues-sur-Mer gun battery; Bayeux War Cemetery & Museum of the Battle of Normandy.
On-Site Experience
- Interpretive Signage: Clear signage at Arromanches, Ver-sur-Mer, and major strongpoints.
- Atmosphere: Arromanches is lively with cafés but the Mulberry ruins offshore are stark reminders of the engineering feat.
- Photography: Best light on the harbour remnants is morning or sunset; from the cliffs for panoramic shots.
Nearby Points of Interest
- Longues-sur-Mer: German 150 mm gun battery, preserved casemates.
- Bay of Arromanches: Mulberry harbour remains visible at low tide.
- Bayeux: Major Allied base; cemetery, tapestry, and medieval town.
Practical Tips
- When to Visit: Arromanches is busiest in summer; early morning is quietest for photos.
- Facilities: Extensive cafés, restaurants, and shops in Arromanches; services in Bayeux.
- Notes: Mulberry harbour is tidal — check tide times for the best views of caissons.
Subscribe to Battlefield Travels and receive a free E-Book Battlefield Guide
Unlock expert battlefield analysis, campaign reconstructions, and historical insights drawn from firsthand exploration and primary sources.
🗺️ You’ll receive:
🎖️ Exclusive historical insights you won’t find elsewhere
📘 A free eBook: 10 Tips for Exploring Historic Battlefields
📰 New battlefield studies straight to your inbox as they are published

⚔️ Go deeper — Members get exclusive access to the Deep Research Collection, Field Notes, and monthly Research Dispatches. Try membership free for 7 days, cancel anytime. From $9/month.