Omaha Beach: The toughest fight of the Normandy invasion!
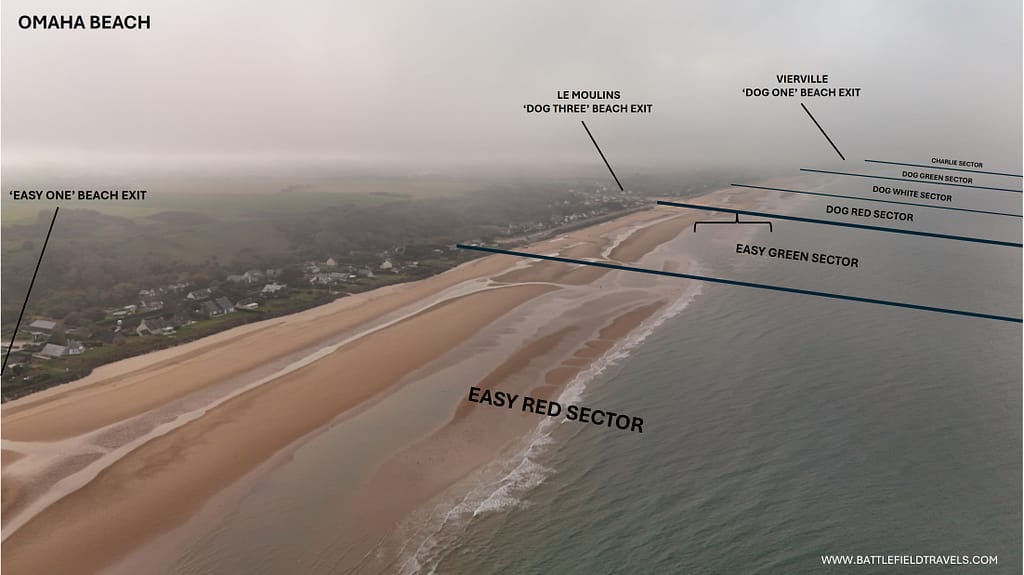
Omaha Beach makes a powerful impression. This is where Robert Capa captured his famous photos of American soldiers pushing through the obstacles under fire. At DOG GREEN and CHARLIE sectors, A Company of the 116th Infantry and C Company of the Rangers made history in scenes later immortalised in Saving Private Ryan. At DOG WHITE, Brigadier General Norman Cota urged, “Rangers, lead the way!” At the far end of the beach, the 1st Infantry Division — “The Big Red One” — finally cracked the defences at EASY RED and FOX GREEN by mid-morning. Omaha was the toughest of the five D-Day beaches, with only five deadly exits through bluffs rising 20–30 metres behind the sand. Both the Americans and the German defenders knew those exits would decide the battle.

Key facts
Google Earth map – Location of the Omaha Beach
🧭🥾 Walking the Battlefield
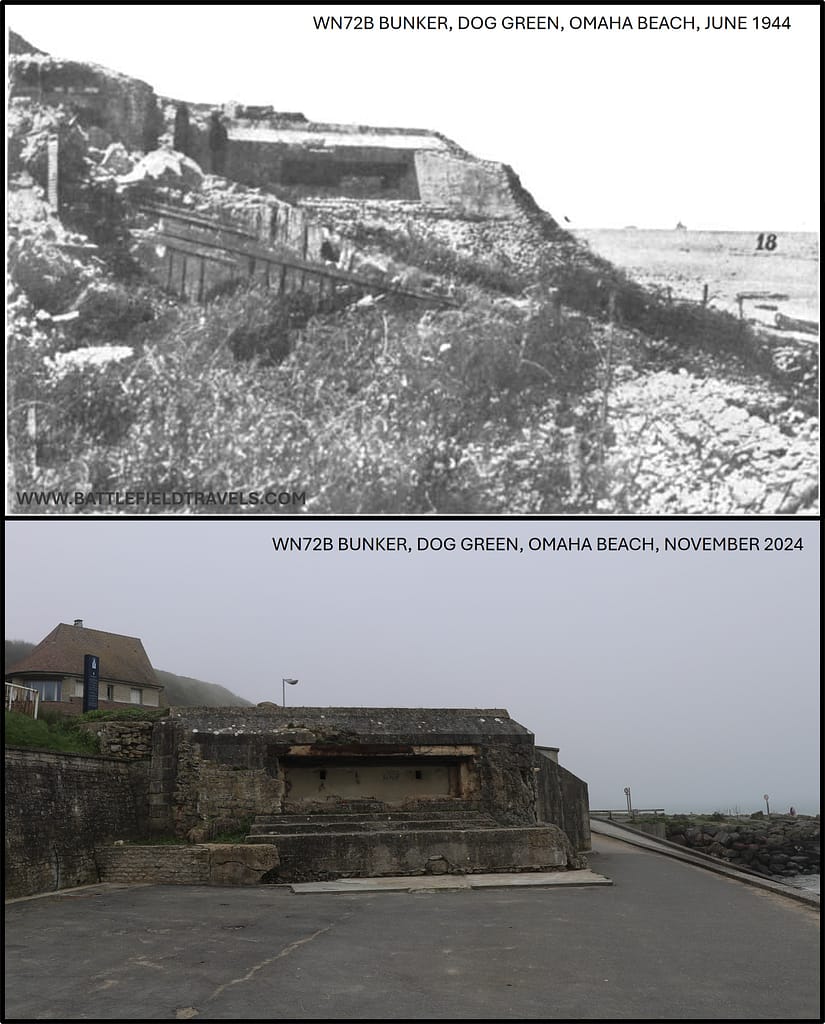
I explored Omaha Beach over several days in November 2024. I was equipped with numerous first-hand accounts, period images, maps and diagrams, plus my own pre-prepared digital mapping. I explored each of the Sectors, starting with Charlie Sector to the west of Vierville. Period images allowed me to take many ‘Then and Now’ shots from the exact location where photos had been taken on D-Day or soon afterwards.
Omaha Beach makes a powerful impression. When you visit the beach, you know that this is where Robert Capa took those famous photos of American soldiers assaulting through a dense obstacle belt, and where the dramatic first 20 minutes of Saving Private Ryan was set. It becomes obvious how important the five beach exits were to the American planners, as there is no other way to get vehicles off the beach.
Normandy series of battlefield studies
This article is part of a series exploring the D-Day airborne and amphibious battlefields on 6 June 1944 and the immediate aftermath. Click on the hotlinks to open the battlefield study.
Omaha Beach 3D flythrough of the battlefield
Strategic Context – Operation OVERLORD
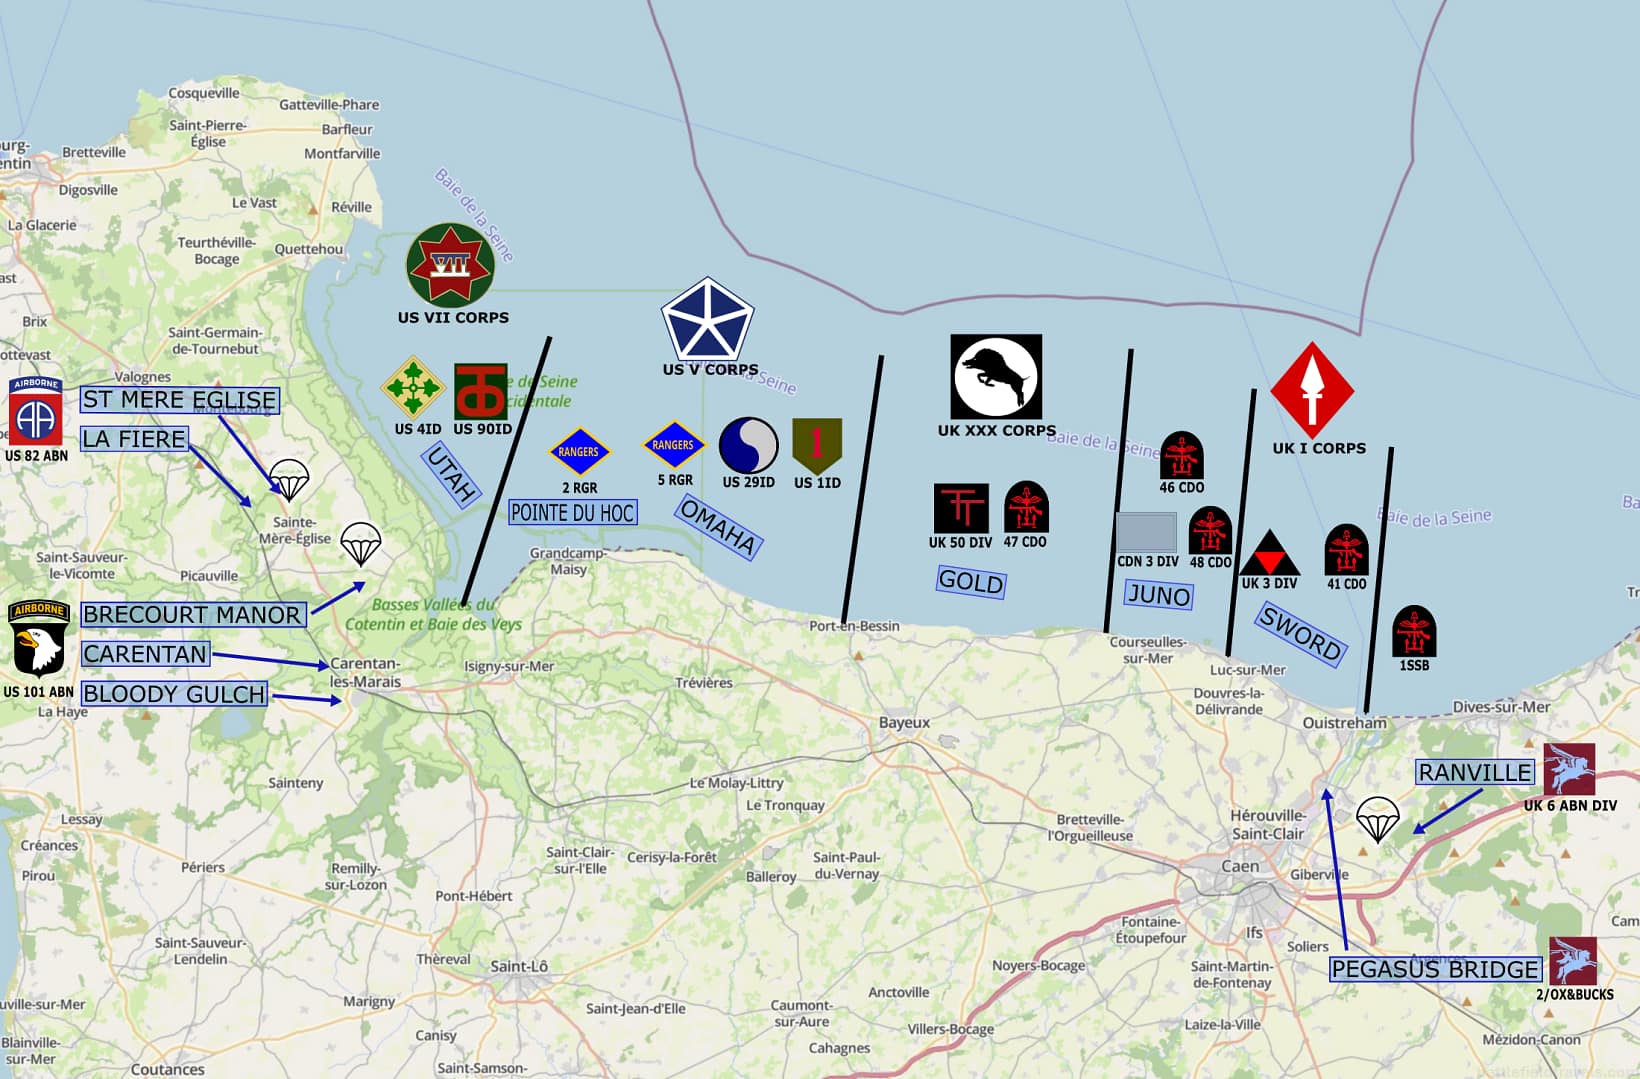
The Allied plan for Operation OVERLORD was to establish a second front in Western Europe, relieve pressure on the Soviet Union, and strike a decisive blow against Nazi Germany. Five contiguous landing beaches (Utah, Omaha, Gold, Juno and Sword) were identified for the amphibious assault. American airborne operations in the west and British airborne operations in the east would secure the flanks of the invasion and seize critical bridges for the eventual breakout.
The planning for D-Day began in earnest after the Casablanca Conference in January 1943, where President Franklin D. Roosevelt and Prime Minister Winston Churchill agreed on the necessity for a cross-Channel invasion. The selection of 6 June 1944 as the invasion date was based on various factors, including weather, tide conditions, and logistical planning. The Allies sought to establish a beachhead in Normandy, from where they could seize deepwater port facilities and breakout into occupied France.
Omaha Beach connected the planned American landings at Utah Beach on the Cotentin Peninsula with the planned British landings at Gold Beach around Arromanches. Omaha Beach was recognised early as a challenging operation. The entire beach area was dominated by steep cliffs, broken only by several ‘draws’ that would allow exit from the beach. The Germans also recognised the strength of this sector and concentrated their defences around those beach exit points.
Opposing Forces at Omaha Beach
 Allied forces
 Allied forces
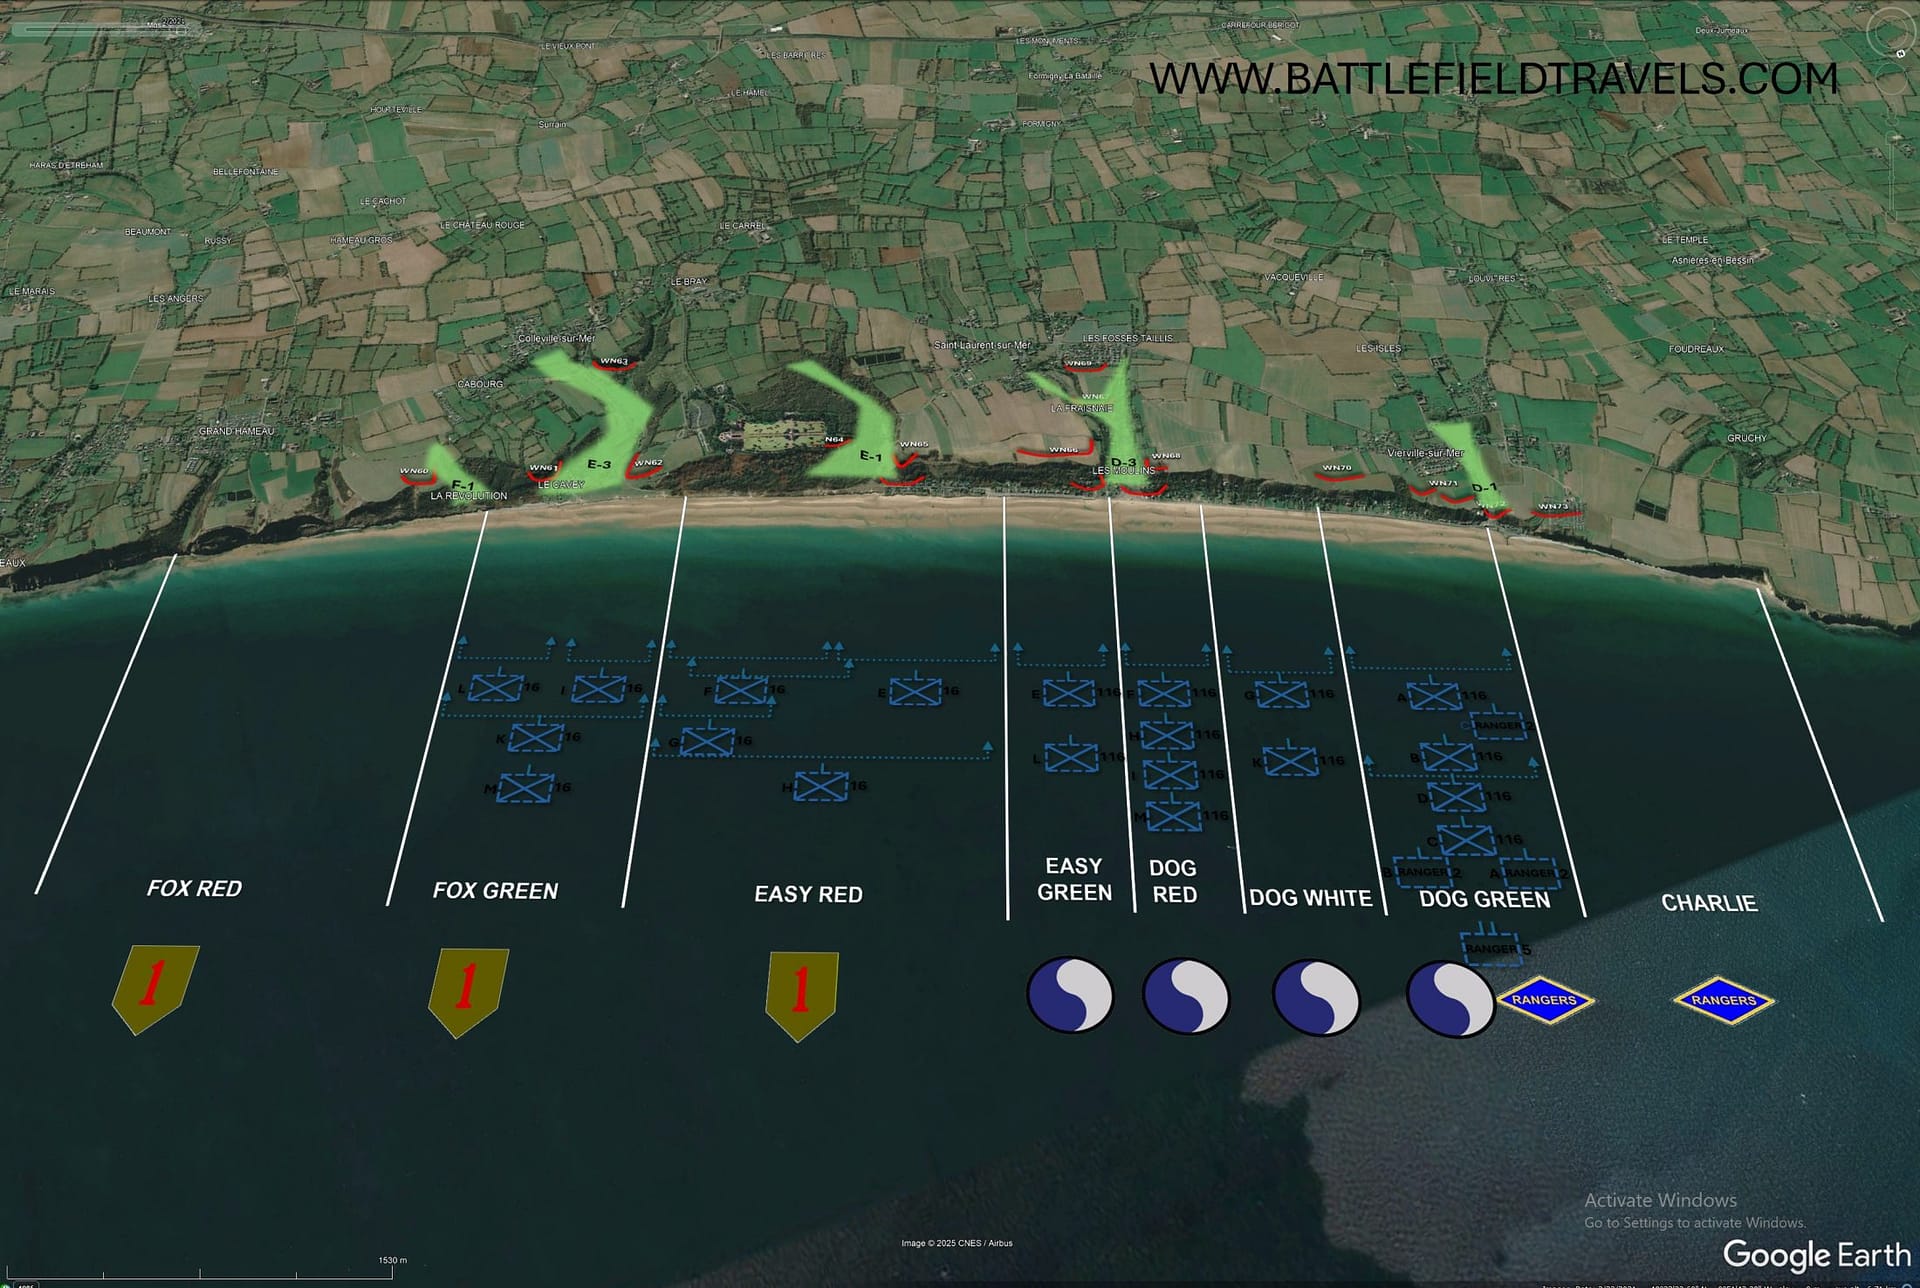
The American force designated to land at Omaha Beach was the US V Corps under Maj. Gen. Leonard T. Gerow. V Corps consisted primarily of the 1st and 29th Infantry Divisions, the 741st and 743rd Tank Battalions, Provisional Engineer Special Brigade Group, and supporting Corps troops. C Company 2nd Ranger Battalion was also assigned to support Omaha Beach, and an additional eight Ranger companies were prepared to assist if they were not landed at Pointe du Hoc. The landings were supported by 11th Amphibious Task Force, and Naval Task Force ‘O’ (for Omaha).
US 1st Infantry Division was tasked with leading the first assault wave, with two regiments abreast: 16th Infantry Regiment on the eastern flank of Omaha Beach, and 116th Infantry Regiment (attached from 29th ID) on the western flank. The remainder of 1st ID and 29th ID would land in the second and subsequent waves over the next two days. About 34,000 American troops and 3,300 vehicles were scheduled to land at Omaha during the amphibious assault.
 German forces
 German forces
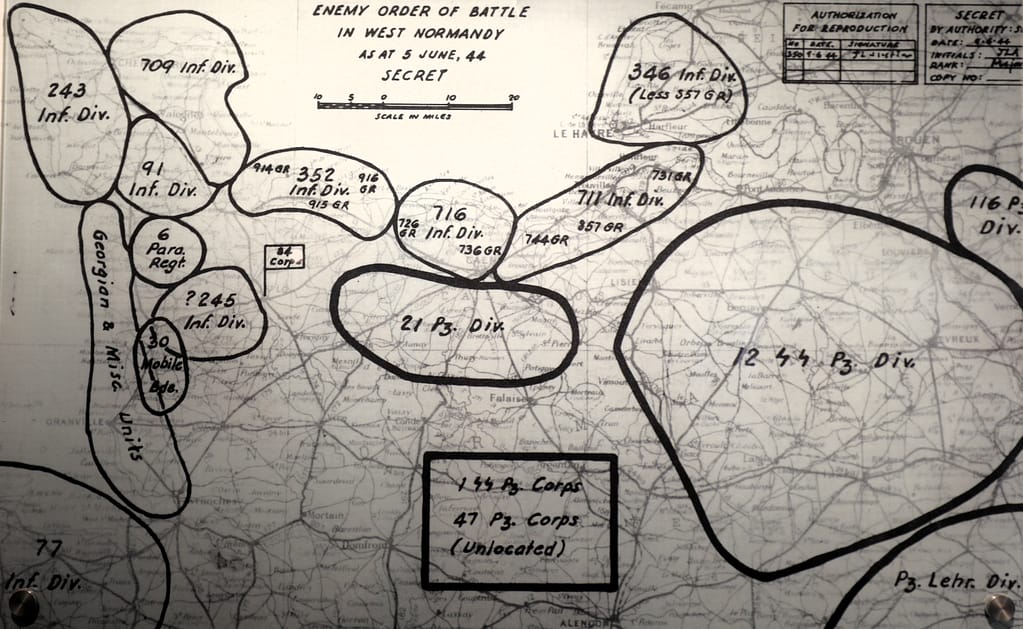
Opposing the US V Corps were approximately 3,000 German soldiers of the 352nd Infantry Division, with elements of the 716th Division attached. The 352nd Infantry Division was responsible for the defence of about 53km of Normandy coastline, including the Pointe du Hoc sector, all of Omaha Beach, and the western end of Gold Beach. The division was deployed with 914th Grenadier Regiment in the west, 916th Grenadier Regiment in the east, and 915th Grenadier Regiment in depth around Bayeux.
The German defences at Omaha Beach were formidable. 15 major ‘Resistance Nests’ (Widerstandsnests (WN)) covered the Omaha Beach sector; numbered east to west as WN60-WN74. Each WN included a mix of anti-tank guns, anti-aircraft (FLAK) guns, light howitzers, mortars and machine guns, plus defending infantry emplacements.
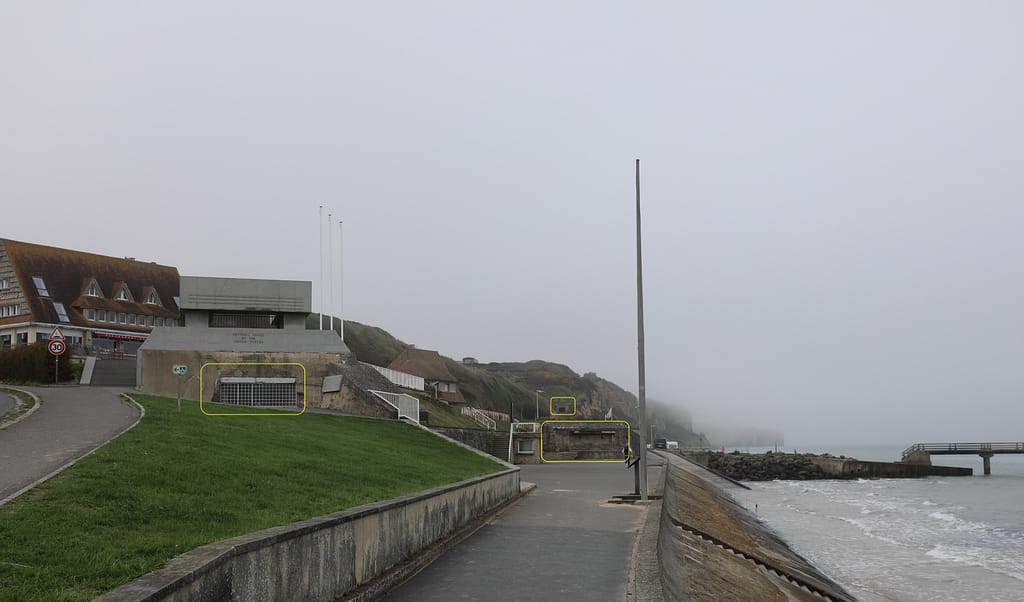
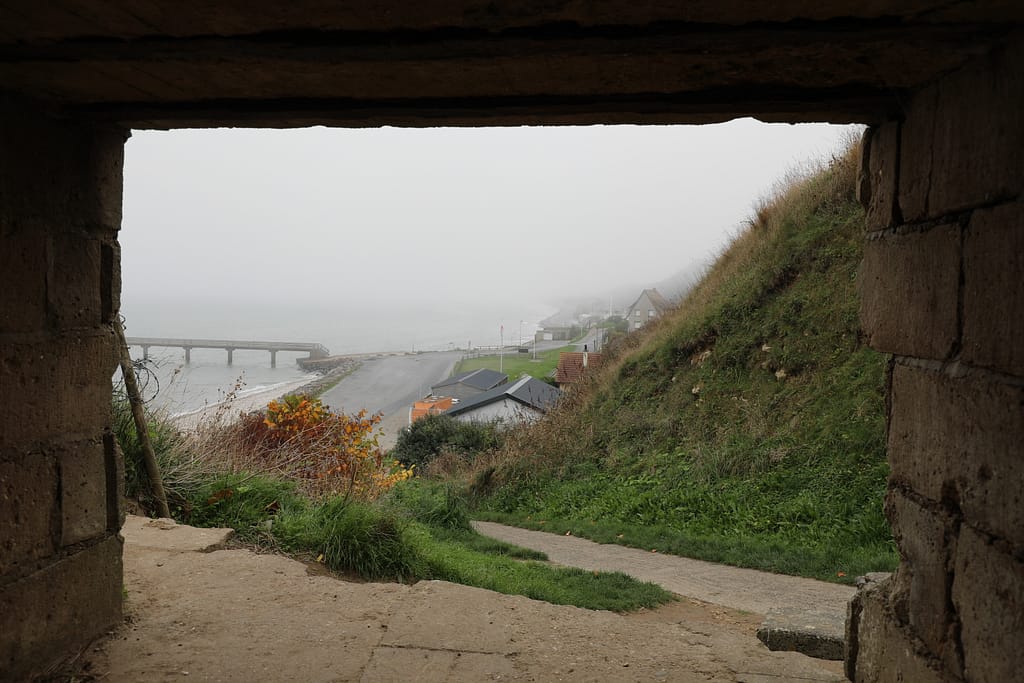
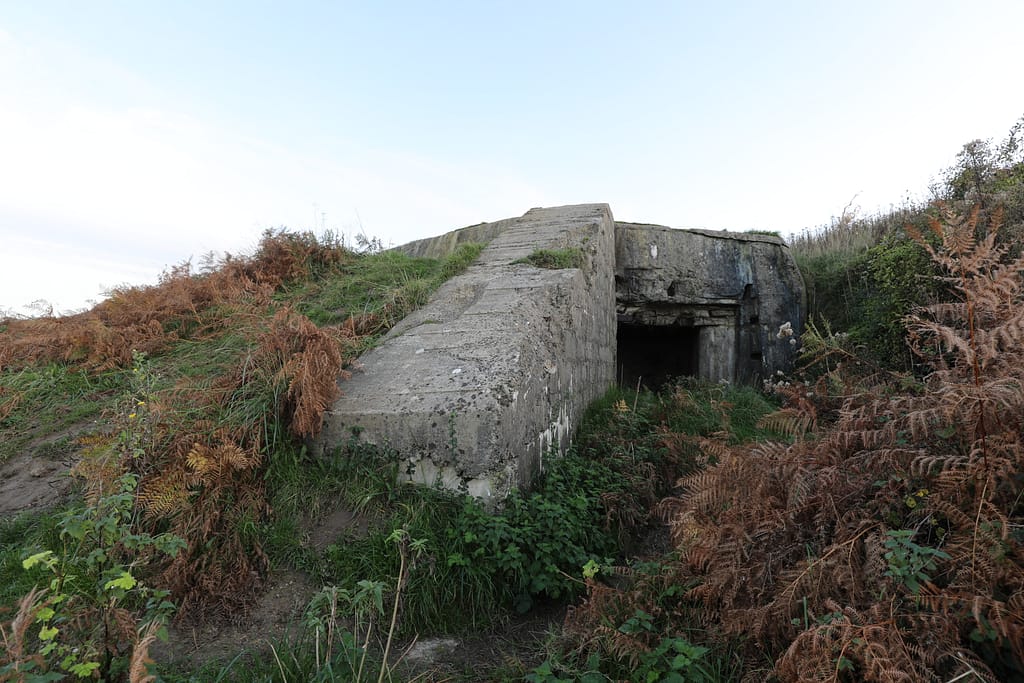
The bunkers along Omaha Beach and the entire West Wall system are built with their embrasures facing along the beach, not out to sea. The seaward side of each bunker is a thick concrete shield to protect against naval gunfire. This is contrary to Hollywood depictions like ‘Saving Private Ryan’, where the embrasures, and therefore the weapons, all point out to sea. For those who understand, these bunkers are perfectly configured to deliver enfilade, grazing fire from a defilade position! A Hollywood style bunker with the opening facing out to sea would be quickly destroyed by Naval fires. Other smaller bunkers such as the ‘Tobruk’ machine gun/mortar positions have 360 degree coverage.
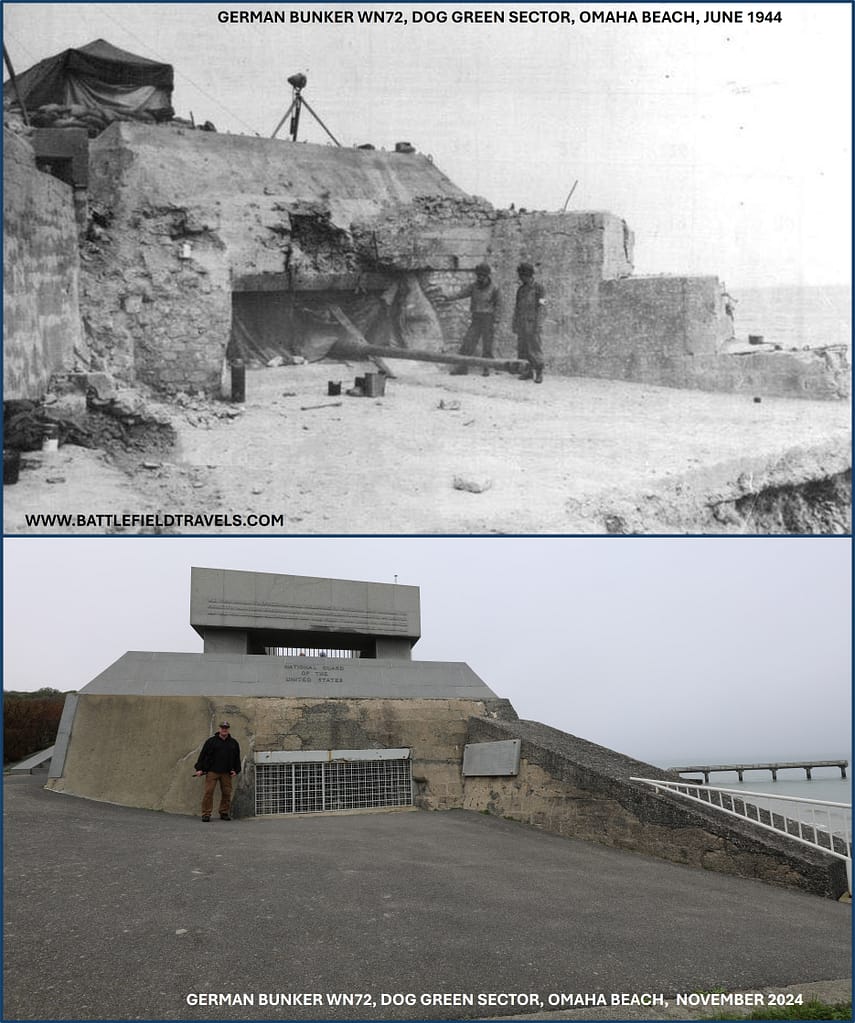
Pre-landing phase: air and naval bombardment
Pre-landing Bombardment
On 14 April 1944, despite protests, both RAF Bomber Command and the US Strategic Air Forces in Europe were formally placed under the direction of General Dwight D Eisenhower and Supreme Headquarters Allied Expeditionary Force (SHAEF). In the months prior to the D-Day landings, allied airpower targeted railyards, aircraft factories and airfields, strategic industry. As invasion day grew closer, some of that airpower was directed against the beach defences and coastal artillery batteries.
About one-hour prior to the D-Day landings, Naval Task Force ‘O’ struck the German defences with a brief but intense naval bombardment. Battleships, cruisers and destroyers targeted the German positions with mixed results. Naval gunfire was crucial in suppressing the German defences at Pointe du Hoc and allowing the Rangers to scale the cliffs. Some soldiers noted that the destroyer’s 5-inch shells barely dented the German concrete bunkers, even with a direct hit; although the occupants could be severely concussed and disoriented.
Results of the bombardment – disappointing
The Landing Craft Tank (Rocket) (LCT(R))s were a disappointment. Eight LCT(R)s supported the Omaha Beach landing and each could launch up to 1,066 5″ rockets in salvos. The rocket barrages were timed to land immediately ahead of the amphibious assault force to break up beach obstacles and destroy enemy positions. At Omaha Beach on D-Day, almost all of the LCT(R) rockets fell into the sea without inflicting significant damage on the German positions.
Despite the well-coordinated plans, the pre-landing bombardments produced mixed results. Much of the offensive air support on D-Day overshot and delivered their bombs behind the beaches. Naval guns, particularly the larger calibers, could destroy emplacements with a direct hit. However, too few emplacements were struck. This pre-landing bombardment did not achieve significant damage against the German defensive network, resulting in heavy resistance when the American forces landed at Omaha Beach.
⚔️ Go deeper — Members get exclusive access to the Deep Research Collection, Field Notes, and monthly Research Dispatches. Try membership free for 7 days, cancel anytime. From $9/month.
Omaha Beach 1st wave landings
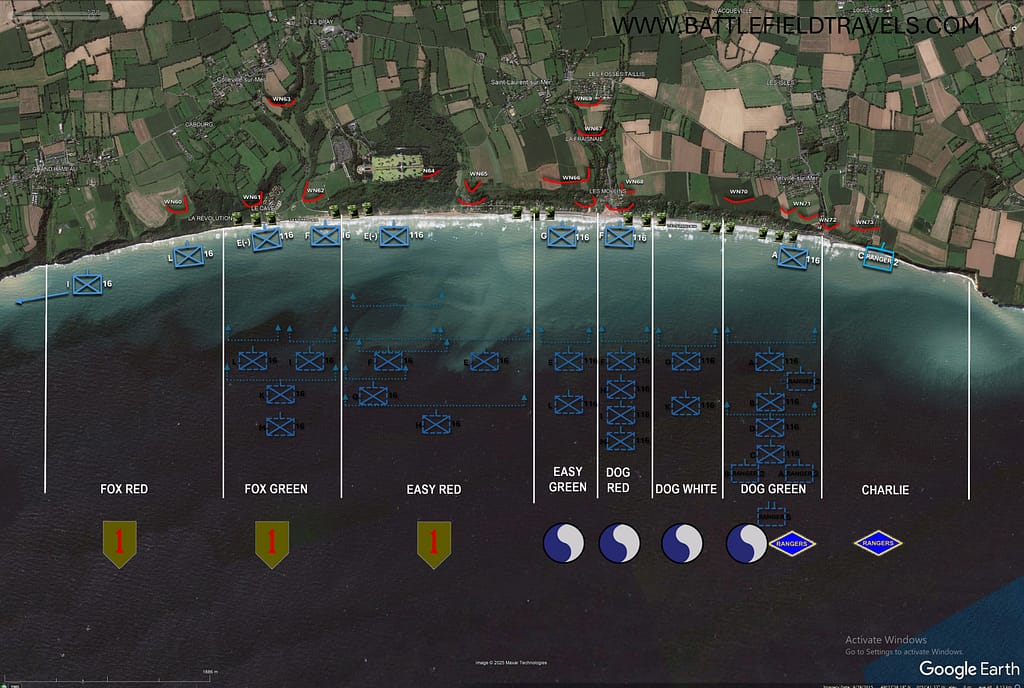
DD and Wading tanks
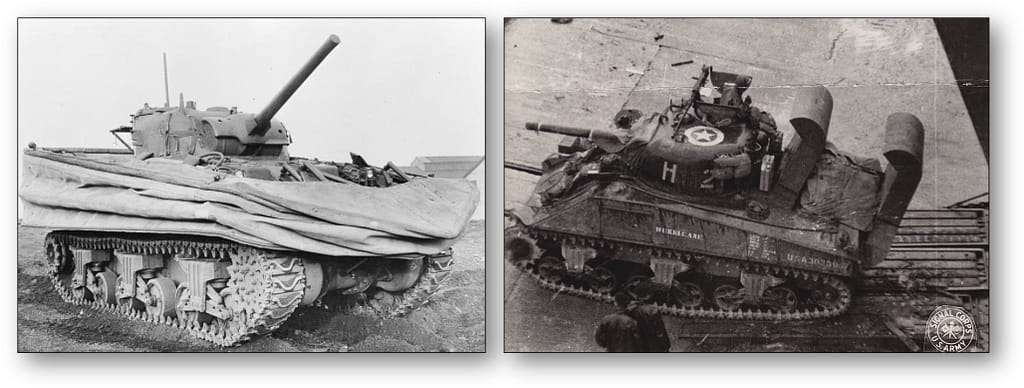
The Omaha Beach assault commenced with a wave of 32 Duplex-Drive (DD) Sherman tanks from 741st Tank Battalion, launched from about 6,000 yards offshore. Tragically, 27 of the tanks were destroyed or foundered before they reached the beach. Only two of the 741st DD tanks made it ashore at Omaha Beach in the 16th Infantry Regiment sector. Commander 743rd Tank Regiment considered the sea conditions too severe for swimming the DDs ashore, so wisely elected to land them instead. Most of the 743rd tanks got ashore in the 116th Infantry Regiment sector. Additional wading Shermans and Bulldozer tanks were delivered to the beach by Landing Craft. In total, about 70 of the 112 DD, Wading snorkel and Bulldozer Shermans made it ashore on Omaha Beach.
Infantry and engineers
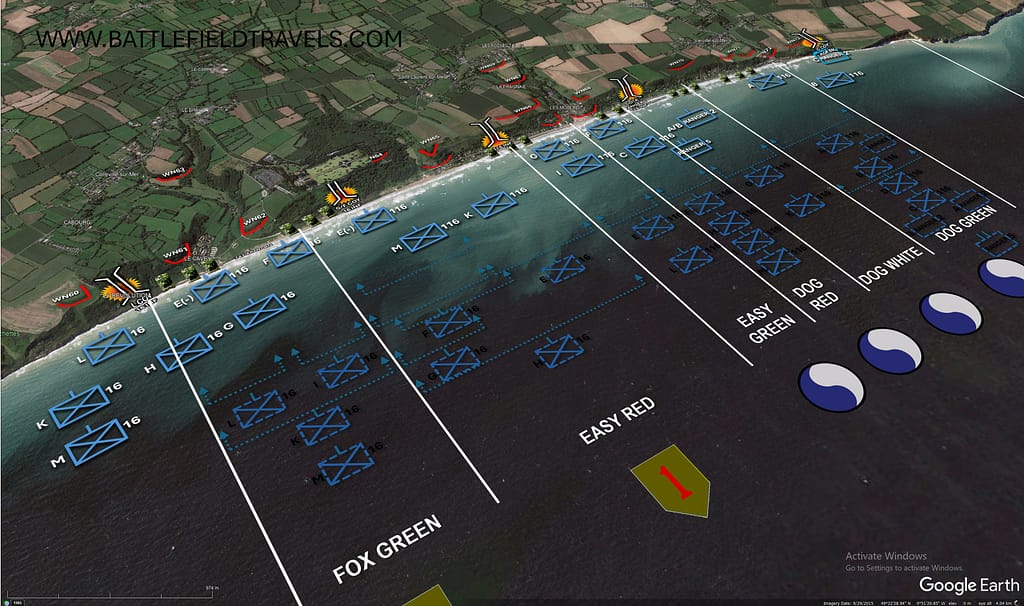
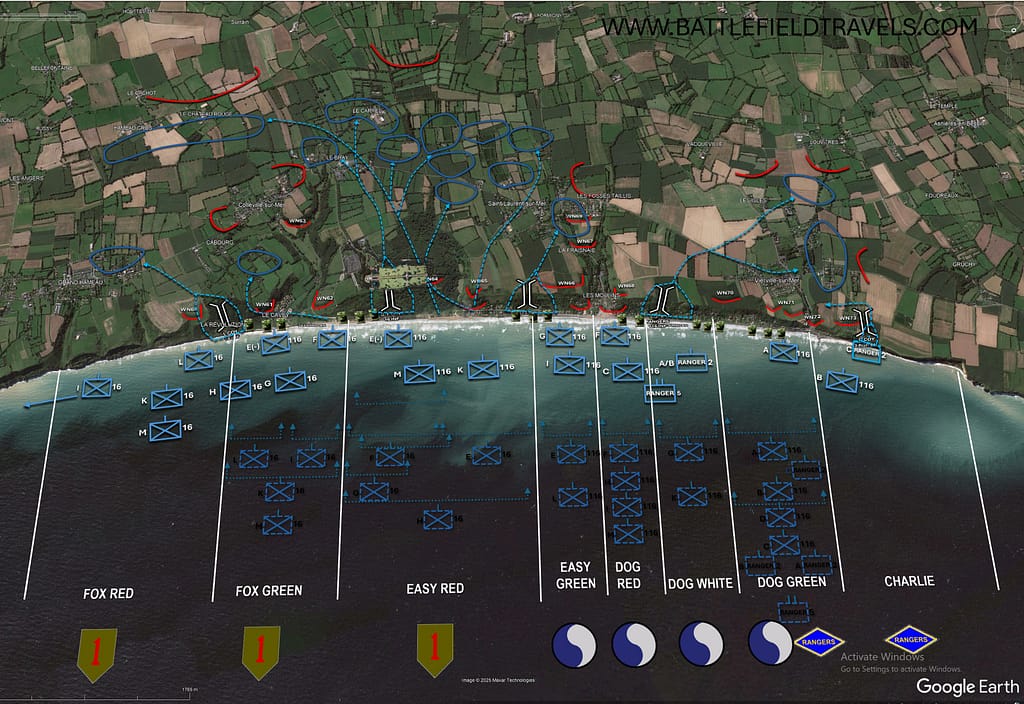
The first infantry assault wave landed at 0635hrs. 16th Infantry Regiment (1st ID) at FOX GREEN and EASY RED. 116th Infantry Regiment (29th ID) at EASY GREEN, DOG RED, DOG WHITE and DOG GREEN. To avoid the extensive German obstacle belt of Hedgehogs, Belgian Gates, Pyramid Traps, Ramps and minefields, the landing commenced at low tide. By landing when the tide was out, the Navy crews could see and avoid most of the obstacles and booby traps. However, upon exiting the landing craft, the assault troops had to cross 300-400 metres of beach before they could reach any form of cover.
With rough seas, a strong current, navigation difficulties and enemy fire, very few of the first wave of assault craft landed where intended. The only intact force to land where intended was A Company, 116th Infantry Regiment at DOG GREEN, where it immediately came under heavy fire.
Fight for the beaches
Landing craft and vehicles were engaged by the 88mm, 75mm and 50mm anti-tank gun emplacements in the Widerstandsnests, and machine-gun fire from German trenches along the bluffs. German machine-guns and mortars fired from the network of Tobruk and other bunkers clustered around the beach exit points. German artillery firing from Maisy Battery and Longues-sur-Mer, and the 352nd Divisional batteries, struck the Omaha Beach landing sites and duelled with the allied warships offshore.
Dog Green/Charlie Sector
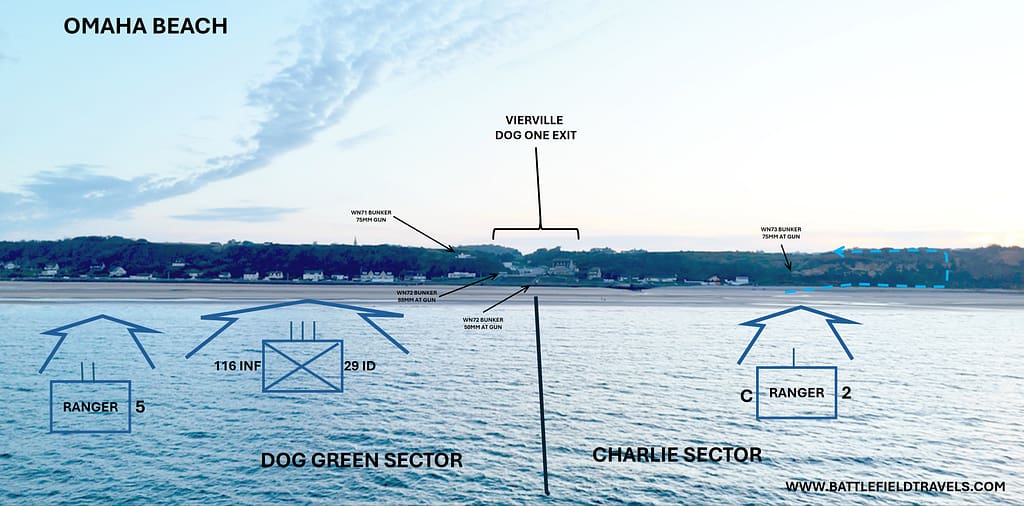
The assault forces were initially pinned on the beach. A Company, 116th Infantry Regiment at Vierville took almost 90% casualties at Vierville. Under intensive fire, NCOs and junior officers had to make decisions and get their men moving off the beach. At both ends of the beach, the initial waves of landing craft continued to deliver troops and vehicles, almost all to locations far from their intended landing locations. By 0830, the beach had become so congested, a decision was made to temporarily halt the landing craft assault waves.
C Company, 2nd Ranger was tasked to support 116th Infantry’s landing at DOG GREEN. When the Rangers witnessed A Company being destroyed as it landed, the Company Commander redirected the Rangers to land further west in CHARLIE Sector at the base of the cliffs west of Vierville Draw. The fire was almost as intense there as it was in DOG GREEN Sector and the Rangers took heavy casualties. Only 31 of C Company’s 61 Rangers made it to cover at the base of the cliffs.
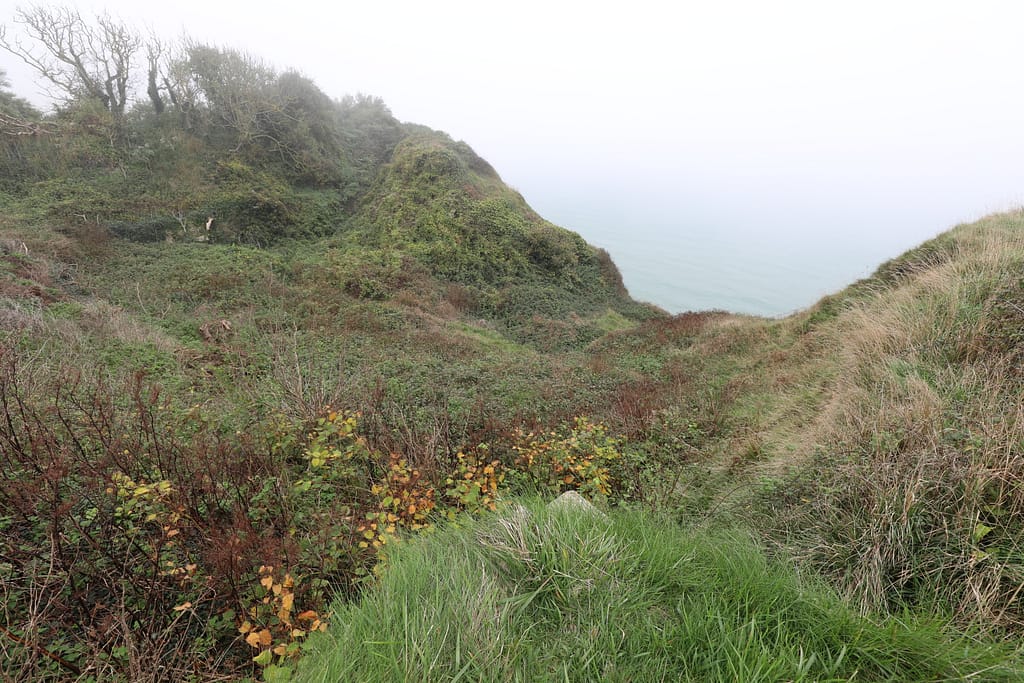
The Rangers identified a climbable path to the top of the bluff and proceeded to climb the cliffs in CHARLIE Sector. This brought them out behind the German WN73 positions on the high ground at the western end of Omaha Beach. The Rangers fought through the German position, neutralizing and eliminating bunkers. This action forced the Germans on the bluffs to defend against this new threat and diverted their attention and firepower away from DOG GREEN and DOG WHITE. It may well have been a game-changer on Omaha Beach. Charlie Company, 2nd Ranger Battalion’s actions in support of 116th Infantry Regiment around Vierville is the basis for the opening scene in Saving Private Ryan.
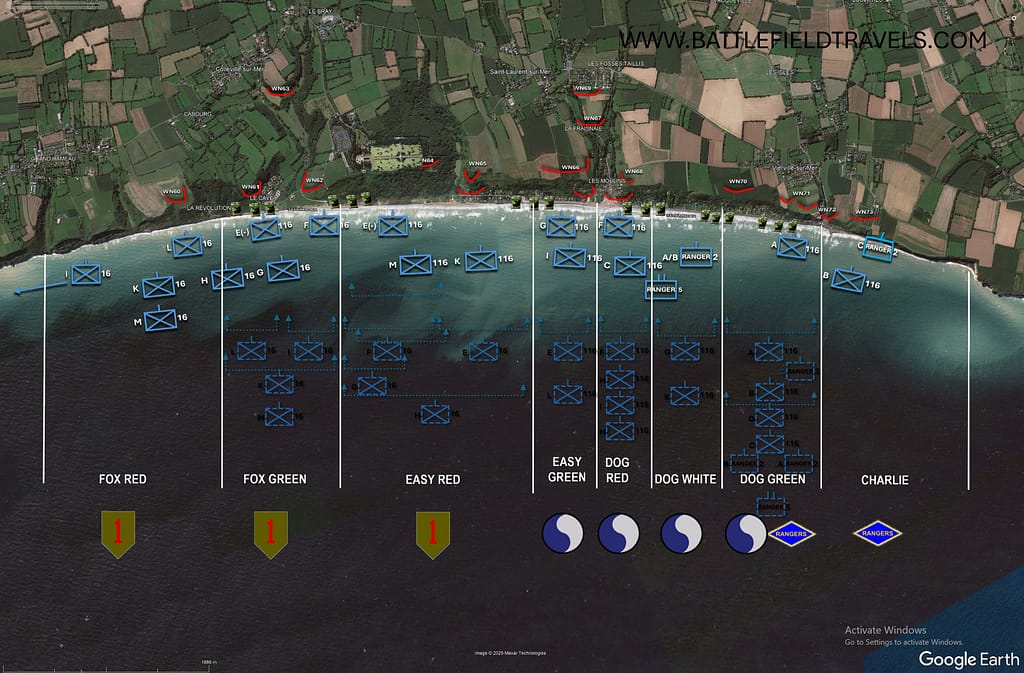
DOG WHITE/DOG GREEN Sectors
With A Company almost wiped out at Vierville, the remainder of 1st Battalion, 116th Infantry Regiment (B, C and D Companies) landed further west on DOG GREEN. They took heavy casualties on the beach but the survivors made it to the relative protection of the sea wall.
Elements of F and G Companies, 116th Infantry Regiment, successfully landed at DOG WHITE Sector. Following close behind was Ranger Task Force C under Lieutenant Colonel Max Schneider, comprised of 5th Ranger Battalion and A and B Companies 2nd Ranger Battalion. Task Force C was on standby to support the Pointe du Hoc assault but when they did not receive the codeword to land at Pointe du Hoc, they shifted to their alternative landing site at Omaha Beach.
Companies A and B, 2nd Ranger Battalion landed near the boundary of DOG WHITE and DOG GREEN and immediately came under heavy fire. LTC Schneider could see what was happening and took decisive action to divert the rest of his force further west in DOG WHITE where it landed largely intact.
“Rangers – Lead the Way!”
116th Infantry Regiment was stalled on the beach, with troops desperately seeking cover behind the seawall but continuing to suffer severe casualties from well-placed German machine guns. At about 0800 Brigadier General Norman D. Cota, the Assistant Division commander of the 29th, walked up to LTC Schneider and said, “We have to get the hell off this beach. Rangers, lead the way!” That was a catalyst for action. 29th ID veterans would always deny that they needed anybody to lead them off the beach!
On DOG WHITE, small parties of Rangers, infantry, and engineers scrambled over the seawall to set bangalore torpedoes to clear a way through the minefield and barbed wire. With a gap opened, Brigadier General Cota, the Rangers and elements of the 116th Infantry filed through the German obstacles and followed a draw onto the clifftop, neutralising German positions as they moved. This force was now behind the German beach defences and able to assault the German positions around Vierville from the rear.
The Rangers and 116th Infantry Regiment were eventually able to clear some of the positions around the western side of Vierville Draw, while Company 2nd Rangers cleared the German positions on the eastern side of the draw.
EASY RED/FOX GREEN Sectors.
With most of the 741st Tank Battalion’s DD Sherman tanks lost before they even made it ashore, the 16th Infantry Regiment faced a tough fight on the beach. Again, the combination of enemy fire, strong currents and navigation difficulties led to most of the initial landings being well east of the planned sites. Easy and Fox Companies were supposed to land in EASY RED SECTOR, but drifted east into FOX GREEN. As the platoons and companies landed they had to first figure out where they were and then adapt to the circumstances.

In his command post onboard USS Augusta, General Omar Bradley could see little of what was happening on Omaha Beach, but the fragments of reporting he received indicated a potential catastrophe with heavy losses. He considered giving an order to evacuate the beach. He knew that sending in more assault waves would only add to the congestion on the beach, but withholding them left early waves isolated and vulnerable.
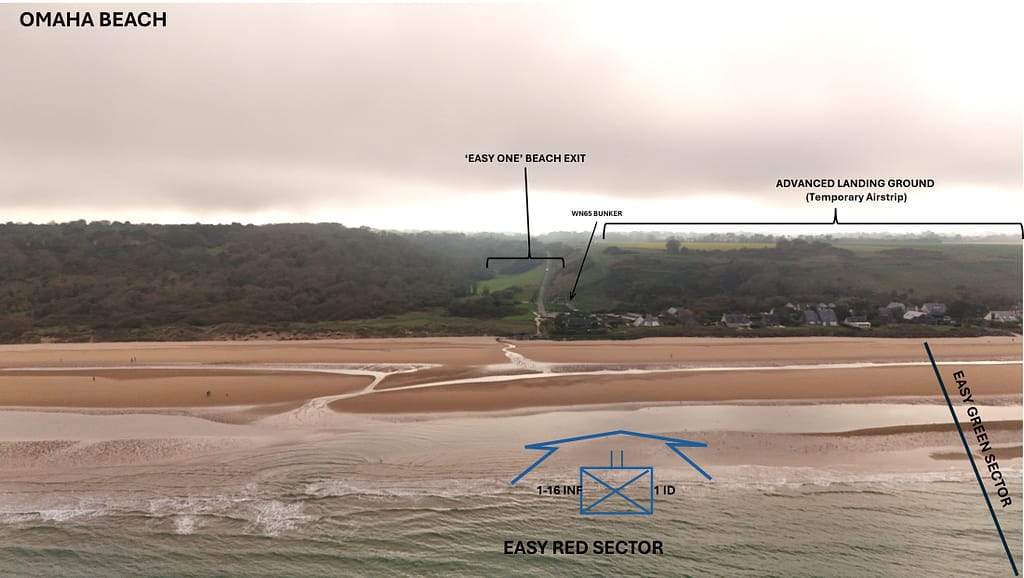
At 0950, Commanding General 1st Infantry Division, Major General Clarence Huebner, ordered 18th Infantry Regiment to land at EASY RED Sector. EASY RED was the longest beach sector, and two companies (Easy and Fox) of the 16th Infantry should have landed there, but it was almost empty. As 18th Infantry landed on EASY RED under heavy fire, the 115th Infantry Regiment also drifted left and began landing at EASY RED (they were scheduled to land at DOG RED).
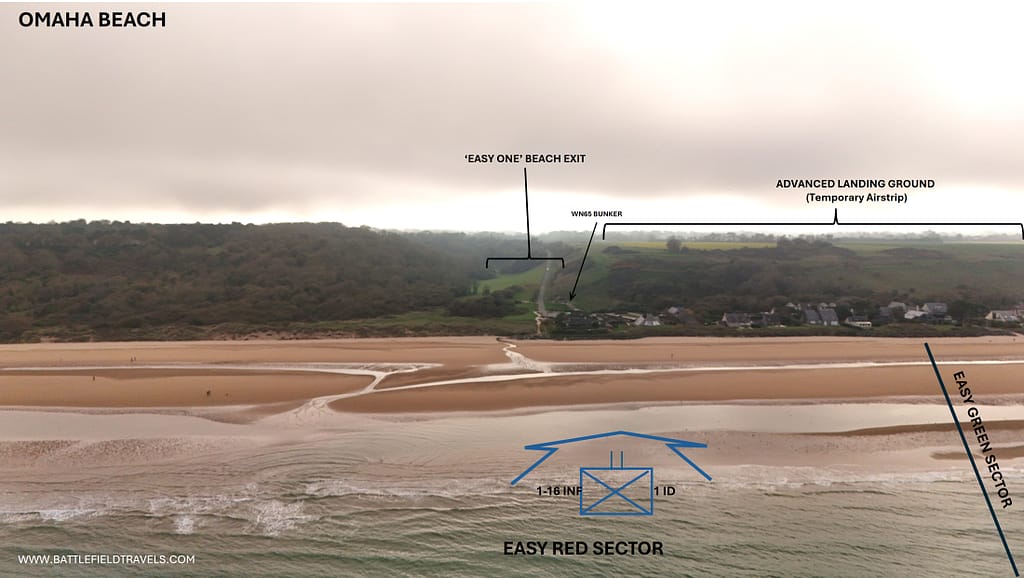
By 1000hrs, the tide had risen and the beach obstacles were no longer visible. Many landing craft were destroyed by German fire or by the underwater mines and obstacles. When the landing craft attempted to offload outside the obstacle belt, tanks and vehicles sank straight to the bottom, and many men drowned. As EASY RED grew more chaotic, Navy destroyers moved closer to shore, some as close as 400 yards from the beach, and were able to assist the landing force by destroying individual German positions.
FOX RED and beyond
L Company 16th Infantry drifted left into FOX RED, and Item Company 16th Infantry landed well left of Omaha Beach, close to Bessin-Huppain. The terrain there was very steep, and the companies were able to gain shelter at the base of the cliffs as they prepared for an assault on the bluffs. L Company was able to eliminate WN60 and clear Exit F-1, but the exit was too steep to be usable on D Day.
Breakthrough at EASY RED
At around 1100, several events gave cause for optimism on EASY RED. Captain Joe Dawson of G Company led a mixed team to breach the obstacles between E1 and E3 exits. Dawson’s team then followed a shallow draw to the crest of the bluff, clearing German positions around E-3 as they moved. At about the same time, Lieutenant John Spalding and a team from E Company cleared a Tobruk position overlooking E-1 exit and also crested the bluff.
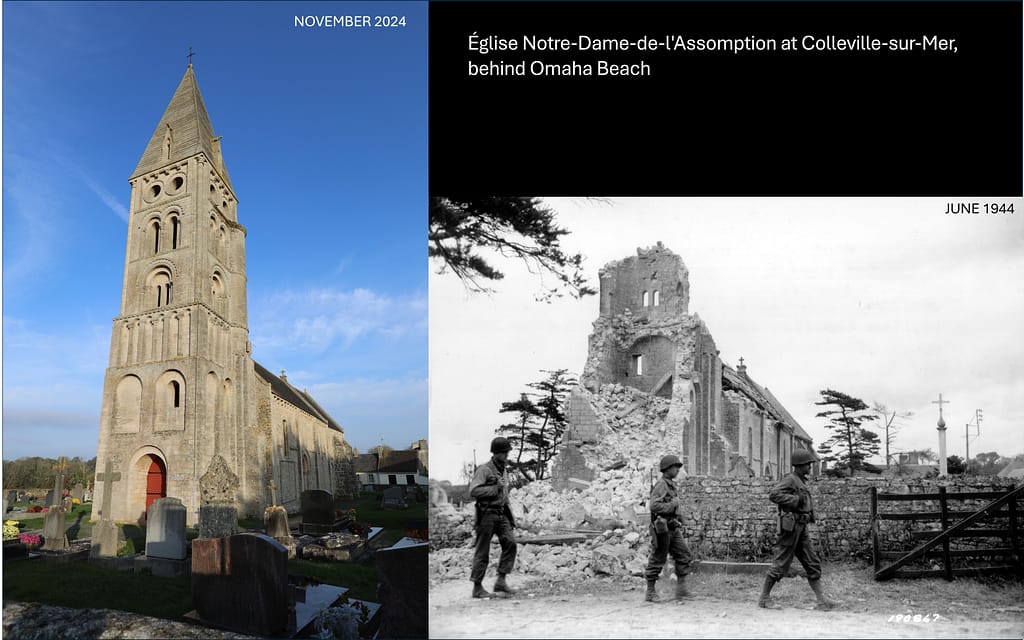
16th Infantry Regiment Commanding Officer, Colonel George A. Taylor, ordered all available tanks to E-3 draw to reinforce the developing success. Captain Dawson’s team from G Company veered left towards Colleville where they cleared the church and eliminated a German artillery observer in the church steeple. Lieutenant Spalding and E Company veered right towards Saint Laurent, eliminating German machine guns and positions along the bluff. By about 1200hrs, the German fire between E-1 and E-3 had considerably reduced as machine gun positions were eliminated and more American troops. Tanks were able to fire directly into bunker embrasures, and tank dozers buried German positions under sand.
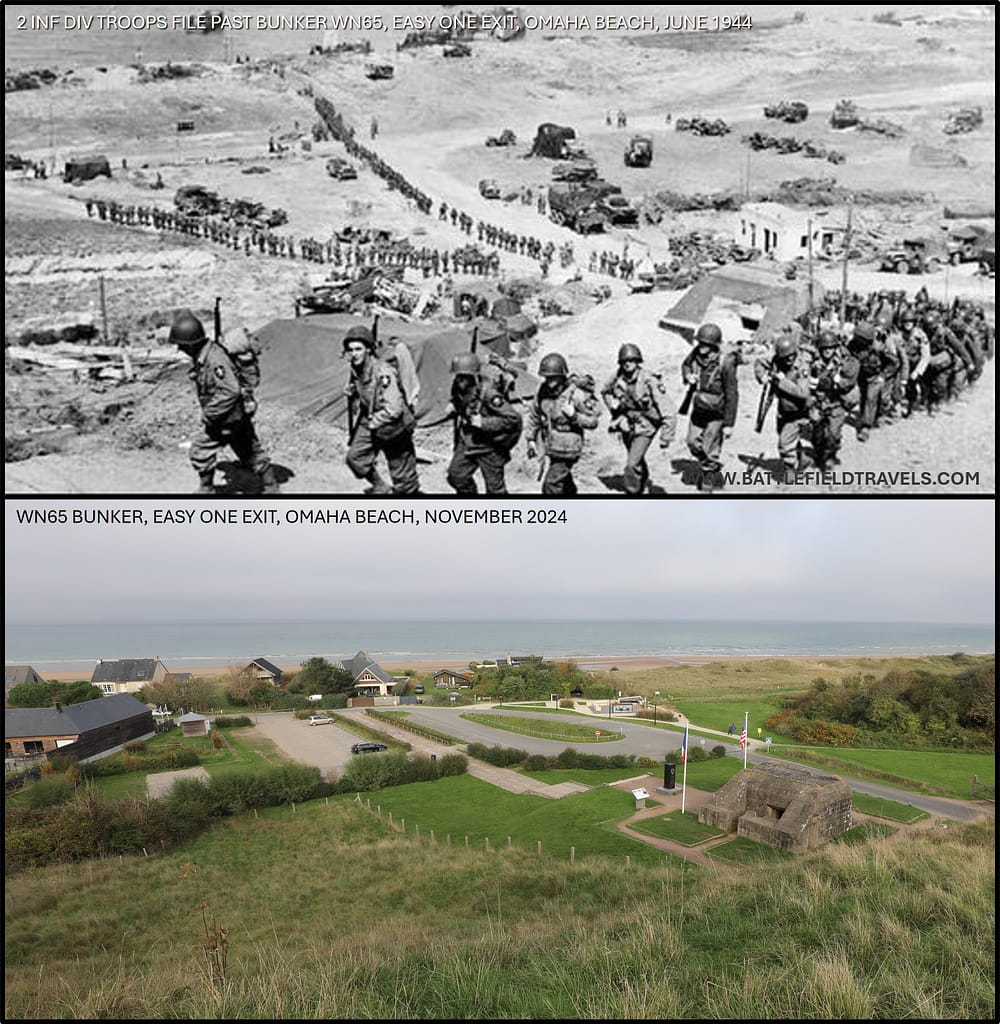
At around 1130, the last German position defending Exit E-1 was destroyed. The Americans finally had a usable exit on Omaha Beach. E-1 would become the main exit point from the beach on D-Day
Tipping point at Omaha Beach
By about 1200hrs, troops from the 16th, 18th, 116th and 115th Infantry Regiments were ashore at EASY RED. Further waves of landing craft continued to disgorge troops and vehicles and junior officers and NCOs continued to exploit the penetration. The situation was now shifting decisively against the German defenders as positions were eliminated, overrun or bypassed, and more American troops and equipment reinforced the breach.
By 1309hrs, Commander V Corps, Major General Leonard T. Gerow, was able to report to General Bradley that troops were advancing beyond EASY RED, EASY GREEN and FOX RED. Elements of 5th Ranger Battalion who had breached the German defences above DOG WHITE turned left and linked up with 16th Regiment elements around Le Moulins.
German responses to Omaha Beach landings
As a consequence of Rommel’s insistence on defeating the allies on the beach, German defences behind the beach were much weaker than the beach defences. German platoons and companies defended hedgerows and strongpoints around the villages, but the defence was not as tightly integrated as it was on the beach. However, a single well-placed machine gun could still hold up an American advance.
The Germans perceived the British and Canadian landings east of Omaha as the greatest threat to Caen, so this is where Rommel directed the operational reserves (primarily 21st Panzer Division). The strategic reserve, Panzer Group West could not move without Hitler’s permission, so was delayed for more than 24 hours. The 352nd Division defending Omaha Beach requested reinforcements but few were available. By end of D Day, the 352nd in the Omaha Sector had culminated.
Situation at the end of D-Day
By the end of D-Day, American forces had penetrated several kilometres to Colleville and had fought off a major German counterattack. A second, shallower penetration was made west of Saint Laurent. Vierville draw was held by elements of the Rangers and 116th Infantry. The German defences were no longer cohesive but isolated pockets of resistance fought on. Subsequent landing waves continued to reinforce and strengthen the hold on Omaha.
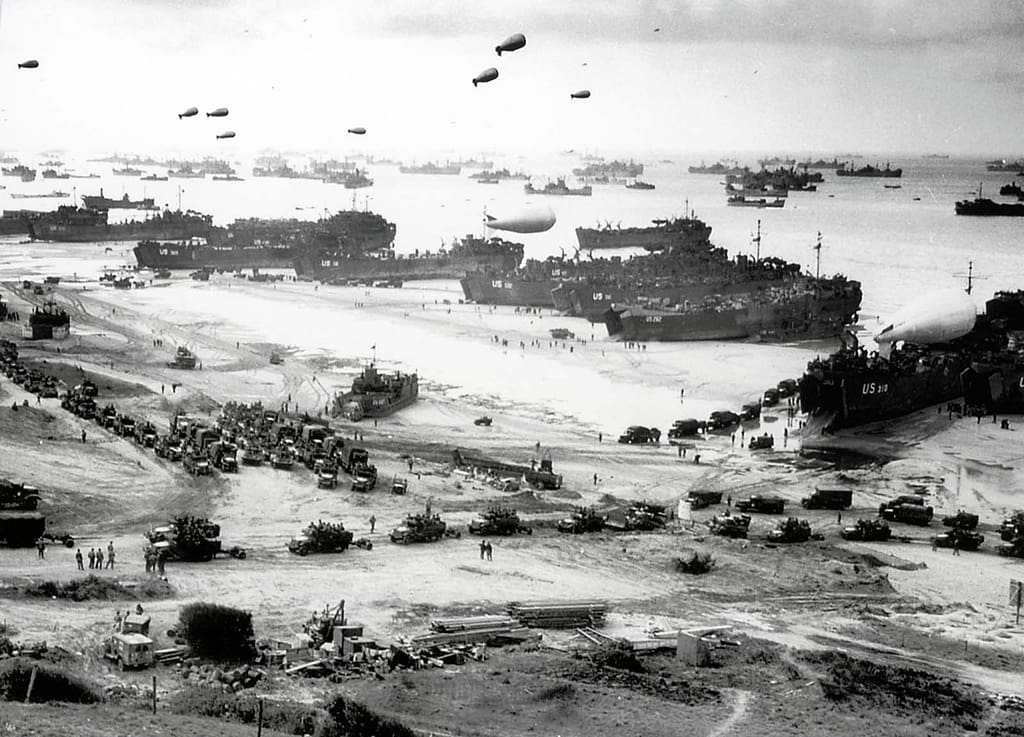
Losses at Omaha were severe, especially amongst the early landing waves. Total casualties for the day were not tallied but were later estimated at about 5,000 killed wounded or missing. More than half of the 112 tanks launched against Omaha Beach were sunk as they swam ashore, or destroyed/disabled on the beach. About 60 landing vessels were destroyed or disabled.
With the beaches relatively secure, the infantry regiments were able to reconstitute and move against their D Day objectives. 1st ID blocked a breakout attempt by German defenders around Colleville, and eliminated a strong German position around Formigny (Formigny is also the site of a Hundred Years War battle in 1450)
29 ID reformed under its division headquarters and cleared the bluffs within its sectors at the western end of Omaha Beach. On 8 June, elements of 116th Infantry and 5th Rangers relieved the beleaguered Ranger Task Force A (D, E, F Companies 2nd Rangers ) at Pointe du Hoc.
On 9 June, 1st ID linked up with British XXX Corps at Gold Beach and 175th Infantry Regiment of 29th ID linked up with the 101st Airborne Division between Carentan and Isgny, thereby linking Omaha Beach with Utah Beach.
Omaha Beach battlefield today
Omaha Beach makes a powerful impression. When you visit the beach, you know that this is where Robert Capa took those famous photos of American soldiers assaulting through a dense obstacle belt, and where the dramatic first 20 minutes of Saving Private Ryan was set. It becomes obvious how important the five beach exits were to the American planners as there is no other way to get vehicles off the beach.
The influence of micro-terrain
At Omaha Beach, the combination of steep bluffs, limited beach exits, and German defensive design reduced Allied movement to a handful of narrow, heavily defended routes. Strongpoints were positioned to dominate the draws with direct, grazing, and enfilade fire, while beach obstacles and exposed tidal flats constrained manoeuvre and timing. Micro-terrain—the small scale terrain features that often do not appear on maps and can only be seen when you are standing on the ground—shaped Allied battlefield decision-making from the moment of landing, compressing options into survival, local initiative, and a fight to find or create gaps.
Progress was achieved not through massed manoeuvre but through junior leader initiative and small-unit exploitation of micro-terrain features: shallow reentrants, shell craters, drainage cuts, and covered approaches. Leaders like Norman Cota and elements of C/2nd Rangers used these features to bypass strongpoints, penetrate the German defensive belt, and gain the high ground from the rear.
Omaha demonstrates how micro-terrain, even within a heavily engineered defensive system, can create decision space for adaptive leadership at the point of contact. The concept of exploiting small scale terrain features in battle is examined further in the Micro-Terrain and Battlefield Decision-Making research hub.
Bunkers and memorials
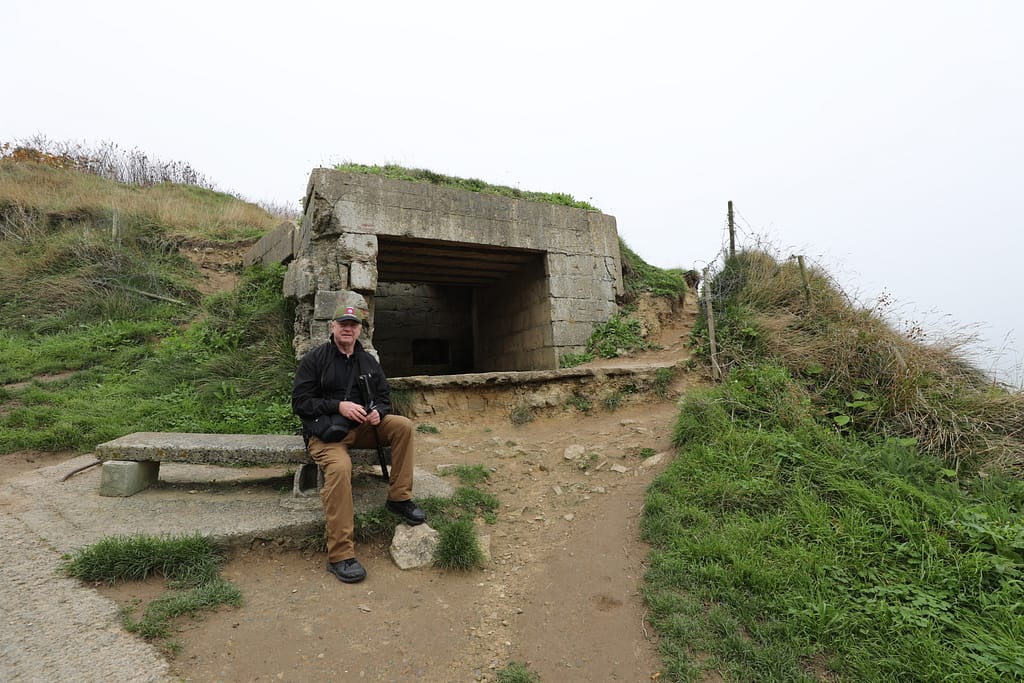
Many of the German ‘Resistance Nests’ (Widerstandsnests (WN)) are still accessible. The first thing you notice is that all the heavy weapons (anti-tank guns etc) were sited to fire along the beach (enfilade grazing fire) rather than out to sea. There is nothing remotely like the gigantic ‘Saving Private Ryan’ bunkers on Omaha Beach. The seaward side of each bunker is protected by a thick concrete wall with no vulnerable apertures. This means that the bunkers are basically invisible and invulnerable to the assault troops, while enemy fire will come from either flank (defilade positions).
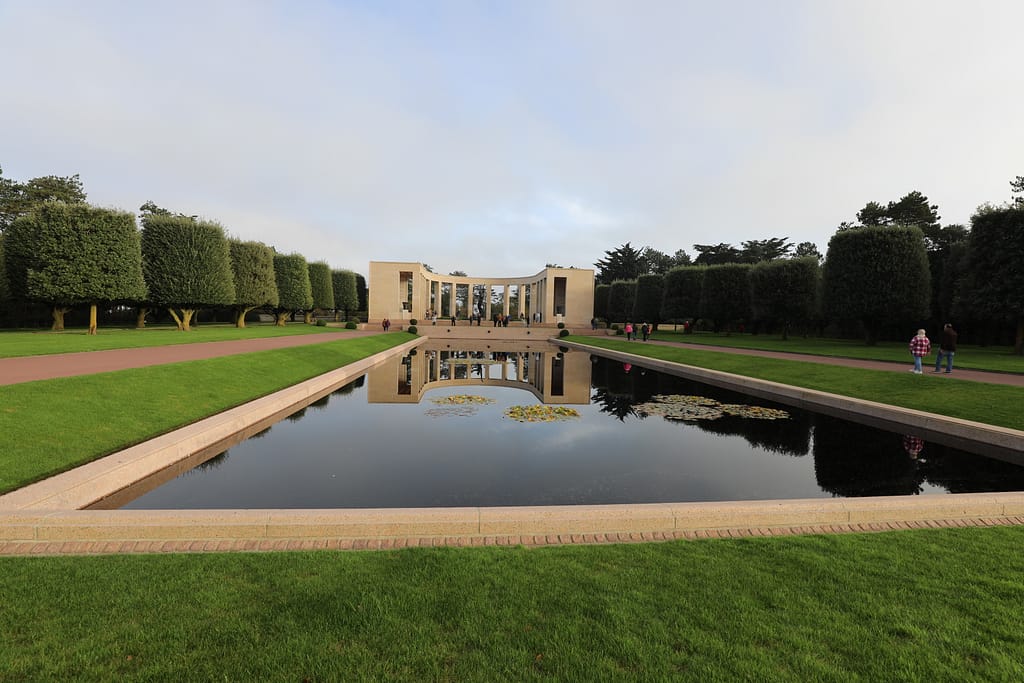
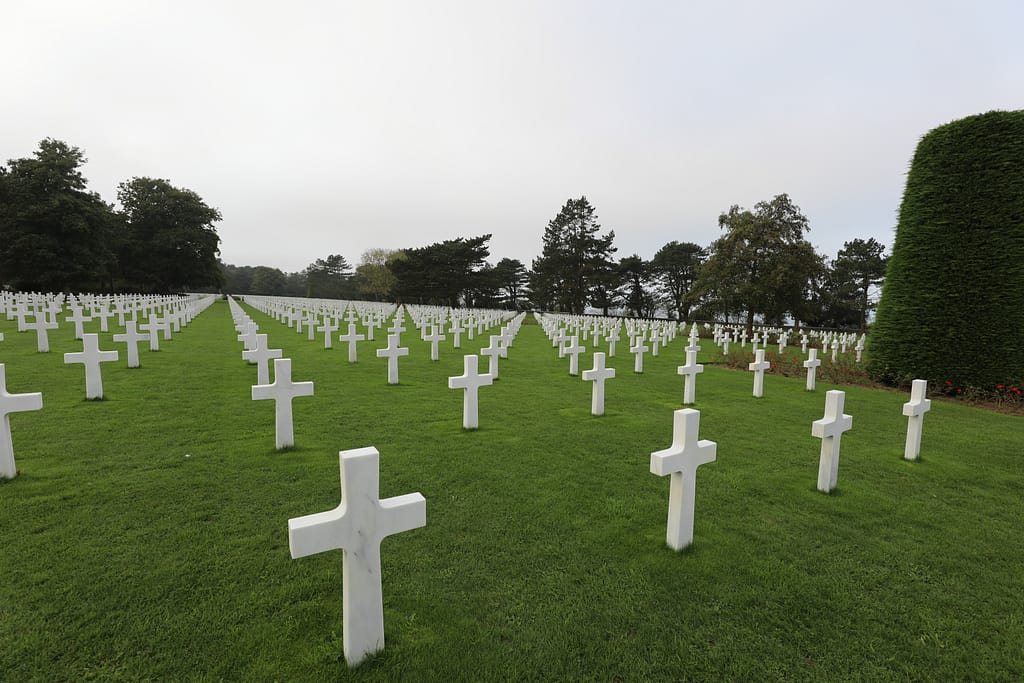
There are memorials around each of the major exits. 29th Infantry Division Memorial is on top of the 88mm bunker at Vierville Draw. 1st Infantry Division Memorial is at the junction of EASY RED and FOX GREEN. The famous American cemetery is on the bluff behind EASY RED, surrounded by remnants of German bunkers. The Le Braves Memorial and the French monument to D-Day are on the beach at Le Moulins exit.
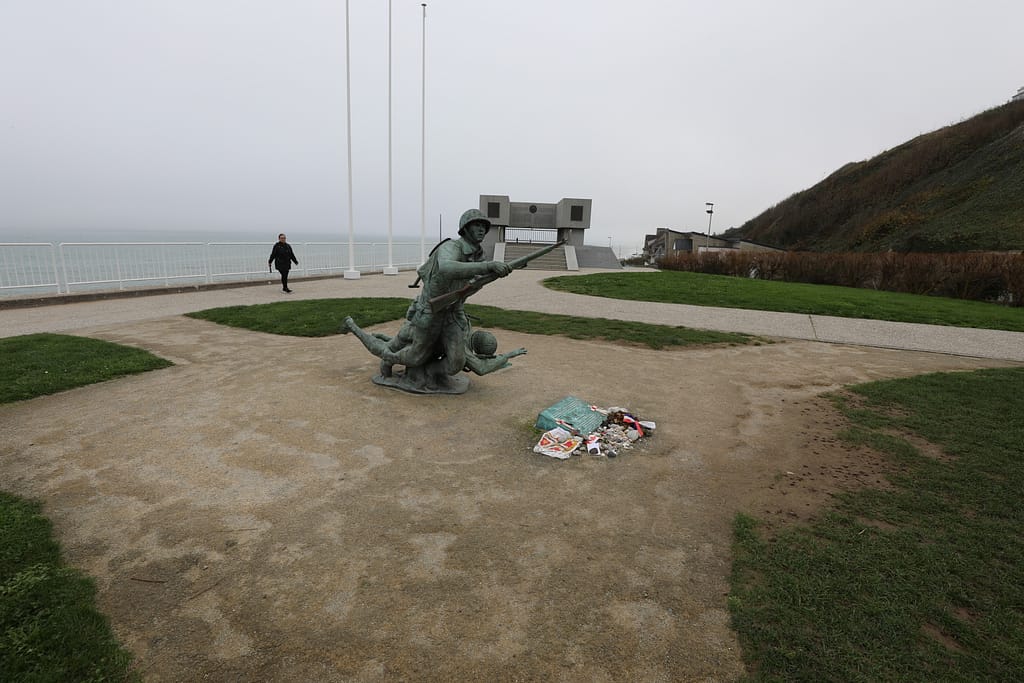
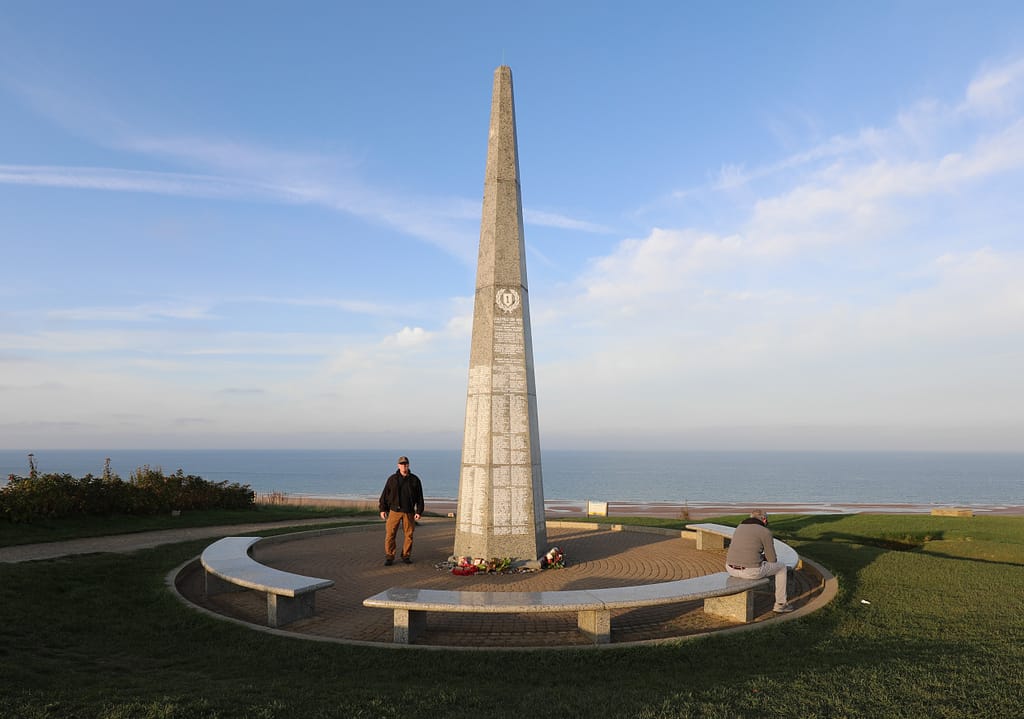
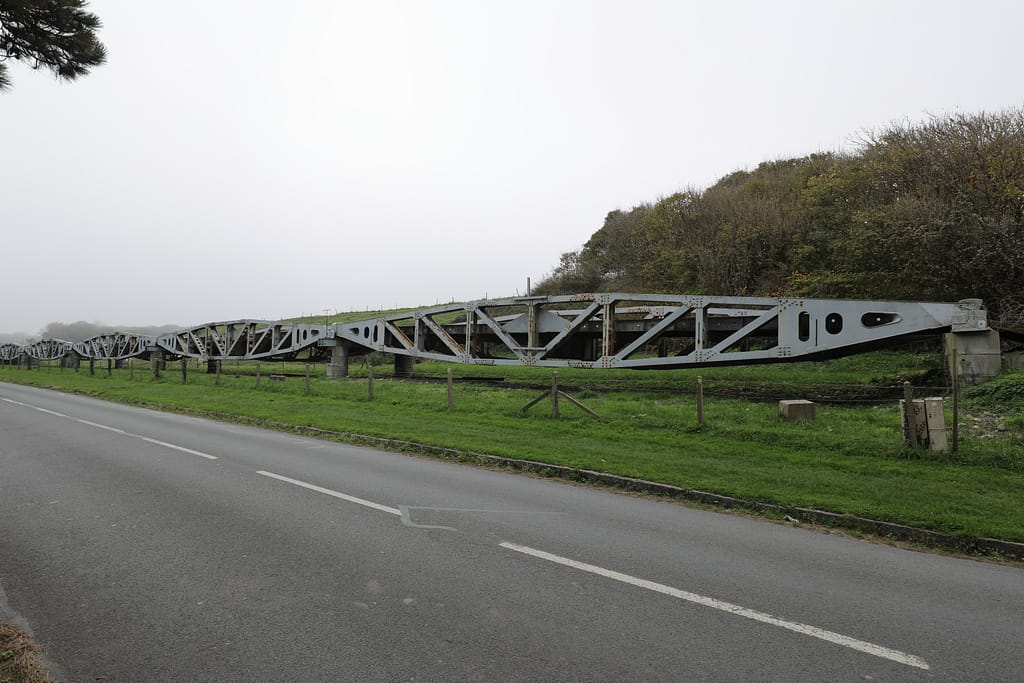
There are also remnants of the Omaha Beach Mulberry Harbor around Vierville. This Mulberry was destroyed in the storm of 19 June 1944. Some of the Phoenix Caissons are visible under water, and a large berthing section is washed up on the beach at the pier. A long section of Mulberry roadway is also preserved alongside the road at Dog-One exit.
Additional images: Vierville
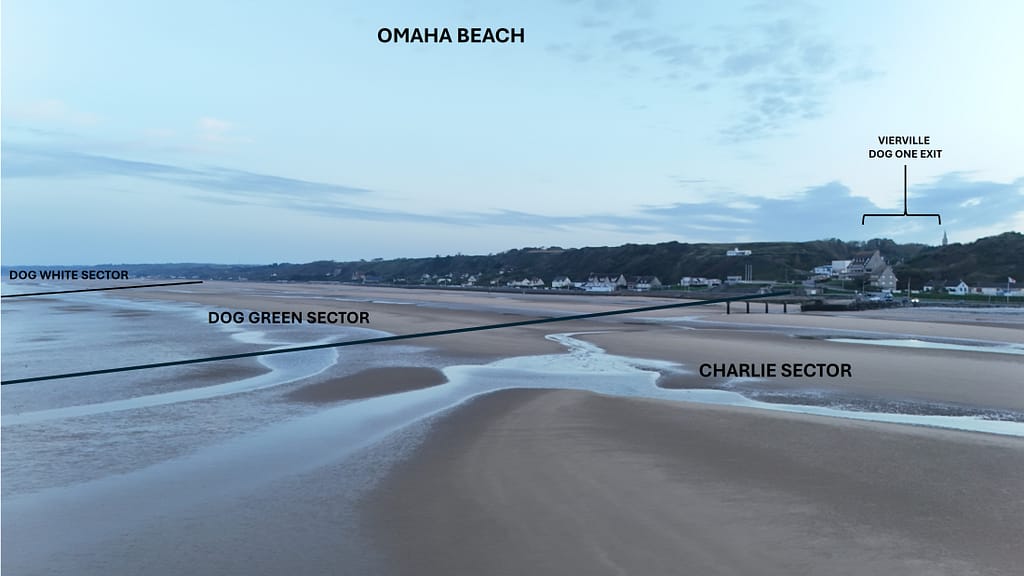
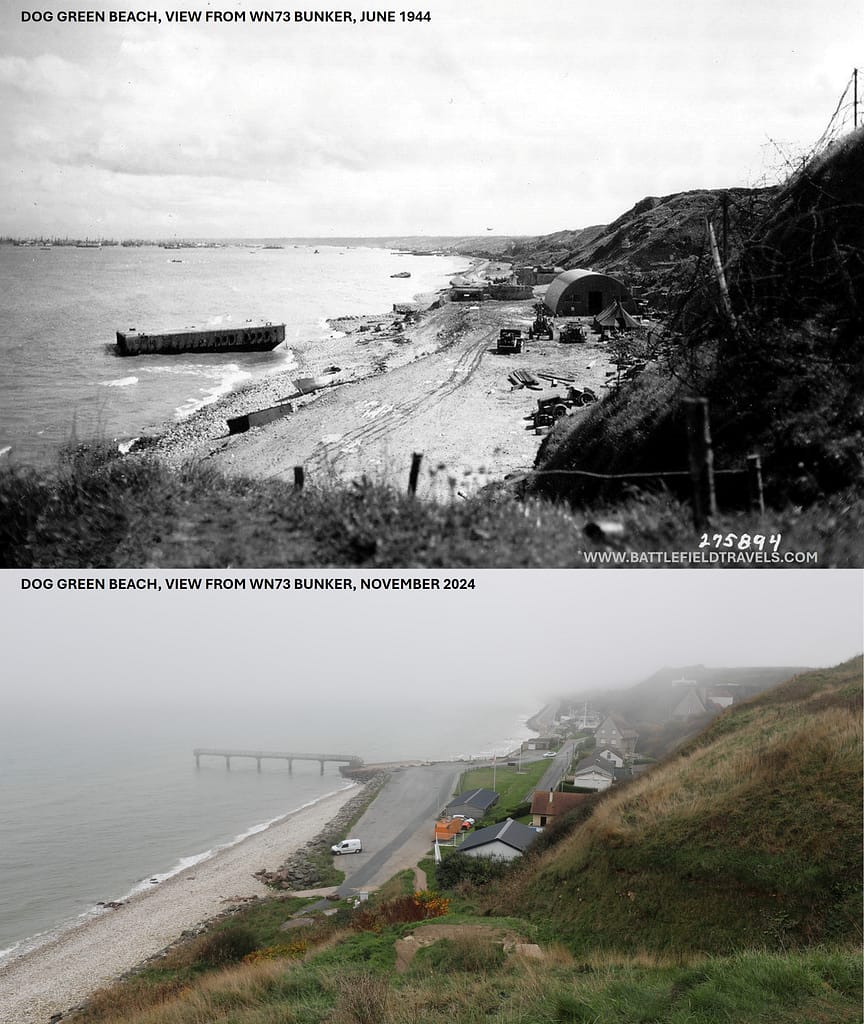
Additional images: DOG RED Sector
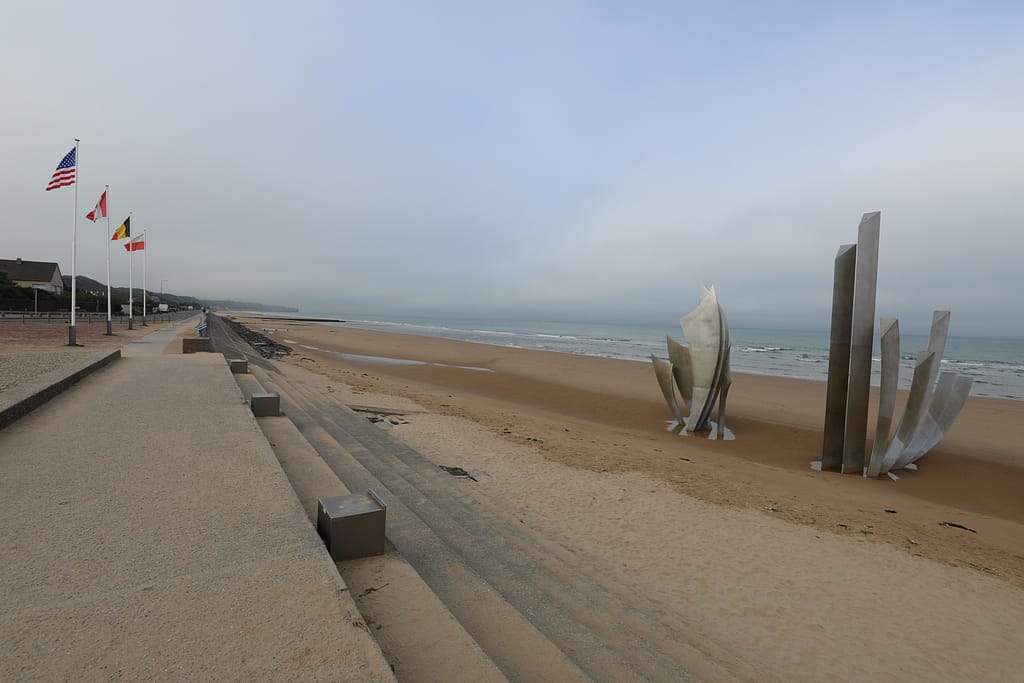
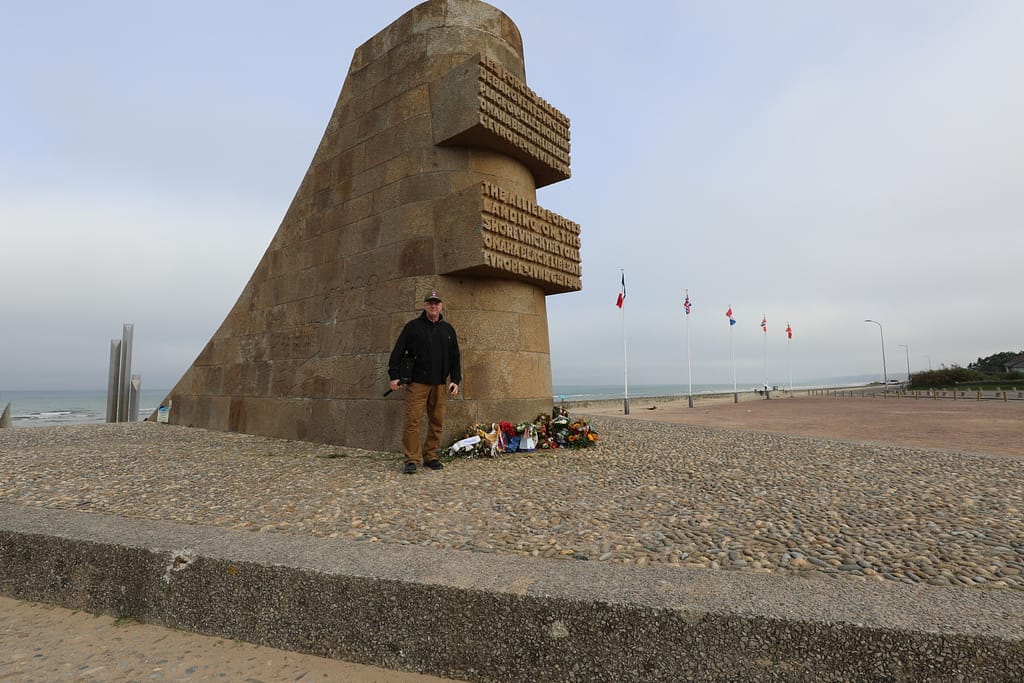
Additional images: FOX GREEN Sector
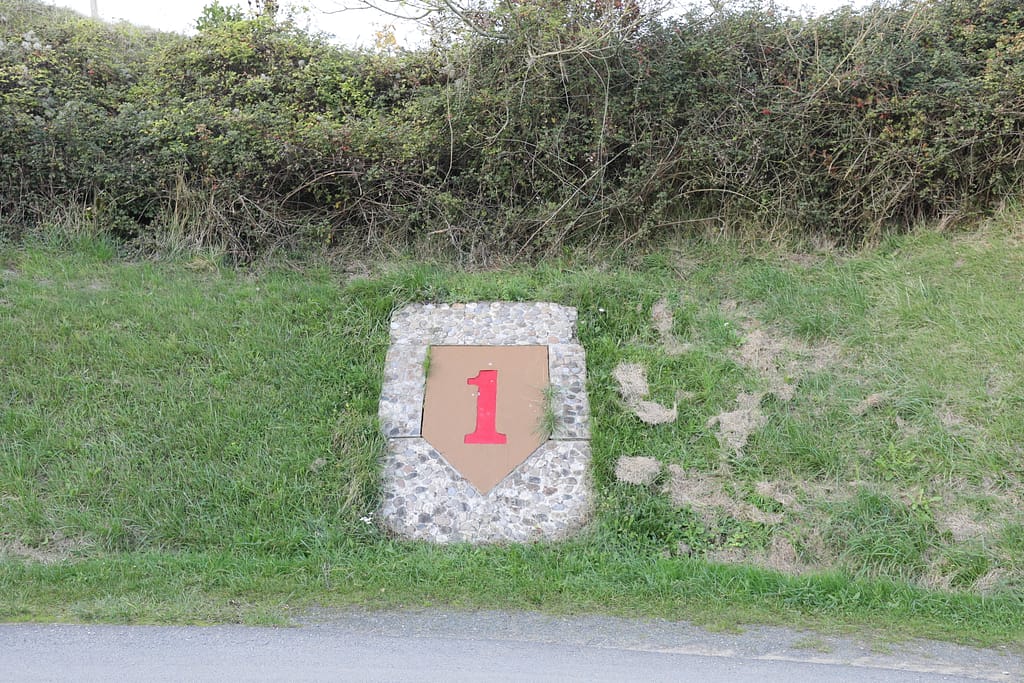
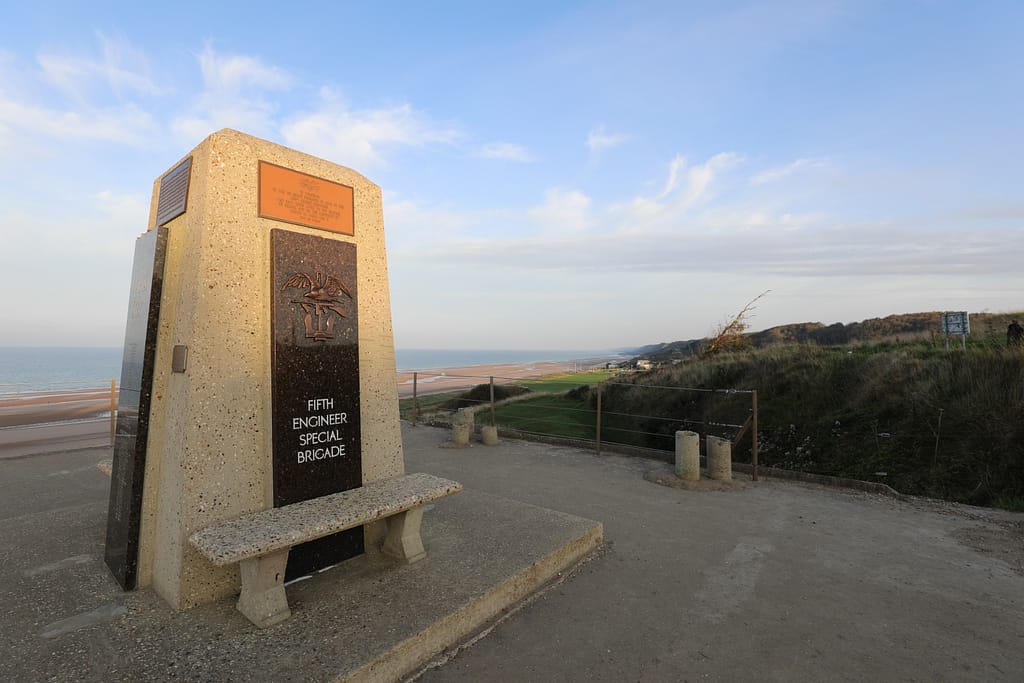
Additional images: Colleville – captured by G/16 Inf Regt on D-Day
Additional images: EASY RED Sector
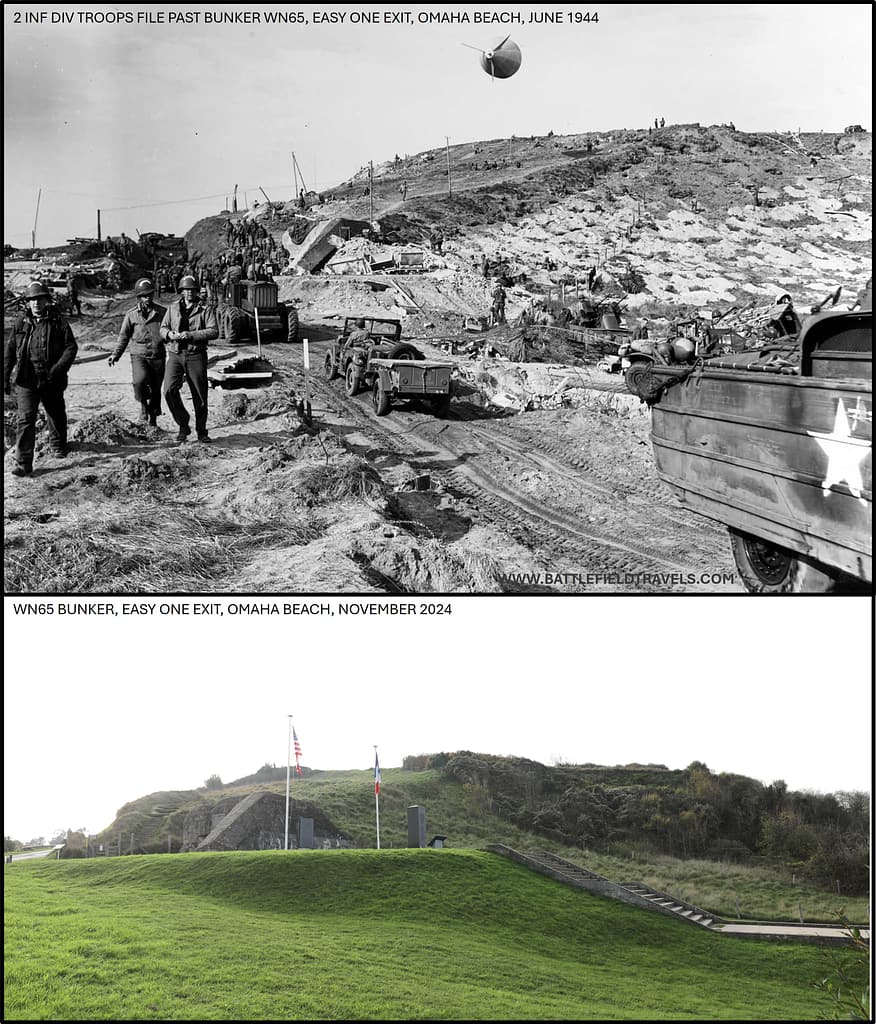
Additional images: Colleville American Cemetery
Found this useful? Buy me a coffee — it helps fund future battlefield research


Authored by Mick Prictor, a retired military officer with 40 years’ service, and a military historian specialising in terrain-focused analysis of tactics, doctrine, and command decision-making in land warfare. His work draws on extensive battlefield fieldwork—more than 280 sites worldwide—and one of the world’s largest private collections of historic military arms, uniforms, and equipment. About me
❓ Test Your D-Day Knowledge
Twenty questions covering the airborne operations, invasion beaches, commanders, forces and fighting of 6 June 1944.
20 questions · 60% to pass · expect a challenge
Sources
- Ambrose, S. E. (1999). D-day, June 6, 1944: the climactic battle of World War II. Thorndike.
- Ambrose, S. E. (1992). Band of Brothers: E Company, 506th Regiment, 101st Airborne from Normandy to Hitler’s Eagle’s Nest. Simon & Schuster, New York.
- Beevor, Antony. (2009). D-Day: The Battle for Normandy. Penguin Books
- Ryan, Cornelius (1959). The Longest Day: June 6, 1944. Simon and Schuster, New York.
- Hastings, Max (1984). Overlord : D-Day and the battle for Normandy. Simon and Schuster, New York.
- 1st Infantry Division Order of Battle on D-Day, https://www.dday-overlord.com/en/battle-of-normandy/forces/usa/1st-infantry-division-battle-order#google_vignette, accessed 28 February 2025
- Roughing it with Charlie, Charlie Company, 2nd Ranger Bn, Landing on OMAHA Beach, https://arsof-history.org/articles/24jun_roughing_it_with_charlie_page_1.html, accessed 1 March 2025
- 116th Infantry Regiment Operations Order for D-Day
- Omaha Beach Landing Tables. Omaha Beach landing table – June 6, 1944 – D-Day – Normandy landing – D-Day Overlord
- 301-3.2 G-3 Journal & File, 1st Infantry Division, 1-8 June 1944 (NAID 378461176)
- Diary of platoon leader Major Stanley Bach, 6/6/1944 (NAID 6922049)
- 329-0.3 (5151) After Action Report 29th Infantry Division June 1944 (NAID 378462212)
📚 Further Reading
This battle study nests within the broader analytical framework explored in the Research Hub, where operational methods, operating environments, armies, commanders, and weapons are examined across conflicts and eras. The links below connect related studies across the wider body of battlefield analysis on the BattlefieldTravels site.
⚔️ Explore all battle studies from World War Two 1939-1945
🏛️Explore the museum of World War Two historic artefacts
The book list for this conflict includes the finest campaign studies, memoirs, and operational analyses available on the D-Day landings, selected specifically to complement this battlefield study.
📚World War Two – Recommended Reading
🗞️ For updates on new battlefield studies and research insights, you can subscribe to the Newsletter.
Related Battle Studies, Museum Pieces & Reading Resources
 ⚔️ D-Day: Brecourt Manor assault, Easy Company, 506th PIR,
6 June 1944
 ⚔️ D-Day: Sword Beach landings,
6 June 1944
 ⚔️ D-Day: Utah Beach landings,
6 June 1944
 ⚔️ D-Day: 101st Airborne Division and the Battle of Bloody Gulch,
13 June 1944
 📝 🔒Field Note: XXX Corps Orders, Leopoldsburg, Belgium, 15 Sep 1944
 ⚔️ D-Day: Juno Beach landings,
6 June 1944
🧭 Battlefield Travel Guide: Omaha Beach (1944)
Getting There
- Nearest Towns: Vierville-sur-Mer, Colleville-sur-Mer, and Saint-Laurent-sur-Mer, Normandy, France.
- Transport: Car access via N13 highway; local roads lead to marked beach sites and memorials.
- Parking: Free at the Normandy American Cemetery, Omaha Beach Museum, and several beach car parks.
Site Orientation
- Key Landmarks: Normandy American Cemetery, Pointe du Hoc, Les Braves Memorial, Vierville draw, and bunkers along WN-62.
- Walking Routes: Trails around the cemetery, bluffs, and preserved German defences.
- Best Vantage Points: Bluffs overlooking the beach convey the tactical challenge faced by Allied forces.
Museums & Visitor Centres
- Omaha Beach Memorial Museum: Artifacts, uniforms, and weapons covering D-Day landings.
- Normandy American Cemetery Visitor Center: Interpretive displays and powerful personal stories of the fallen.
- Nearby: Arromanches (Mulberry Harbour Museum) and Bayeux War Museum for broader context.
On-Site Experience
- Interpretive Signage: Waysides and museum displays explain German strongpoints, Allied assault waves, and beach obstacles.
- Atmosphere: Quiet, windswept shoreline contrasts with the violence of 6 June 1944.
- Guides & Tours: Local guides and battlefield tours available; cemetery rangers provide talks.
Nearby Points of Interest
- Pointe du Hoc: Rangers’ assault site with preserved craters and bunkers.
- Utah Beach: Another American landing sector, with its own excellent museum.
- Bayeux: Medieval town with tapestry and central base for Normandy tours.
Practical Tips
- When to Visit: June anniversaries offer ceremonies but large crowds; spring/autumn quieter.
- Facilities: Restrooms and cafés at major museums; limited directly on the beach.
- Special Considerations: Allow a full day; weather can be windy and changeable—dress accordingly.
Subscribe to Battlefield Travels and receive a free E-Book Battlefield Guide
Unlock expert battlefield analysis, campaign reconstructions, and historical insights drawn from firsthand exploration and primary sources.
🗺️ You’ll receive:
🎖️ Exclusive historical insights you won’t find elsewhere
📘 A free eBook: 10 Tips for Exploring Historic Battlefields
📰 New battlefield studies straight to your inbox as they are published

⚔️ Go deeper — Members get exclusive access to the Deep Research Collection, Field Notes, and monthly Research Dispatches. Try membership free for 7 days, cancel anytime. From $9/month.
.
